Table of Contents
Advertisement
Quick Links
Advertisement
Table of Contents

Subscribe to Our Youtube Channel
Related Manuals for Belkin F1DC101C-US


Summary of Contents for Belkin F1DC101C-US
-
Page 1: Package Contents
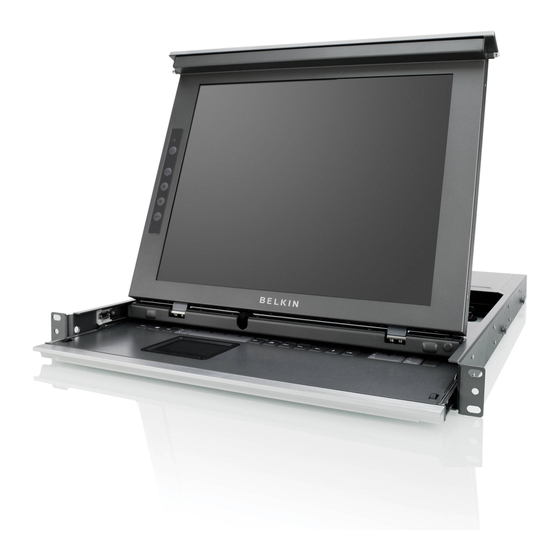
Package Contents 17" Dual-Rail LCD Side-Rail Kit VGA, PS/2 Cable Kit Rack Console Keys IEC Power Cable Quick Installation Guide Introduction This booklet will guide you through the basic steps needed to install the 17” LCD Rack Console with Dual-Rail Technology. Introduction... -
Page 2: Specifications
Specifications Material Power Net Weight Unit Dimensions Minimum Rack-Mount Depth Maximum Rack-Mount Depth Display Type Resolution Contrast Ratio Brightness Pixel Pitch Heavy-duty steel Auto-switching 100 to 240VAC 50 to 60Hz 48 watts 32.6 lbs. (14.8kg.) 19 (W) x 26.3 (D) x 1.70 (H) in. (483.2 x 668.51 x 43.18mm) 26 in. - Page 3 Panel Color Response Time Keyboard Type Keyboard Connection Mouse Type Mouse Connection Operating Life of Individual Keys Warranty Key-Locking Mechanism Front-Panel Controls 105-Key Keyboard Touch Pad On/Off Auto Auto Down Menu Menu 16.7 million display colors Rising 2ms, Decay 14ms Laptop style PS/2 Touchpad style...
-
Page 4: Installation
Installation Step 1 Place the console inside the rack. Step 2 Mount the front brackets to the rack. Step 3 Slide the side rails onto the mounting studs. Installation... - Page 5 Step 4 Mount the side rails to the rear of the rack. Step 5 Connect the IEC power cable to an active power outlet and power up the Console. Installation...
- Page 6 Connecting the KVM Switch or Server Step 1 Make sure your KVM switch or server is powered OFF. Step 2 Using the included PS/2 KVM Cable Kit, connect one set of VGA and PS/2 connectors to the back of the Console. (Refer to diagrams below.) Step 3 Connect the other end of the Cable Kit to the console monitor, keyboard, and mouse ports on your KVM switch or server.
- Page 7 You are now ready to use your LCD Rack Console. Console Console KVM Switch Server The Console offers two power on/off methods: • a power button on the LCD front-panel console, and • an LCD power-save (with drawer closure). Connecting the KVM Switch or Server...
-
Page 8: Troubleshooting
Troubleshooting My Console doesn’t appear to be on. Make sure that the power switch located at the front of the keyboard drawer is “on” and that the power cable is connected properly. What is the maximum video resolution that the LCD panel supports? The LCD panel supports a resolution of up to 1280x1024. -
Page 9: Start Here
Titan 17” Dual-Rail LCD Rack Console Start Here Quick Installation Guide F1DC101C-US... - Page 10 Rushden, NN10 6GL, United Kingdom +44 (0) 1933 35 2000 +44 (0) 1933 31 2000 fax © 2008 Belkin International, Inc. All rights reserved. All trade names are registered trademarks of respective manufacturers listed. Titan 17” Dual-Rail LCD Rack Console Belkin Ltd.
Need help?
Do you have a question about the F1DC101C-US and is the answer not in the manual?
Questions and answers