Advertisement
Quick Links
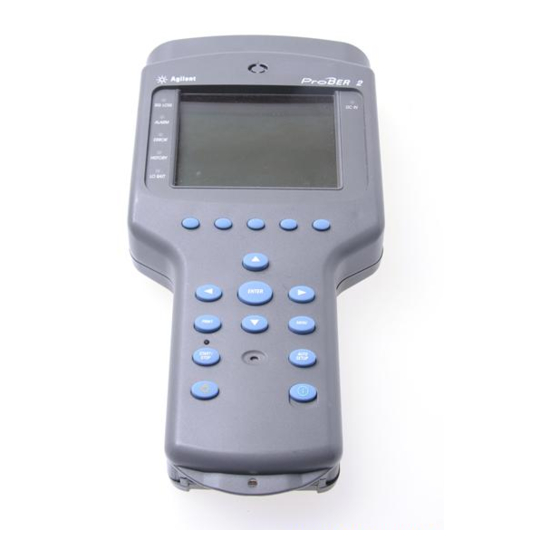
ProBER 2 - Getting Started
TRANSMIT output
Speaker.
Menu field
Help message for
active field.
(Available in local
language.)
Cursor control keys.
Print on demand.
Start/Stop
measurement.
Microphone.
Backlight On/Off
(Hold down to
change contrast.)
EXT CLOCK IN input
PRINTER (and data) output.
s1
RECEIVE input
Highlighted
(active) field.
Reveals more
choices.
Choices associated
with active field.
Softkeys
(Choices indicated in
display above keys).
Actions data change
and exits edit.
Moves cursor
to Menu field.
Automatically
configures
receiver to match
input signal.
Power On/Off
(Hold down until
display blanks to
switch off.)
dc input.
Advertisement

Related Manuals for Agilent Technologies ProBER 2


Summary of Contents for Agilent Technologies ProBER 2
- Page 1 ProBER 2 - Getting Started TRANSMIT output EXT CLOCK IN input RECEIVE input dc input. Speaker. Highlighted Menu field (active) field. Reveals more Help message for choices. active field. Choices associated (Available in local with active field. language.) Softkeys (Choices indicated in display above keys).
- Page 2 Initial Switch-on ProBER 2 is supplied ready to use straight from the box. There is no need to charge the battery. Use the instru- ment until the battery is completely exhausted before giving it its first charge. When you first switch on ProBER 2, you may need to adjust the display contrast by holding down the display backlight key .
- Page 3 Charging your Battery To recharge the battery, first fit the appropriate adapter (supplied) to the charger, as shown. Normally the battery will be fully charged after 5 hours. Note that ProBER 2 can be used while the battery is charging.
- Page 4 START/STOP an Overall Status PASS or FAIL message will be displayed. 4. If the FAIL message is displayed, ProBER 2 should be returned to an Agilent Service Office for repair. For an up to date list of offices, see the Agilent Website at URL: http://www.tm.agilent.com/tmo/TMTop/English/index.html...