Advertisement
Advertisement

Related Manuals for Avid Power ACAP110D


Summary of Contents for Avid Power ACAP110D
- Page 1 20V AUTOMATIC CORDLESS INFLATOR (Mon. to Sun. Any time) MODEL: ACAP110D...
-
Page 2: Table Of Contents
TABLE OF CONTENTS IMPORTANT SAFETY INSTRUCTIONS----------------------------------P.2 SAFETY PRECAUTIONS FOR INFLATOR------------------------------P.4 SPECIFICATIONS---------------------------------------------------------------P.6 FUNCTIONAL--------------------------------------------------------------------P.7 OPERATION----------------------------------------------------------------------P.7 MAINTENANCE------------------------------------------------------------------P.14 PARTS LIST AND SCHEMATIC DRAWING-----------------------------P.15... -
Page 3: Important Safety Instructions
IMPORTANT SAFETY INSTRUCTIONS READ AND UNDERSTAND ALL INSTRUCTIONS. Failure to follow all instructions listed below, may result in electric shock, fire and/or serious personal injury. When using electric appliances, basic precautions should always be followed, including the following. WORK ARER 1. - Page 4 IMPORTANT SAFETY INSTRUCTIONS 6. Do not wear loose clothing or jewelry. Contain long hair. Loose clothes, jewelry, or long hair can be drawn into air vents. 7. Do not use on a ladder or unstable support. Stable footing on a solid surface enables better control of the inflator in unexpected situations.
-
Page 5: Safety Precautions For Inflator
IMPORTANT SAFETY INSTRUCTIONS 8. Keep the inflator and its handle dry, clean and free from oil and grease. Always use a clean cloth when cleaning. Never use brake fluids, gasoline, petroleum- based products, or any strong solvents to clean your inflator. Following this rule will reduce the risk of loss of control and deterioration of the enclosure plastic. - Page 6 SAFETY PRECAUTIONS FOR INFLATOR 4. Inspect unit for cracks, pin holes, or other imperfections that could cause inflator to become unsafe. Never cut or drill holes in the inflator. 5. Make sure the hose is free of obstructions or snags. Entangled or snarled hoses can cause loss of balance or footing and may become damaged.
-
Page 7: Specifications
SAFETY PRECAUTIONS FOR INFLATOR should be properly repaired or replaced by an authorized service center. Following this rule will reduce the risk of shock, fire, or serious injury. 19. Inspect tool cords periodically and, if damaged, have repaired at your nearest Authorized Service Center. -
Page 8: Operation
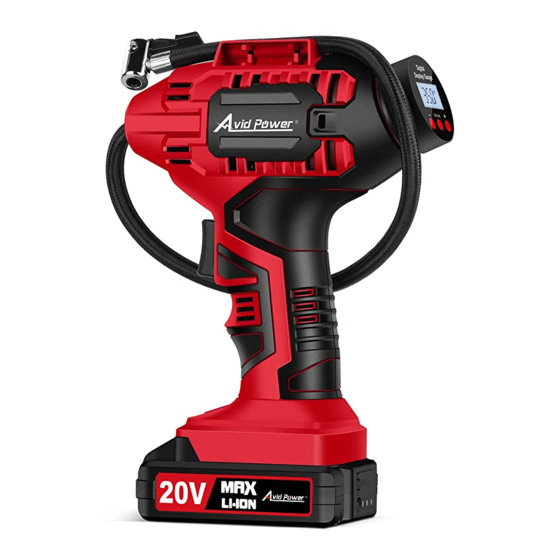
FUNCTION A. Rubber-covered handle B. Air hose C. Air chuck D. Digital pressure gauge E. Hose storage area F. Start switch G. Charger H. LED-light I. 12V Power adapter J. USB Output Port OPERATION Battery Pack 1. The battery is not fully charged. You’d better let it charge for 3-5 hours before the first use. - Page 9 OPERATING How to charge the battery pack ? Fig.2 Green Light Red Light Green light: power indicator. When the charger is connected to AC household current, the green light is on. Red light: charging indicator. When the battery is properly inserted into the charger and charging, the red light is on.
- Page 10 OPERATING USB OUTPUT FOR OTHER DEVICES CHARGING 1. Plug the USB cable into the USB Output Port (A) on the battery pack (Fig.3) 2. Press the button (B) for charging (Fig.4) Fig.4 Fig.3 3. Press the button (B) to display the battery level.(Fig.4). Three lights on the battery indicates a full charge.
- Page 11 OPERATING Install or remove 12V car power adapter (Fig.6) Fig.6 1. Unravel cord before use. If the battery is installed, remove it from the machine first by pressing battery release button and pulling out. 2. Slide the 12V Car Power Adapter into the machine until you hear a click.
- Page 12 OPERATING NOTE: Always leave the hose free of obstructions when the tool is not in use. Overheating could occur if the hose is blocked. Step 3: Set the Pressure Value (Fig.8) Fig.8 1. Press “On/Unit” button to read the current tire pressure on the gauge. 2.
- Page 13 OPERATING NOTE 1.Since the pressure gauge is not calibrated and not binding for exact values, tire pressure must be checked by using a reliable measuring device after inflating tires with this pump. Driving a vehicle with improperly inflated tires could result in serious injury. 2.
- Page 14 OPERATING ACCESSORIES The supplied accessories perform a variety of functions. The tapered adaptor can be used on smaller pinch valves to inflate small items like children’s toys, which usually require the user to inflate them by blowing air into them. The sport ball needle can be used to inflate any type of sports ball or any other item that requires an inflation sport ball needle.
-
Page 15: Maintenance
MAINTENANCE 1. Do not let brake fluids, gasoline, petroleum based products, penetrating oils, etc., come in contact with plastic parts. Chemicals can damage, weaken or destroy plastic which can result in serious personal injury. 2. Keep the tool clean by using a soft damp (not wet) cloth. Do not use solvents on the plastic parts. -
Page 16: Parts List And Schematic Drawing
PARTS LIST AND SCHEMATIC DRAWING Description Description Absorber Right Housing Left Housing Screw Digital Gauge Screw Buckle Led Cover Absorber Cylindrical Lamp Air Pump Assembly Self-locked Switch Motor Torsional Spring Control Board Trigger Battery Clip Assembly...
Need help?
Do you have a question about the ACAP110D and is the answer not in the manual?
Questions and answers