Advertisement
Quick Links
PROGRAMMING INSTURCTIONS
RZ327
RATINGS: 50/60Hz
• 120/277VAC 16A Resistive
• 120/277VAC 13A Standard Ballast
• 120/277VAC 10A LED
• 120VAC 8A 960W Tungsten
• 120VAC 1/2 HP Motor
• 120VAC 720VA Pilot Duty
PUISSANCE : 50/60 Hz
• 120/277 V c.a. 16 A Résistif
• 120/277 V c.a. 13 A Ballast standard
• 120/277 V c.a. 10 A DEL
• 120 V c.a. 8 A 960 W Tungstène
• 120 V c.a. 1/2 H.P. Moteur
• 120 V c.a. 720 VA Pilote
CLASIFICACIONES: 50/60 Hz
• 120/277 VCA 16 A Vatios resistivo
• 120/277 VCA 13 A Balastro estándar
• 120 VCA 10 A LED
• 120 VCA 8 A 960 W Tungsteno
• 120 VCA 1/2 HP Motor
• 120 VCA 720 VA Servicio piloto
ONE YEAR LIMITED WARRANTY: If this product fails because of a
manufacturing defect within one year after purchase, we will, at our
option, either repair or replace it at no charge. Our warranty does not
cover damage caused by accident, abuse or misuse. We assume no further
liability with respect to the sale or use of this product. THIS WARRANTY
IS IN LIEU OF ALL OTHER WARRANTIES, EXPRESSED OR IMPLIED,
INCLUDING THE WARRANTY OF MERCHANTABILITY. We make no
warranty with respect to the fitness of any goods for the users particular
application. This warranty gives you specific legal rights, and you also may
have other rights which vary from state to state.
It is our intent to provide accurate and current specification information.
However, in the interest of product improvement, TORK may alter the
specifications or constructional details without prior notice.
CAUTION: Before wiring and servicing, power to this time switch and the
equipment it controls must be turned off at the main panel.
WARNING: Unit must be properly grounded to operate correctly.
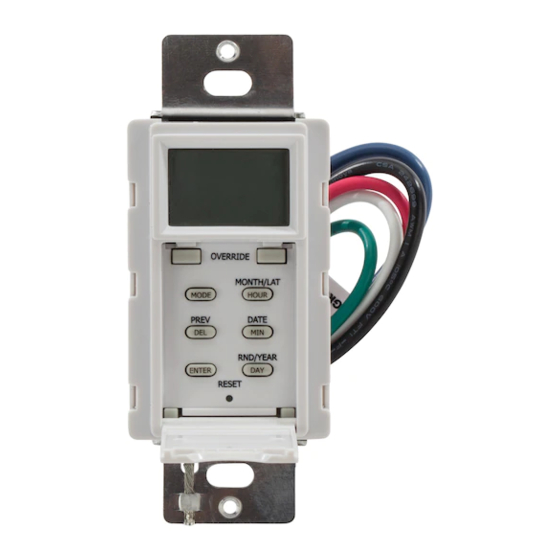
RZ327 SMART TIMER INSTALLATION
1. Connect black, white and blue wires as shown in the diagram.
Cap the red wire.
2. Connect the mounting strap green wire to the ground wire.
3. Mount the timer inside electrical box using 2 mounting screws provided.
4. Install cover plate.
5. Turn power on at the electrical panel.
RETROFITTING A RZ327 TO EXISTING 3-WAY SWITCH
1. Disconnect the second 3-way switch.
2. Connect the white and blue wires as show in diagram. Connect the timer black
wire to "Traveler A" and the timer red wire to "Traveler B".
3. Connect the mounting strap green wire to the ground wire.
4. Mount the timer inside electrical box using 2 mounting screws provided.
5. At switch #1 connect a wire between the hot leg of the 3-way and
"Traveler A" inside of that switch's gang-box.
6. Install cover plates.
7. Turn power on at the electrical panel.
BLACK
NOIR
NEGRO
H
RED
ROUGE
ROJO
GROUND
DE MISE À
LA TERRE
TIERRA
GREEN
VERT
VERDE
FOR TECHNICAL SUPPORT:/SOUTIEN TECHNIQUE :/PARA COMUNICARSE CON EL SERVICIO TÉCNICO: techsupport@nsiindustries.com • 888.500.4598
MISE EN GARDE : Avant de procéder à des raccordements électriques
ou de l'entretien, vous devez couper l'alimentation électrique de la
minuterie et de l'équipement au niveau du panneau principal.
ADVERTISSEMENT : L'appareil doit être mis à la terre pour assurer
son bon fonctionnement.
INSTALLATION DE LA MINUTERIE INTELLIGENTE RZ327
1. Reliez le fil noir et le fil bleu tel qu'illustré dans le diagramme. Installez un capuchon de
connexion sur le fil rouge.
2. Reliez le fil vert de la traverse et le fil vert de la minuterie au fil de mise à
la terre.
3. Installez la minuterie dans la boîte électrique à l'aide des 2 vis de montage fournies.
4. Installez la plaque.
5. Rétablissez le courant au niveau du panneau électrique.
REMPLACEMENT D'UN INTERRUPTEUR À TROIS VOIES EXISTANT
PAR LA MINUTERIE RZ327
1. Déconnectez le second interrupteur à trois voies.
2. Reliez le fil bleu de la minuterie à la charge. Reliez le fil noir de la minuterie au fil de
passage A et le fil rouge de la minuterie au fil de passage B.
3. Reliez le fil vert de la traverse et le fil vert de la minuterie au fil de mise à la terre.
4. Installez la minuterie dans la boîte électrique à l'aide des 2 vis de montage fournies.
5. Au niveau de l'interrupteur n1, reliez un fil entre la borne chaude de l'interrupteur tripolaire
et le fil de passage A à l'intérieur de la boîte électrique.
6. Installez les plaques.
7. Rétablissez le courant au niveau du panneau électrique.
RZ327 THREE-WAY INSTALLATION: Connect a wire inside the gang-box between travelr a and hot.
ADAPTATION DE LA MINUTERIE RZ327 À UN INTERRUPTEUR À TROIS VOIES : Branchez un fil de la boîte de connexion entre le conducteur A et
la branche sous tension.
DIAGRAMA DEL CABLEADO: INSTALACIÓN DE TRES VÍAS RZ327: Conecte un conductor dentro de la caja, entre el "viajero A" y la energizada.
BLUE
BLEU
AZUL
BLACK
NOIR
LOAD
WHITE
NEGRO
TENSION
BLANC
H
BLANCO
CARGA
N
N
GROUND
DE MISE À
LA TERRE
TIERRA
PRECAUCIÓN: Antes de realizar tareas de cableado y
mantenimiento o reparación, debe desactivar la alimentación eléctrica
a este temporizador y al equipo que controla en el tablero principal.
ADVERTENCIA: La unidad debe estar conectada a tierra
apropiadamente para funcionar correctamente.
INSTALACIÓN DEL TEMPORIZADOR SMART TIMER RZ327
1. Conecte los cables negro y azul como se muestra en el diagrama. Ponga un
tapón en el cable rojo.
2. Conecte el cable verde de la correa de montaje al cable de conexión a tierra.
3. Monte el temporizador dentro de la caja eléctrica usando los 2 tornillos de
montaje suministrados.
4. Instale la cubierta.
5. Active la alimentación eléctrica en el tablero eléctrico.
READAPTACIÓN DE RZ327 A INTERRUPTOR DE 3 VÍAS EXISTENTE
1. Desconecte el segundo interruptor de 3 vías.
2. Conecte el cable azul del temporizador a la carga. Conecte el cable negro del
temporizador al "Conmutable A" y el cable rojo del temporizador al
"Conmutable B".
3. Conecte el cable verde de la correa de montaje al cable de conexión a tierra.
4. Monte el temporizador dentro de la caja eléctrica usando los 2 tornillos de
montaje suministrados
5. En el interruptor #1 conecte un cable entre la patilla caliente del interruptor de 3
vías y el "Conmutable A" dentro de la caja eléctrica de ese interruptor.
6. Instale las cubiertas.
7. Active la alimentación eléctrica en el tablero eléctrico.
BLACK
BLUE
NOIR
BLEU
NEGRO
AZUL
TRAVELER A FIL NEUTRE A VIAJERO A
RED
ROUGE
ROJO
WHITE
BLANC
TRAVELER B FIL NEUTRE B VIAJERO B
BLANCO
N
GREEN
VERT
VERDE
LI-1088(A)
BLACK
NOIR
NEGRO
LOAD
TENSION
CARGA
N
Advertisement

Subscribe to Our Youtube Channel
Related Manuals for NSi INDUSTRIES Tork RZ327


Summary of Contents for NSi INDUSTRIES Tork RZ327
- Page 1 CAUTION: Before wiring and servicing, power to this time switch and the MISE EN GARDE : Avant de procéder à des raccordements électriques PRECAUCIÓN: Antes de realizar tareas de cableado y equipment it controls must be turned off at the main panel. ou de l’entretien, vous devez couper l’alimentation électrique de la mantenimiento o reparación, debe desactivar la alimentación eléctrica minuterie et de l’équipement au niveau du panneau principal.
- Page 2 M T W TH F SA SU ASTRO M T W TH F SA SU ASTRO M T W TH F SA SU ASTRO M T W TH F SA SU PLEASE READ ALL INSTRUCTIONS FIRST VEUILLEZ LIRE TOUTES LES INSTRUCTIONS EN PREMIER LIEU LEA TODAS LAS INSTRUCCIONES PRIMERO ASTRO M T W TH F SA SU...
Need help?
Do you have a question about the Tork RZ327 and is the answer not in the manual?
Questions and answers