Table of Contents
Advertisement
Cambridge
Qt
X Sound Masking System
®
Installation & Operation Guide
Models
Qt
X 300, Qt
X 300D
®
®
Qt
X 600, Qt
X 600D
®
®
(D) Dante
versions available
®
in a future release
PRODUCT DESCRIPTION
Biamp's Cambridge Qt
X Series is a complete, all-in-one sound masking
®
solution that delivers the flexibility, reliability, and ease of installation that
integrators desire. It is engineered to incorporate direct-field technologies,
making the Qt X ideally suited for office environments. Qt X is easily interfaced
with a building's life-safety system out of the box, ensuring proper coordination
during emergencies.
All models of the Qt X control modules include a sound masking generator,
controller, third octave band equalizer and amplifier with two analog audio inputs.
This allows for distribution of audio from paging controllers and/or (background)
music players, one digital media input (RJ45 Ethernet port), and 3 or 6 analog
output channels (depending on the Qt X model) to connect to sound masking
emitters or speakers.
A:
9300 S.W. Gemini Drive Beaverton, OR 97008 USA
FEATURES
• 3 or 6 outputs of sound masking coverage depending upon the model
• Wall, rack mount and plenum options
• Web-based control interface
• Compatible with active and passive Qt
• Qt X is easily interfaced with a building's life-safety system out of the box
• "D" models (Qt X 300D/600D) will support distribution of Dante
and AVB (enabled in future firmware release)
Qt X 300 and Qt X 600: Use direct field devices (Qt Standard or Active Emitters).
The emitters point downward above the listener's head for direct, unimpeded
audio signal. The Qt X 300 control module is a compact three-output controller
suitable for installations of up to 36,000 square feet (3,345 m
control module is identical in features and functions yet supports six outputs of
sound masking and audio installations of up to 72,000 square feet (6,689 m²).
Outputs can be assigned to a zone and then the zones are adjusted for masking
and audio levels and spectra. Qt X 300/600 models have "preset" optimized
sound masking spectra for use with Qt Emitters. Additional configuration is
available from a web-based control interface or from a remote desktop leveraging
the unit's network connectivity with the Qt X software.
The "D" models of each controller (Qt X 300D/600D) will be available in a future
release. They support Dante
audio stream inputs and are AES67 compatible.
®
The Qt X web-based management software provides an intuitive interface
for setup and programming of a Qt X sound masking system. For information
related to this software interface, see Qt X
Unless otherwise noted, all installation, set up and use instructions apply to the
Qt X family of control modules (Qt X 300 and Qt X 600).
Connecting people through extraordinary audiovisual experiences™
Pro emitters
®
®
). The Qt X 600
2
Web
help.
W:
www.biamp.com
, AES67,
Advertisement
Table of Contents

Related Manuals for Biamp Cambridge Qt X


Summary of Contents for Biamp Cambridge Qt X
-
Page 1: Product Description
PRODUCT DESCRIPTION Qt X 300 and Qt X 600: Use direct field devices (Qt Standard or Active Emitters). Biamp’s Cambridge Qt X Series is a complete, all-in-one sound masking ® solution that delivers the flexibility, reliability, and ease of installation that The emitters point downward above the listener's head for direct, unimpeded integrators desire. -
Page 2: Table Of Contents
Placing masking only near a • You should have the design plan / layout from the Biamp Design Team talker has no effect. In the case of enclosed spaces, it is typical to place sound noting device, output and zone locations. -
Page 3: System Installation Checklist
SYSTEM INSTALLATION CHECKLIST Suggested order of operations for installation & commissioning a typical sound masking system. ‰ Go through each zone testing / adjusting levels, checking behavior ‰ Mount, Install and Cable all components ‰ Power & test emitters ‰ Set Audio Source levels ‰... - Page 4 Installation Considerations Qt X 300/600 systems • Output runs must have the same device type (Standard or Active Emitters) and will share the same sound masking settings. The cabling runs must be configured to prevent any signal interference among the 4 channels along the layout.
-
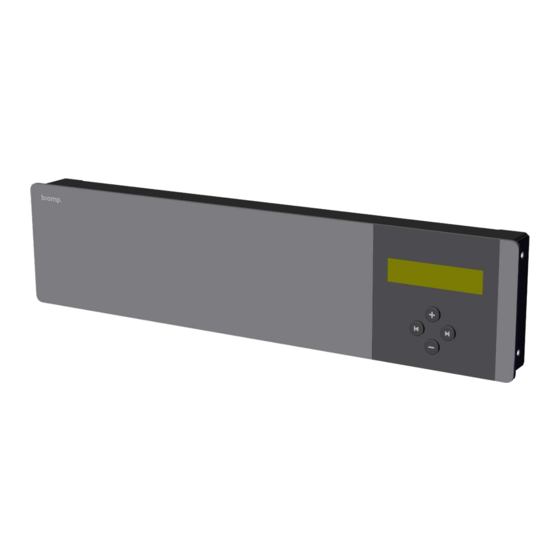
Page 5: Qt X 300 & Qt X 600
QT X 300 & QT X 600 Figure 1. Qt X 300 or Qt X 600 Front Panel Figure 2. Qt X 300 or Qt X 600 Rear Panel (Qt X 600 panel shown) 1. LCD Display 4-Pin Logic I/O - 2 ports The LCD display indicates system statuses and parameters. - Page 6 Installation The Qt X 300 and Qt X 600 may be installed on a wall with the included hardware. An optional Rack Mount accessory kit is available to install the unit in a rack Loosen Screws (Instructions can be found on pages 25-26).
-
Page 7: Wiring & Connections
WIRING & CONNECTIONS Wiring / Cabling Network Ports (continued) Qt X 300/600: Cabling for Active and Passive emitters is included in designated Single Cable Mode: Control network and Media network are combined using lengths (16, 22 or 30 feet) dependent upon emitter bundle ordered. Sort the the same network infrastructure. - Page 8 Panel Connections (continued)) Contact Closures The Qt X provides a mute capability for masking and/or audio. #1 position is configured for Fire or Emergency panel input. The contact closure utilizes the same style green euroblock connector as the privacy lights and GPIO (4-pin). See Figure 5.
- Page 9 Panel Connections (continued) GPIO (General Purpose Input Outputs) WARNING: Mute functionality should only be used in situations where it is The logic port connections can be configured as either an input or output trigger permissible to disable a zone in very select instances. (i.e. a conference room in either "Active Low"...
- Page 10 Panel Connections (continued) Privacy Lights Outputs Contact Connections (source) Two ports are provided to interface with privacy lights panels. They may be Follow the instructions provided with the privacy sign to make sure that the unit designated to 2 different zones and should be home run from the controller to is connected to the controller inputs correctly.
- Page 11 Panel connections (continued) Inputs - Paging and Music For unbalanced audio inputs: Paging and music sources may be connected to the Qt X audio inputs for distribution throughout select zones. Specific instruction on settings levels in 1. Disconnect power from the Qt X. different zones is covered in the Qt X Web UI help files.
- Page 12 Outputs - Sound masking devices Emitters - Qt X 300/600 models The Qt X control modules support installation of both Qt Standard and Active emitters. Both emitter types are 'direct field' devices, mounted downward for direct unimpeded transfer of the audio signal to the listening location (Figure 11). Qt Passive emitter The passive emitter is a passive audio loudspeaker device suitable for sound masking applications.
-
Page 13: Emitter Installation (Qt X 300/600 Models)
NOTE: for open ceilings or other installations that do not secure to a tile, other mounting # and associated zone. options are available (such as hanging pendants). See Biamp's product offerings for information. 4. Install the first emitter in the ceiling tile by NOTE: Active and passive emitters are installed identically. - Page 14 Emitter Installation (continued) Emitter Spacing Guidelines 5. Listen to the emitter after it is connected. It should produce a 'whooshing' • Maintain a square or rectangular pattern with distances/spacing based on sound. If it does not produce sound refer to the troubleshooting steps at right. ceiling or mounting height.
- Page 15 12' x 12' ( 3.7 x 3.7 m) 2' ( .6 m) 6' (1.8 m) 14' + (4.3 m+) Contact Biamp Support Contact Biamp Support 2' ( .6 m) 7' (2.1 m) *Mounting height may not always be at the ceiling height...
- Page 16 Emitter Installation (continued) Active Emitter Outputs Basics of Qt X 300/600 outputs: maximum signal run, channel definitions, output run architecture and spacing in small rooms per ceiling height. See Figures 16-18. Passive emitter Outputs Maximum Signal cable distance ≤ 1000 ft (304.8m) Channel Designations per Run Output X - Run A - A,B,C,D,A,B,C,D,A,B,C,D...
- Page 17 Emitter Run Layout - Correct and Incorrect Layouts below show runs with Passive emitters; the same layout will work for Active Emitter runs with the addition of the power injector prior to the 1st Qt Active Emitter. The same emitter type must be on both the A & B runs of any output, and are applicable for both the Qt X 300 and 600 models. CORRECT INCORRECT Emitters...
- Page 18 Emitter Installation in Hallways or Corridors Mixing Qt Emitter Types Emitter spacing in hallways and corridors should adhere to the same spacing Both the Qt Standard and Qt Active Emitters may be used on the same sound standards as used for larger open offices, with the distance between emitters masking project with signals supplied by a single Qt X Controller if they are being based on emitter mounting/ceiling heights.
-
Page 19: Interacting With A Qt X System
INTERACTING WITH A Qt X SYSTEM There are two (2) current methods of accessing and configuring the system Qt X Web Interface (online help file <link>) with differing levels of what can be viewed or affected. The front panel of each unit has very basic functionality - limited to basic information and operating The web interface allows you access or control to: mode of that particular controller. - Page 20 Interacting with a Qt X system (continued) Controller Front Panel Menu / Functionality When the panel is powered up and connected, you can navigate through the basics of the system using the 4 push buttons under the front panel display. What you will be able to view is based on whether the controller is unconfigured (not part of a system) or configured (part of a defined network system).
- Page 21 IMPORTANT: Please refer to the web help <here> for additional information on a biamp sound-masking system. It can be accessed by inputting either the IP configuring a system or setting specific items.
-
Page 22: Commission The System (Next Steps)
COMMISSION THE SYSTEM (next steps) Once all of the components and their peripherals have been installed and are ‰ Go through each zone testing / adjusting levels, checking behavior operational, they need to be configured into a networked sound masking system. Additional information to explain each of the configuration steps is available in ‰... -
Page 23: Commission The System (Continued)
COMMISSION THE SYSTEM (continued) Setting Sound Masking Levels Target sound masking levels may vary from area to area throughout a facility Once sound masking levels are optimized for a space, it is always recommended to that they remain consistent indefinitely as very small changes in level can be based on use. -
Page 24: Accessories
ACCESSORIES Qt Active Emitter Accessories Qt X Controller Accessories Rack Mount Kit (Qt X RMT-KT) – allows a Qt X 300 or 600 to be mounted Power Supply (PS-AE-3) – has 3 outputs and can provide power for 1-3 PI-AE power injectors to a rack. - Page 25 Conversion from Wall Mount to Rack Mount 1. Remove the wall mount bracket from the controller and reserve the M4 screws to attach the rack mount brackets later (Figure 20). 2. Disconnect the power supply supporting bracket from the wall mount bracket (Figure 21).
- Page 26 Conversion from Wall Mount to Rack Mount (continued) 3. Attach the power supply bracket to the longer (R) rack ear with 2 M4 hex 5. Secure the Qt X device to the rack via the rack ears as shown in Figure 24. nuts and insert the power supply with power cord outlet located to the back Hardware to attach the unit to the rack is not included.
- Page 27 Plenum Bracket Installation Mount here A pair of mounting brackets and M4 screws are included with the plenum bracket kit. They can be positioned as shown below in any of 3 configurations to fit over a ceiling rail (shown in the smaller inset images). Chose the orientation that best fits your application (Figures 25-27).
- Page 28 Accessories (continued) Room Control (QT-RC3) VERY IMPORTANT: Use of the Qt-RC3 room control is ONLY recommended for 1. Qt-RC3 in a Single Room (at the end of a single output) zones broadcasting background music or paging and only when the control needs to be accessible by building occupants.
-
Page 29: Qt X System Information Worksheet
Qt X SYSTEM INFORMATION WORKSHEET Controller Information Qt X Homerun Output Destination Record Output Run A Emitter Run B Emitter Controller Type / Serial Number: Qt X ________ / #_______________ (Qt X 300/600) (Qt X 300/600) Hostname: _______________________________________________ Mac Address (control / media): _______________/________________ IP Address (control / media): _________________/________________ Netmask (control / media): __________________/_________________ Location: _________________________________________________... - Page 30 Notes Notes page 30 Installation and Operation Guide Qt X Sound Masking System...
- Page 31 Safety Information - Multi-language The controllers are UL 2043 approved for installation into a plenum space. DANGER: The AC/DC power supply provided with this product has not been evaluated to UL 2043 and must not be installed in a plenum space. Les contrôleurs sont approuvés UL 2043 pour une installation dans un espace plénum.
- Page 32 However, due to ongoing technical advances, changes or modifications may have occurred that are not covered in this manual. The latest version is available at www.biamp.com. Dante is a registered trademark of Audinate ®...
Need help?
Do you have a question about the Cambridge Qt X and is the answer not in the manual?
Questions and answers