
Related Manuals for Camfil CleanSeal V3


Summary of Contents for Camfil CleanSeal V3
- Page 1 CleanSeal V3 (CL) CleanSeal Exhaust V3 (CR) Installation & Operating Manual Camfil EMC EMC_SPEC040_CLCR.doc Rev. E – 2021 10 18...
-
Page 2: Updates
Date Revision Object Author 2021-04-29 Correct support bracket footprint values §8.4.1 V.Parkkoin 2020-09-18 Update to last MIP updates V.Parkkoin 2020-09-14 Update MIP drive shaft connection §9.5.3 V.Parkkoin 2020-07-26 First issue V.Parkkoin Camfil EMC EMC_SPEC040_CLCR.doc Rev. E – 2021 10 18... -
Page 3: Table Of Contents
Compression Mounting with Quick Clamping Kit ..............22 Duct Connection ........................23 8.5.1 D-Spigot ............................ 23 8.5.2 N-Spigot ............................ 24 8.5.3 Rectangular Flange ........................25 8.5.4 Open Plenum Versions ......................26 Measurement Port Connection ....................27 Camfil EMC EMC_SPEC040_CLCR.doc Rev. E – 2021 10 18... - Page 4 10.4.3 Main Filter Installation / Exchange ................... 51 10.4.4 Prefilter Installation / Exchange ....................52 10.4.5 Testing Shroud (Option) ......................53 10.4.6 Filter Validation with Mobile Integrity Probe ................56 10.4.7 MIP Driver ..........................58 Camfil EMC EMC_SPEC040_CLCR.doc Rev. E – 2021 10 18...
- Page 5 Maintenance ..........................59 11.1 Spare Parts ..........................61 11.2 Procedures ..........................62 11.2.1 Replacing Measurement Port Tubes ..................62 11.2.2 Adjusting Door Fit on CleanSeal Exhaust .................. 63 Camfil EMC EMC_SPEC040_CLCR.doc Rev. E – 2021 10 18...
-
Page 6: Purpose & Scope
Because actual use of products, methods and information by the user is beyond the control of Camfil, such use is within the exclusive responsibility of the user and Camfil cannot be held responsible for any loss incurred through incorrect or faulty use of products or information. ... -
Page 7: Quality Control
CleanSeal V3 Quality Control Quality control items for CleanSeal terminal housings are documented by Camfil Qualified Sub Contractors on the corresponding checklist, according to a product specific Quality Check Instruction. The combination of order reference, date and batch serial number on the identification sticker allows Camfil to track quality documentation of any individual housing. -
Page 8: Prior To Installation Or Intervention
Install & Operating Manual CleanSeal V3 Prior to Installation or Intervention Precautions : Respect applicable safety and health rules on site and wear protective gear. (clothing, gloves, eye protection, safety footwear, mask, …). A work coat or overall and gloves are recommended as a minimum precaution. -
Page 9: Product Presentation
Install & Operating Manual CleanSeal V3 Product Presentation Design Features CleanSeal housings are designed as terminal housings for air supply or extraction in clean rooms. CleanSeal housings (CL) for ceiling installation are designed for supply air, but can perfectly work as extract air terminals in the ceiling. -
Page 10: Corrosion Resistance
Life Science and Clean Process environments. Camfil has chosen to evaluate corrosion resistance of its metal products with respect to decontamination products most commonly used by our customers. •... -
Page 11: Materials & Temperature Limitations
From the technical characteristics of component materials (paint & plastic parts) it is safe to say that CleanSeal housings are fully functional for the same temperature range as the corresponding Camfil Megalam filter panels, i.e. 60°C maximum for continuous use. ... - Page 12 Install & Operating Manual CleanSeal V3 Temp. Illustration Name Material(s) [°C] Common Parts CleanSeal Supply (CL) & CleanSeal Exhaust (CR) (a) 1.0038 (S235JRG2) (b) SS 1.4301 (X5CrNi18-10) Housing Body ( >250 ) 1.4307 admissible (c) SS 1.4404 (X5CrNiMo17-12-2) Epoxy primer Housing Coating (<=90)
- Page 13 Install & Operating Manual CleanSeal V3 Temp. Illustration Name Material(s) [°C] Specific Parts CleanSeal Supply (CL) Retainer Bracket 1.4301 (X5CrNi18-10) ( >250 ) Retainer 1.4310 (X10CrNi18-8) ( >250 ) Spring Base 1.4404 (X5CrNiMo17-12-2) ( >250 ) Spring 1.4310 (X10CrNi18-8) ( >250 ) Damper Adj.
- Page 14 Install & Operating Manual CleanSeal V3 Temp. Illustration Name Material(s) [°C] Other Parts Flange Gaskets 1.4301 (X5CrNi18-10) (<=90) MIP Sampling Tube Silicone <=135 Stainless Steel MIP Drive Flexible Shaft <=80 14/63 EMC_SPEC040_CLCR.doc Rev. E – 2021 10 18...
-
Page 15: Installation Of Housings
Install & Operating Manual CleanSeal V3 Installation of Housings Unboxing & Handling • Open the TOP of the box (see pictogram on the side of the box) • Retrieve the bag(s) of accessories and remove protective foam parts • Damper ready S-C-versions will contain a second pouch with the damper adapter rod. -
Page 16: Recommended Cutout Dimensions
Install & Operating Manual CleanSeal V3 Recommended Cutout Dimensions • Recommended cutouts ensure a recovery area of 5 … 10 mm with the standard 20mm flange • Dimensions are generally +7mm of the respective max. housing dimension, with reduced cutout height B +4mm for wall-mounted CR housings . -
Page 17: Suspension Mounting
Install & Operating Manual CleanSeal V3 Suspension Mounting Standard Suspension The standard CleanSeal support system allows housing installation by both suspension and compression for most practical situations. • Recommended cutouts (see § 8.2) will allow to insert any standard housing straight, no balancing required •... -
Page 18: Optional Suspension - Basic Plenum Hangers
Install & Operating Manual CleanSeal V3 Optional Suspension – Basic Plenum Hangers CleanSeal ceiling housings (CL) can be optionally supplied with alternative supports, where the standard support system is not suitable PLEASE NOTE: Suspension options require customized housings with the corresponding option. -
Page 19: Optional Suspension - Knauf Rapid Push-On Hangers
Install & Operating Manual CleanSeal V3 Optional Suspension – KNAUF Rapid Push-on Hangers CleanSeal ceiling housings (CL) can be optionally supplied with alternative supports, where the standard support system is not suitable PLEASE NOTE: Suspension options require customized housings with the corresponding option. -
Page 20: Compression Mounting
Install & Operating Manual CleanSeal V3 Compression Mounting Standard Compression The standard CleanSeal support system allows housing installation by both compression and suspension for most practical situations. • Recommended cutouts (see § 8.2) will allow to insert any standard housing straight into the cutout, no balancing required •... -
Page 21: Compression Mounting Options
+ Pressure Screw Kit 1068200 PLEASE NOTE: For compression mounting on even thicker panels, custom brackets can be proposed, subject to project-specific feasibility study and quotation. ➔ Please contact your Camfil representative. 21/63 EMC_SPEC040_CLCR.doc Rev. E – 2021 10 18... -
Page 22: Compression Mounting With Quick Clamping Kit
For compression mounting on thicker panels custom locking plates can be proposed: With standard housing <= 95 mm max With custom housing subject to project-specific feasibility study and quotation. ➔ Please contact your Camfil representative. Align mark with... -
Page 23: Duct Connection
Install & Operating Manual CleanSeal V3 Duct Connection CleanSeal housings are supplied with different air hookup connections, depending on type and custom features. D-Spigot This female spigot form is used as standard on CL ceiling and CR wall housings. It is compatible with ... -
Page 24: N-Spigot
Install & Operating Manual CleanSeal V3 N-Spigot This male spigot form may be ordered as a custom feature on any housing, where an adapter solution is not convenient (see § 8.5.1), except CL ceiling housing type “damper ready”. It is designed for airtight general purpose hookup to most ducting systems, both rigid and flexible. -
Page 25: Rectangular Flange
Install & Operating Manual CleanSeal V3 Rectangular Flange This flange form is available on many standard housings. May also be used as a custom feature on any housing. It is specifically suitable where integration space is at a premium. Duct... -
Page 26: Open Plenum Versions
Gaskets can be proposed Gasket Material: EPDM - ASTM D 1056 - 2 A2 - 4 mm Custom dimensions subject to project-specific feasibility study and quotation. ➔ Please contact your Camfil representative 26/63 EMC_SPEC040_CLCR.doc Rev. E – 2021 10 18... -
Page 27: Measurement Port Connection
Install & Operating Manual CleanSeal V3 Measurement Port Connection Every housing is fitted with a complete suite of fully welded measurement ports Supply Air housings Exhaust Air housings Rp1/8” Pressure + UPSTREAM Rp1/8” Pressure - DOWNSTREAM To activate the secondary dp-ports, e.g. for remote sensor hookup, proceed as follows: ... -
Page 28: Installation Of Add-Ons
Install & Operating Manual CleanSeal V3 Installation of Add-ons Dampers PLEASE NOTE: The installation of either shut-off or regulation dampers as standard add-ons requires a “damper ready” S-C-housing or a customized T-C-housing. Interface parts like the adapter rod and locking screws are included as accessories with the housing. -
Page 29: Duct Adapters
1077088 1077097 Other dimensions are possible as custom versions. 500x150 1072256 1077098 500x200 1072258 1077099 ➔ Please contact your Camfil representative 600x200 1077089 1077100 800x150 1077090 1077101 Adapters to be fixed with 4 bolts and 12 mm self-adhesive gasket. •... -
Page 30: Aerosol Injection
ISO 14644-3 / IEST-RP-CC034.4. Testing reports available on request. • In case of short upstream ducts, installation distance may be reduced while still being ISO compliant. ➔ Please contract Technical Support via your Camfil representative for details 30/63 EMC_SPEC040_CLCR.doc Rev. E – 2021 10 18... -
Page 31: Integribox
Install & Operating Manual CleanSeal V3 IntegriBox IntegriBox is an optional interface for remote aerosol injection and upstream pressure readings. Up to 5 (up to 10 depending on injection line length) housings can be controlled from one box. The Cleanroom Box features a fully welded box with identical flange and clamping system as the filter housings, designed for integration into a wall or ceiling panel. -
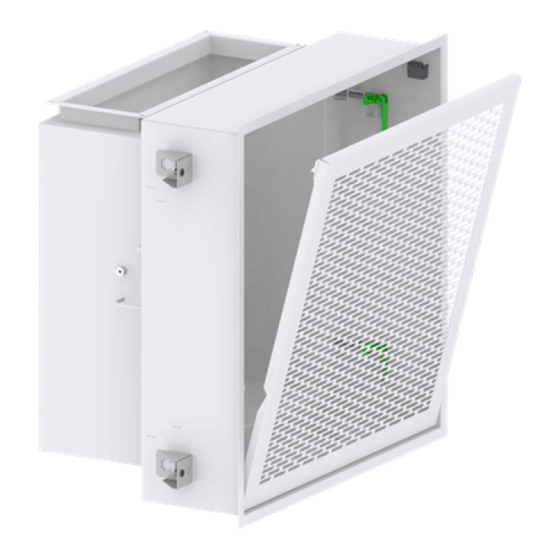
Page 32: Mobile Integrity Probe (Mip)
Install & Operating Manual CleanSeal V3 Mobile Integrity Probe (MIP) The Mobile Integrity Probe (MIP) is a manual scanning system for exhaust air applications, integrated downstream into the housing and suitable for wall and ceiling installations. Base housing – Open Plenum version ... -
Page 33: Special Precautions When Installing A Mip Housing
Install & Operating Manual CleanSeal V3 Special precautions when installing a MIP housing IMPORTANT: Danger of damages from inappropriate unpacking or handling. The housing is delivered fully assembled and tested. Do not touch the scanning system during manipulation or installation as any deformation or misalignment might result in functional damage. -
Page 34: Choosing The Control Box Location
(probe in the plenum) is on the RIGHT - • These custom versions cannot be rotated. • The location area will follow for the corresponding 90° orientation. Dimensions refer to the outer flanges. ➔ Please contact your Camfil representative 34/63 EMC_SPEC040_CLCR.doc Rev. E – 2021 10 18... -
Page 35: Adapting And Operating The Control Box Locking System
The spacer will receive only compression forces, it may be fixed to the wall by double-sided tape. Other panel thicknesses or customized locking solutions may be possible, subject to project-specific feasibility study and quotation. ➔ Please contact your Camfil representative 35/63 EMC_SPEC040_CLCR.doc... - Page 36 Install & Operating Manual CleanSeal V3 Prior to installation, the clamping system has to be adapted to the panel thickness P : X = Panel P [+Spacer] – 50 [mm] ➔ Calculate the main rod length as : Place the clamping bar ...
-
Page 37: Connecting The Mip Drive Shaft
Install & Operating Manual CleanSeal V3 Connecting the MIP Drive Shaft Connecting to the Housing Drive Port • Insert the shaft end into the housing interface. Note the drive pin is asymmetrical ! Place shorter side to match the setting screw position in the interface hub. -
Page 38: Installing The Control Box
Install & Operating Manual CleanSeal V3 Installing the Control Box The Control Box can serve a secondary purpose as an access hatch to the technical area in case of intervention on tubing or the flexible drive shaft. PLEASE NOTE: The locking mechanism allows for quick &... -
Page 39: Installation Validation Before Startup
The connection tube must not stretch or collapse at any point, nor exceed the probe level. • Scan support rails and drive screw must be free from dirt, surface damage or deformation IMPORTANT: Use only the Camfil qualified MIP driver to operate the system (see also § 10.4.7) -
Page 40: Operation
Use settings for MX (90 mm) and adjust, see § 10.2. Camfil CleanSeal clamping presets are designed for filters with 6 … 7,5 mm foamed PU gasket. Other brand filters and/or gasket types may be used, referring to the instructions in §... -
Page 41: 10.2 Filter Clamping - General Settings
Install & Operating Manual CleanSeal V3 10.2 Filter Clamping - General Settings CleanSeal housings come out of the box “plug-and-play”, i.e. fully configured to specification. The scalable filter clamping settings can be changed at any time. Gasket compression surface ... - Page 42 Install & Operating Manual CleanSeal V3 Clamping Height Base Settings Height setting Range Adjustment Clamping Height nominal Range Filter clamp closed add compression less compression Type [mm] [turns] / [mm] [turns] / [mm] [mm] [mm] 67,5 +0,5 / 0,5 -13 / -10,5...
-
Page 43: 10.3 Cleanseal Cl For Ceiling Installation
Install & Operating Manual CleanSeal V3 10.3 CleanSeal CL for Ceiling Installation Features Removable support blocks 43/63 EMC_SPEC040_CLCR.doc Rev. E – 2021 10 18... -
Page 44: Front Plate Operation For Cleanseal Cl
Removing or installing the front plates requires full 90° opening. A minimum intervention space beneath the housing needs to be free from obstructions of any kind. Custom solutions are available if this cannot be ensured. ➔ Please contact your Camfil representative Minimum Intervention Space [mm] Short Side (SS) down Long Side (LS) down ... -
Page 45: Filter Installation / Exchange
The media pack of a traditional HEPA filter panel is extremely sensitive. This is no longer an issue for latest generation filters like Camfil EnerGuard , but generally speaking, filters have to be handled with the utmost care to avoid creating damage during installation. -
Page 46: Local Aerosol Injection With Integripod
For superior ease of use, a hookup tool is available. Hookup tool 1072227 ➔ Please contact your Camfil representative Using the Hookup-Tool ➔ The tool cannot be inserted the wrong way, due to a safety key : ➔... -
Page 47: Controlling Multiple Housings With Integribox
Install & Operating Manual CleanSeal V3 Controlling Multiple Housings with IntegriBox IntegriBox will allow remote aerosol injection and upstream pressure readings for up to 5 (10) housings. Upstream pressure port Aerosol injection port D12 mm • Connect the “+” port of the manometer to the relevant upstream pressure port for a pressure drop reading against the ambient room pressure. -
Page 48: Filter Validation For Supply Air
Install & Operating Manual CleanSeal V3 Filter Validation for Supply Air • Connect a particle counter or photometer with dilution stage to the concentration port in the housing. • Connect an aerosol generator to the injection port in the housing or in the IntegriBox. -
Page 49: 10.4 Cleanseal Exhaust Cr For Wall Installation
Install & Operating Manual CleanSeal V3 10.4 CleanSeal Exhaust CR for Wall Installation Features 49/63 EMC_SPEC040_CLCR.doc Rev. E – 2021 10 18... -
Page 50: Door Operation For Cleanseal Exhaust Cr
Install & Operating Manual CleanSeal V3 Door Operation for CleanSeal Exhaust CR The door locking system allows for fast & easy access without any tools. • To unlock, push on both corners of the housing door The door unlocks with an audible "click" for each lock. -
Page 51: Main Filter Installation / Exchange
The media pack of a traditional HEPA filter panel is extremely sensitive. This is no longer an issue for latest generation filters like Camfil EnerGuard , but generally speaking, filters have to be handled with the utmost care to avoid creating damage during installation. -
Page 52: Prefilter Installation / Exchange
Install & Operating Manual CleanSeal V3 Clamping lever position When combining a MG-size HEPA filter with a prefilter-door, respect the following clamping lever positions to avoid collision : Prefilter Installation / Exchange • Before inserting the filter, make sure all spring clamps are mobile in their holders. -
Page 53: Testing Shroud (Option)
Install & Operating Manual CleanSeal V3 Testing Shroud (Option) The separately available testing shroud is a compact unit that will allow for aerosol distribution compliant with or exceeding distribution performance requirements of IEST-RP-CC034.4 / ISO14644-3 for HEPA filter validation purposes. - Page 54 Install & Operating Manual CleanSeal V3 Installing the Testing Shroud • Replace frontplate or door by the respective mounting frame with diffuser plate. The wall mounting frame is operated like CleanSeal Exhaust (CR) doors, see § 10.4.2. It features 4 locking hooks .
- Page 55 Install & Operating Manual CleanSeal V3 • Connect a particle counter or photometer with dilution stage to the concentration port using a D10 tube compatible with quick-connect fittings. Push the locking ring on the fitting to release. • Connect an aerosol generator to the injection port using G1/4 fittings RIEGLER 246.32 or 246.12 or compatible.
-
Page 56: Filter Validation With Mobile Integrity Probe
• The Control Box door may remain in place to deposit small parts or it may be taken off before operation, if necessary. IMPORTANT: Use only the Camfil qualified MIP driver to operate the system (see also § 10.4.7) DO NOT use general purpose electrical... - Page 57 (sampling probe displacement) is calculated as follows : ���� (e.g.: Vs = 10 mm/s ➔ R = 200 rpm) �� [������] = ���� [ ] × ���� �� Drive tools for MIP operation can be obtained from Camfil. ➔ Power tool MIP Driver Ref. 1086894 57/63 EMC_SPEC040_CLCR.doc...
-
Page 58: Mip Driver
Install & Operating Manual CleanSeal V3 MIP Driver The Camfil MIP Driver is designed to enable simple operation in a wide range of stable scanning speeds while preserving the drive mechanism. Power Supply is delivered from a main adapter or alternatively by a optional portable battery pack. - Page 59 E07 – Internal error Any error code cause motor to stop operation. To reset, press Run button (9) or Direction button (8). The Camfil MIP Driver is delivered with its power supply in a transport case. MIP Driver Ref. 1086894 The case can additionally hold the optional Battery Pack with charger (not included, to be ordered separately) .
-
Page 60: Maintenance
On MIP housings check absence of filings etc. which would indicate a mechanical issue with excessive wear on the scan drive. • For specific intervention procedures, see § 11.2 or contact your Camfil representative. 60/63 EMC_SPEC040_CLCR.doc Rev. E – 2021 10 18... -
Page 61: 11.1 Spare Parts
Install & Operating Manual CleanSeal V3 11.1 Spare Parts Category Designation Illustration Camfil COMIC PU Air Tubing for dp ports 1076242 green D8d6 PU Air Tubing for 100% ports 1071603 green D10d8 PU Air Tubing for aerosol injection 1076240 transp. D11.6d9... -
Page 62: 11.2 Procedures
Install & Operating Manual CleanSeal V3 11.2 Procedures Replacing Measurement Port Tubes For CleanSeal Push PU tube all the way For CleanSeal Supply air or onto the welded steel tube ! Exhaust air Exhaust air (tube may be fully painted) -
Page 63: Adjusting Door Fit On Cleanseal Exhaust
Install & Operating Manual CleanSeal V3 Adjusting Door Fit on CleanSeal Exhaust The door should lock safely and easily and should be flush with the housing front when locked. If necessary, this can be readjusted independently for both locks. PLEASE NOTE: In case of door misalignment, check hinge pin bushings first, before touching locks.
Need help?
Do you have a question about the CleanSeal V3 and is the answer not in the manual?
Questions and answers