Advertisement
Quick Links
ATTACH YOUR RECEIPT HERE
Serial Number ________________________________ Purchase Date _________________________________
Questions, problems, missing parts? Before returning to your retailer, call our
customer service department at 1-877-447-4768, 8:00 a.m. – 4:30 p.m. CST,
Monday – Friday or e-mail us at customerservice@ghpgroupinc.com.
70-10-646
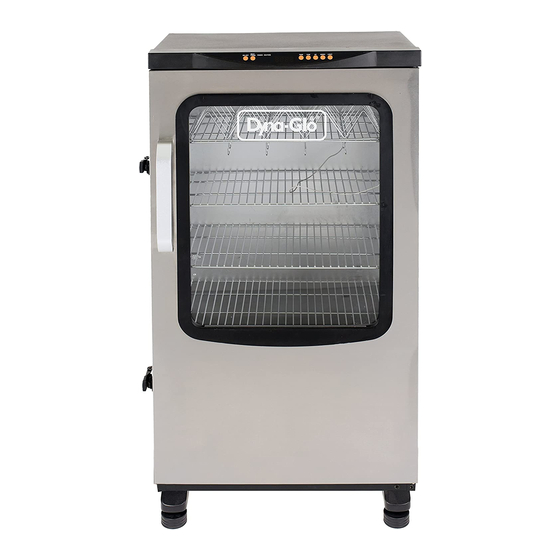
40" Single Door Vertical
Electric Digital Smoker
MODEL #DGU951SSE / DGU951SSE-D
1
Français p. 27
Español p. 53
FOR OUTDOOR
USE ONLY
Use only with Class A GFI
(Ground Fault Interrupter)
Rev. 02/03/20
Advertisement

Related Manuals for Dyna-Glo DGU951SSE


Summary of Contents for Dyna-Glo DGU951SSE
- Page 1 40" Single Door Vertical Electric Digital Smoker MODEL #DGU951SSE / DGU951SSE-D Français p. 27 Español p. 53 FOR OUTDOOR USE ONLY Use only with Class A GFI (Ground Fault Interrupter) ATTACH YOUR RECEIPT HERE Serial Number ________________________________ Purchase Date _________________________________ Questions, problems, missing parts? Before returning to your retailer, call our customer service department at 1-877-447-4768, 8:00 a.m.
- Page 2 ® DYNA-GLO 40" SINGLE VERTICAL ELECTRIC DIGITAL SMOKER STOP! NO NEED TO RETURN TO THE STORE Questions with The Assembly? Require Parts Information? Product Under Manufacturers Warranty? Call Toll Free : 1-877-447-4768 8:00 a.m. – 4:30 pm CST, Monday – Friday...
-
Page 3: Table Of Contents
TABLE OF CONTENTS Safety Information ........................Package Contents ........................8 Hardware Contents ........................9 Preparation Before Assembly ....................... 9 Assembly Instructions ........................ 10 Operating Instructions ......................... 13 Tips On Smoking ......................... 19 Care and Maintenance ........................ 21 Troubleshooting ........................... 22 Replacement Parts List ...................... -
Page 4: Safety Information
SAFETY INFORMATION IMPORTANT SAFEGUARDS READ ALL INSTRUCTIONS, PRIOR TO USING THIS SMOKER • DO NOT use this product for anything other than its intended purpose. It is NOT intended for commercial use. It is NOT intended to be installed or used in or on a recreational vehicle and/or boat. •... - Page 5 SAFETY INFORMATION • DO NOT wear loose clothing while operating the smoker. Tie back long hair while operating the smoker. • ALWAYS wear shoes that fully cover your feet while operating the smoker. • DO NOT touch hot surfaces. Use handles or knobs. •...
- Page 6 SAFETY INFORMATION Ground Fault Interrupter • Since 1971, the National Electric Code (NEC) has required Ground Fault Interrupter devices on all outdoor circuits. • If your residence was built before 1971, check with a qualified electrician to determine if a Ground Fault Interrupter protector exists. • Do not use this appliance if the circuit does not have Class A GFI protection. •...
- Page 7 SAFETY INFORMATION WARNING To avoid serious injury: • While cooking, the smoker must be on a level, stable, noncombustible surface in an area clear of combustible material, including long or dry grass. • The use of alcohol, prescription or nonprescription drugs may impair the user’s ability to properly assemble and safely operate this appliance.
-
Page 8: Package Contents
PACKAGE CONTENTS PART DESCRIPTION QUANTITY Smoker cabinet assembly Rear casters Front legs (left/right) Rear handle Grease Tray Door Handle Rib & Sausage rack Cooking grates Water bowl Wood chip box Water bowl & wood chip box support... -
Page 9: Hardware Contents
HARDWARE CONTENTS (PRE-ASSEMBLED) M4 x 35 mm M6 x 12 mm M5 x 12 mm Screw Screw Screw Qty. 4 Qty. 6 Qty. 12 Note: Eight M5 x 12 mm Note: Four M4 x 35 mm Note: Four M6 x 12 mm screws screws (CC) are pre- screws (AA) are pre- (BB) are pre-assembled on the... -
Page 10: Assembly Instructions
ASSEMBLY INSTRUCTIONS Remove the eight pre-installed M5 x 12 (CC) screws from the bottom of the cabinet assembly (A) and attach each of the rear casters (B) us- ing four screws per caster. Remove the six pre- installed M6 x 12 (BB) screws from the bottom of the cabinet assembly and attach the front legs (C) using three screws per leg. - Page 11 ASSEMBLY INSTRUCTIONS Remove the four pre-installed M4 x 35 (AA) screws from the door handle (F) and attach the handle to the front of the door. Hardware Used M4 x 35 mm Screw Place the grease tray (E) onto the bottom of the cabinet.
- Page 12 ASSEMBLY INSTRUCTIONS Place the water bowl (I) and wood chip box (J) onto the water bowl & wood chip box support (K), and slide the support (K) onto the bottom rails inside the cabinet assembly (A). Slide the 4 cooking grates (H) onto the support rails inside of the cabinet (A) as shown.
-
Page 13: Replacement Parts List
REPLACEMENT PARTS LIST For replacement parts, call our customer service department at 1-877-447-4768, 8:00 a.m. - 4:30 p.m. CST, Monday - Friday or e-mail us at customerservice@ghpgroupinc.com. PART DESCRIPTION PART # PART DESCRIPTION PART # Smoker Cabinet 70-01-704 Rib Rack & Sausage 70-01-619 Assembly Hooks... - Page 14 REPLACEMENT PARTS LIST 70-10-646 Printed in China...
Need help?
Do you have a question about the DGU951SSE and is the answer not in the manual?
Questions and answers