Advertisement
Quick Links
Advertisement

Subscribe to Our Youtube Channel
Related Manuals for Newcastle Systems PC Series


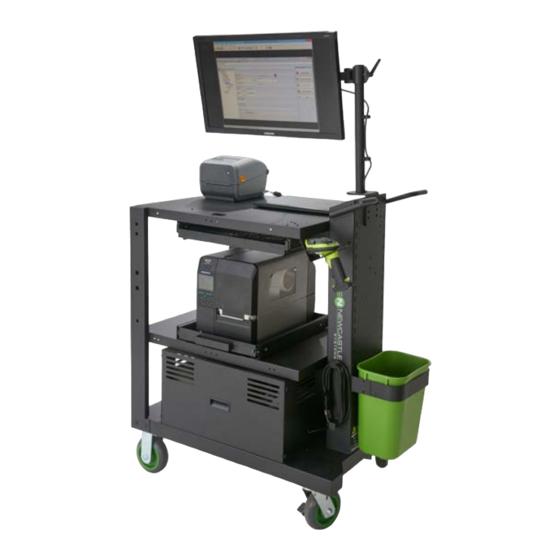
Summary of Contents for Newcastle Systems PC Series
- Page 1 PC SERIES ASSEMBLY MANUAL 1 or 2 Battery Setup...
- Page 2 PC Series 1 & 2 Battery Systems with 1000W Inverter/Charger Standard Contents: - Cart (Assembled) - Battery & Hardware - Wastebasket and Bracket & Hardware Optional second shelf and optional keyboard tray shown in picture above. If second shelf was purchased, remove it...
- Page 3 PC Series 1 & 2 Battery Systems with 1000W Inverter/Charger Remove front battery panel by loosening the thumb screws. Carefully lift the battery box and make sure cables stay positioned through the plastic wire grommet. Place battery box on its side as shown below.
- Page 4 PC Series 1 & 2 Battery Systems with 1000W Inverter/Charger One Battery Setup (Skip to page 5 for 2-battery systems) Place Battery here Remove battery and hardware from packaging. Wire A (red) connects to red positive (+) battery terminal. Wire B (black) connects to black negative (-) battery terminal.
- Page 5 PC Series 1 & 2 Battery Systems with 1000W Inverter/Charger One Battery Setup Cont. Wire A (red) comes pre- connected from remote battery meter to fuse block. Negative Connection: Place lock Wire B (black) connects washer onto bolt first, then flat washer, then...
- Page 6 PC Series 1 & 2 Battery Systems with 1000W Inverter/Charger Two Battery Setup Place Battery (proceed to page 8 if only 1 battery setup) Place Battery #1 here #2 here Remove batteries and hardware from packaging. Battery #2 Battery #1...
- Page 7 PC Series 1 & 2 Battery Systems with 1000W Inverter/Charger Two Battery Setup Cont. 3. Positive Connection, Battery 1: Take bolt and place Negative Connection, Battery 1: Take flat washer and large red wire (A) onto bolt (as shows bolt and place flat washer, black connector above);...
- Page 8 PC Series 1 & 2 Battery Systems with 1000W Inverter/Charger Two Battery Setup Cont. 7. Positive Connection, Battery 2: Take bolt and place flat washer, large red wire (B) onto Negative Connection, Battery 2: Take bolt (as shown above); insert bolt into positive bolt and place flat washer, small black wire (+) battery terminal.
- Page 9 PC Series 1 & 2 Battery Systems with 1000W Inverter/Charger Make sure all fittings are tight and that the batteries Run charger cord through cable opening are strapped down. and securely wrap around cord reel holder. Carefully place the battery box cover on base.
- Page 10 PC Series 1 & 2 Battery Systems with 1000W Inverter/Charger Testing the Battery Function Turn the unit on by pressing the green power button. Turn the power strip on. The switch should light red. Place the front battery panel as shown above.
Need help?
Do you have a question about the PC Series and is the answer not in the manual?
Questions and answers