IEM Tel-O-Graph BT Instructions For Use Manual
Hide thumbs
Also See for Tel-O-Graph BT:
- Operating instructions manual (47 pages) ,
- Operating manual (304 pages) ,
- Technical manual (40 pages)

Related Manuals for IEM Tel-O-Graph BT


Summary of Contents for IEM Tel-O-Graph BT
- Page 1 Gebrauchsanweisung Instructions for Use Manual de instrucciones Mode d’emploi Istruzioni per l'uso Gebruiksaanwijzing...
- Page 2 For USA: Caution: Federal law restricts this device to sale by or on the order of a physician IEM GmbH Gewerbepark Brand 42 52078 Aachen Germany Email: info@iem.de Website: www.iem.de The content of this instructions for use must not be reproduced or published without the written approval of IEM GmbH. All rights reserved. © IEM GmbH 2021.
-
Page 3: Table Of Contents
Table of contents Correct posture ............28 1 Introduction ............4 Measuring ..............29 Clinical Validation ............5 Stopping the measurement ........30 CE Mark............... 5 Accessories ..............5 7 Transferring readings via Bluetooth ® ....31 Active Pairing (Bluetooth -Modem) ....31 ®... -
Page 4: Introduction
Introduction 1 Introduction Thank you for choosing the Tel-O-Graph BT upper-arm blood pressure monitor. ® Read this operating manual carefully before use and keep it in a suitable place so that the information is available when required. The Tel-O-Graph ® BT is a fully automated blood pressure and pulse monitor that enables automatic transmission by means of a Bluetooth ®... -
Page 5: Clinical Validation
▪ 2011/65/EU (RoHS) guidelines and bears the CE mark. IEM GmbH hereby declares that the Tel-O-Graph ® BT corresponds to the 2014/53/EU (RED) guideline. The complete text of the EU declaration of conformity is available at the following website address: https://www.iem.de/doc/... -
Page 6: Instruction Notes
Instruction Notes 2 Instruction Notes Intended Use The Tel-O-Graph BT is intended for the measurement of blood pressure and pulse on the upper arm in adults. ® The blood pressure monitor is suitable for individuals with an arm circumference of 20-55 cm (7.9-21.7 in) when used with the corresponding monitor cuff size. -
Page 7: Essential Performance
Instruction Notes The Tel-O-Graph ® BT is not designed to be used on pregnant women or in cases of pre-eclampsia. Note There are currently no clinical studies available on the use of pulse wave analysis in children. Accordingly, ▪ there is no confidence interval for persons under the age of 20 years. If you are taking medication to alter blood clotting, consult your physician before using the blood pressure ▪... -
Page 8: Safety
Safety 3 Safety This section explains all the safety information for the device. Read this section carefully before using the blood pressure monitor. Contact your physician before using the device if you are pregnant, are taking medication to alter blood clotting or if you have been diagnosed with cardiac arrhythmia, coagulation disorders or arteriosclerosis. -
Page 9: Important Patient Information
Safety Note The signal word Note indicates further information about the Tel-O-Graph BT or its accessories. ® External Reference Indicates reference to external documents in which further information may optionally be found. Important patient information WARNING Danger as a result of self-diagnosis Do not undertake any changes to your treatment and/or take medication due to the measured values ▪... - Page 10 Safety WARNING Danger of tissue bleeding or haematoma. ▪ When using the blood pressure monitor, make sure it does not impede the blood circulation in your arm. ▪ If you have sensitive bodily tissue, despite the correct positioning of the cuff, it can still result in tissue bleeding or haematoma.
- Page 11 Safety WARNING Danger of injury as a result of putting on or pumping up a cuff on an arm on the same side of the body as a mastectomy has been carried out Do not apply the Tel-O-Graph BT cuff to the arm on the side where a mastectomy was performed. ▪...
- Page 12 Safety WARNING Danger of blood flow interruptions as a result of steady cuff pressure or too frequent measuring ▪ Ensure the cuff hose is in the correct position and take care that the cuff hose is not knotted, pinched, kinked or stretched. ▪...
- Page 13 Safety ▪ Measurement can be interrupted at any stage by pressing the button. This deflates the cuff and the cuff can be removed. WARNING Risk of injury if used on patient groups for whom this device is not intended The Tel-Graph ®...
-
Page 14: Important Device Instructions
(e.g. transformers and cables) may cause increased electromagnetic interference or have reduced electromagnetic immunity. You should therefore only use genuine IEM accessories. The cuff and the hose are made of a material that does not conduct electricity. They thus protect the ▪... - Page 15 Safety ATTENTION Batteries ▪ Remove the batteries from the battery compartment when they no longer have any charge or if you do not expect to use the blood pressure monitor for a longer period of time. ▪ Do not throw batteries into fire and never expose them to high temperatures! Do not attempt to recharge the batteries.
- Page 16 Safety ATTENTION Fluid damage to the blood pressure monitor ▪ Liquid must not penetrate the device. If you believe that liquid has penetrated the device during cleaning or use of the blood pressure monitor, the device must no longer be used. If the blood pressure monitor is exposed to moisture, switch the blood pressure monitor off and remove ▪...
-
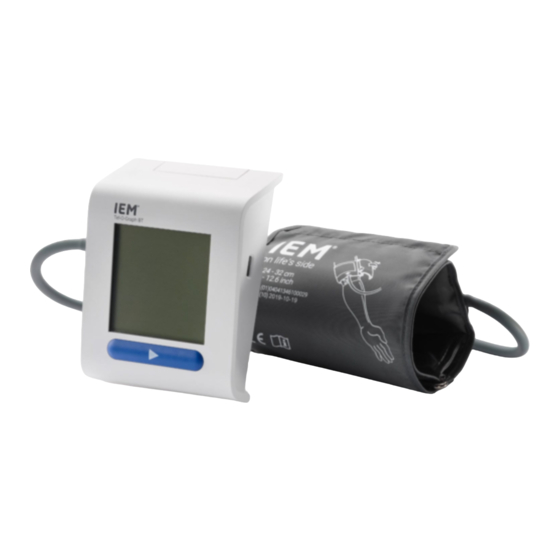
Page 17: Description Of Device
Description of device 4 Description of device Blood pressure monitor Fig. 1: Blood pressure monitor Display Battery cover Infrared interface (for service) Air hose socket - Button... -
Page 18: Blood Pressure Cuff
Description of device Blood pressure cuff Fig. 2: Blood pressure cuff Blood pressure cuff Air hose Air hose connection... -
Page 19: Display
Description of device Display Fig. 3: Display When this appears: Battery empty Number of pulse beats per minutes Display of systolic (upper) value Pulse detected Data transfer Number of measurement values Bluetooth ® Display of diastolic (lower) value Infrared communication... -
Page 20: Ambient Conditions
Description of device Ambient conditions ATTENTION ▪ Extreme temperatures, humidity or air pressure can influence measurement accuracy. Please follow the operating instructions. Extreme temperatures, humidity or altitude can affect the performance of the blood pressure monitor. ▪ Do not store the device near a fireplace or heating unit and do not expose it to intense sunlight. Do not place the device near a nebuliser or steam generator, as the condensation may damage it. -
Page 21: Preparing The Measurement
Preparing the measurement 5 Preparing the measurement Unpacking Note All parts included in delivery package have been properly packed and checked for completeness and functionality. Should the product be incomplete, damaged or defect, please inform your healthcare provider/physician immediately. WARNING Risk of strangulation from the cuff hose and blood pressure cuff! Keep the blood pressure cuff out of the reach of children! ▪... -
Page 22: Inserting The Batteries
Preparing the measurement Inserting the batteries Open the battery cover on the underside of the blood pressure monitor. Insert four batteries (AA, alkaline), with the poles aligned correctly. Close the battery cover. The blood pressure monitor switches on automatically, carries out a display test and displays the start screen. -
Page 23: Switching The Blood Pressure Monitor On/Off
Preparing the measurement Fig. 5: Test screen Switching the blood pressure monitor on/off Switching on Press the button. The display shows the start screen (Fig. 6). Fig. 6: Start screen Switching off The blood pressure monitor switches off automatically after about 5 minutes. -
Page 24: Measuring Blood Pressure And Pulse
Measuring blood pressure and pulse 6 Measuring blood pressure and pulse Before measuring Choose the right cuff size. The blood pressure cuff size is printed on the cuff. ▪ ▪ Avoid eating, smoking or any strenuous activity directly before the measurement. All these factors affect the results. - Page 25 Measuring blood pressure and pulse WARNING Danger of injury as a result of allergic reactions to the cuff material! ▪ In the event of pain or allergic reaction, remove the cuff. Follow the instructions on cleaning and disinfection (see chapter 9.2) ▪...
- Page 26 Measuring blood pressure and pulse Note To obtain accurate blood pressure and pulse wave readings, it is very important that the correct cuff is used. Uncover your left upper arm. Note The blood pressure cuff must be directly against your skin. Insert your left arm into the blood pressure cuff.
- Page 27 Measuring blood pressure and pulse Position the blood pressure cuff correctly (see Fig. 8): The hose must run down the middle of the inside of your lower arm towards your middle finger. The lower edge of the cuff must be about 2 cm (0.8 in) above your elbow.
-
Page 28: Correct Posture
Measuring blood pressure and pulse Correct posture After positioning the blood pressure cuff, assume the correct posture to take the measurements (Fig. 9). Sit down comfortably on a chair to measure your blood pressure. Place your elbow on a table or a solid surface. Lean back in your chair. -
Page 29: Measuring
Measuring blood pressure and pulse Measuring WARNING Risk of injuries during measurement! ▪ Do not place the air hose around your neck. ▪ If you feel any pain during the measurement, stop the measurement. Do not place the blood pressure cuff over wounds. ▪... -
Page 30: Stopping The Measurement
Measuring blood pressure and pulse Note To record the pulse wave, the Tel-O-Graph ® BT inflates the cuff to the diastolic blood pressure for approximately 10 seconds after measuring the blood pressure. After the measurement, all the air is let out of the blood pressure cuff. The display shows your blood pressure and your pulse rate. -
Page 31: Transferring Readings Via Bluetooth
Transferring readings via Bluetooth ® 7 Transferring readings via Bluetooth ® If the blood pressure monitor is configured to transfer readings via Bluetooth ® , readings will be sent to the database automatically. All readings which have not yet been sent to the database will be sent together. The blood pressure monitor will emit a short beep after transferring readings to confirm that the readings have been transferred successfully. - Page 32 Transferring readings via Bluetooth ® Note Please consult the operating instructions for your device. The blood pressure monitor should be no more than 10 m from the device, otherwise it may not be possible to establish a data connection. Press the button.
-
Page 33: Passive Pairing (Hms Cs)
Transferring readings via Bluetooth ® Note There should be only one other Bluetooth device in the surrounding area. ® Passive Pairing (HMS CS) Note Pairing requires some basic familiarity with Bluetooth ® . If you are not familiar with Bluetooth ®... -
Page 34: Memory
Memory 8 Memory Saving readings The blood pressure monitor can save 350 blood pressure readings and 350 pulse rate readings. If there are more than 350 readings (15 readings with PWA), the oldest data will be overwritten by the new readings. Fig. -
Page 35: Delete Readings From The Device
Memory Note Previously transmitted data is retained in the database and is not overwritten. Delete readings from the device To clear the memory on your blood pressure monitor, proceed as follows: Press and hold the button on the blood pressure monitor for about 6 seconds. - Page 36 Memory Note The Infrared transmission (IR) menu option is intended for service personnel only. Wait until [c lr] flashes on the display. Press the button. You will hear an acoustic signal and the display will be shown [c lr] permanently. Press and hold the button for more than 3 seconds.
-
Page 37: Cleaning And Disinfection
Cleaning and disinfection 9 Cleaning and disinfection WARNING When putting the blood pressure monitor on, there must no longer be any disinfectants on the blood ▪ pressure cuff! There are patients who have intolerances (e.g. allergies) to disinfectants or its components! ▪... -
Page 38: Cleaning
Cleaning and disinfection Cleaning ATTENTION To clean, use lukewarm water up to 30 °C at most, to which you can add a mild detergent if necessary. ▪ (Never use abrasive or solvent-based detergents as these can damage the surface of the blood pressure monitor and the cuff.) ▪... - Page 39 Cleaning and disinfection Cleaning the bladder and hose: The bladder needs to be removed from the cuff sleeve before cleaning. To remove the bladder, pull the end of the cuff out of the clasp and spread the cuff out fully. Remove the bladder and hose by pulling the bladder out of the bladder compartment via the slit provided for this purpose on the inside of the cuff.
-
Page 40: Disinfection
▪ Terralin Liquid (Manufacturer: Schülke & Mayr) When using other disinfectants not checked by IEM GmbH, the user is responsible for the proof of use without damage. Never use disinfectants which leave residue on the product or which are not suitable for contact with the skin. -
Page 41: Maintenance
In certain countries, this requirement may be regulated by national laws or regulations. The metrological check comes at an additional cost and can be carried out in Germany by either IEM GmbH, a competent authority or by authorised maintenance services corresponding to the "Medizinprodukte-Betreiber- Verordnung"... -
Page 42: Disposal
Disposal 11 Disposal Blood pressure monitor The symbol on the product or packaging means that this product should not be treated as normal domestic waste, but has to be taken to a recycling point for electric and electronic devices. You can find out more about this from your local authority, the communal disposal companies or the shop in which you bought the product. -
Page 43: Error Messages
Error messages 12 Error messages Blood pressure measurement errors The blood pressure monitor indicates blood pressure measurement errors and communication errors by emitting 12 short acoustic signals. Error Possible cause Remedy description Err 1 Arm moved during Keep your arm still during the measurement (Chapter 6.3). measurement. - Page 44 Error messages Error Possible cause Remedy description Power pack or battery voltage Change the batteries (Chapter 5.2). Err 5 too low. Battery contacts are corroded. Clean the battery contacts with a cotton cloth and a little alcohol. Check the blood pressure cuff for air congestion or a kink in Err 6 Air congestion the air hose.
-
Page 45: Communication Error
Error messages Communication error Error Possible cause Remedy description Cod 1 Error during pairing Repeat the pairing process (Chapter 7.2). The data transfer device Switch the device on. is switched off Check that the data transfer device is switched on. If this error Cod 2 No Bluetooth ®... -
Page 46: Technical Data And Symbols
Technical data and symbols 13 Technical data and symbols Technical data The blood pressure monitor complies with the EMC directives. The blood pressure cuff and air hose are made of a non-conductive material. This makes the device defibrillator safe. Specification Value Unit Measuring method... - Page 47 Technical data and symbols Specification Value Unit Ambient pressure 700 to 1060 Transport temperature -25 to +70 °C Storage temperature -25 to +70 °C Rel. air humidity, not condensing (operation, 15 to 93 transport and storage) Battery capacity c. 500* Measurements Data connection Bluetooth...
- Page 48 Technical data and symbols Symbol Meaning CE 0044: Labelling of a medical device in accordance with directive 93/42/EEC Protect from rain and moisture MR unsafe: This product presents hazards in environments where magnetic resonance tomography is performed. Comply with the operating manual The symbol on the product or packaging means that this product should not be treated as normal domestic waste, but should be taken to a recycling point for electric and electronic devices.
-
Page 49: Warranty And Repairs
14 Warranty and repairs Warranty information IEM GmbH provides a two-year warranty on the blood pressure monitor from the date of sale. Proof of the date of sale shall be provided in the form of a properly completed warranty card or an invoice. - Page 50 Warranty and repairs ATTENTION Do not open the casing. ▪ Once the device is opened, all warranties will lapse. Repairs If the device has functional errors, please contact our customer service department who will also inform you about shipping procedures.
-
Page 51: Manufacturer's Emc Guidelines
Manufacturer’s EMC guidelines 15 Manufacturer’s EMC guidelines Electromagnetic interference emissions The Tel-O-Graph ® BT is intended to be operated in the electromagnetic environment specified below. Only use the Tel-O-Graph ® BT in such an environment. Measurements of – interference Compliance Electromagnetic environment guidelines emmisions... - Page 52 Manufacturer’s EMC guidelines Elektromagnetic immunity The Tel-O-Graph BT is intended to be operated in the electromagnetic environment specified below. Only use the ® Tel-O-Graph BT in such an environment. ® Measurement of Electromagnetic environment – interference Test level Compliance level guidelines emissions Electrostatic...
- Page 53 Manufacturer’s EMC guidelines Measurement of Electromagnetic environment – interference Test level Compliance level guidelines emissions Magnetic field at 30 A/m 30 A/m Magnet fields at mains frequency should supply frequency match the typical values found in (50/60 Hz) in business and hospital environments. accordance with IEC 61000-4-8 IEC 61000-4-11...
- Page 54 Manufacturer’s EMC guidelines The Tel-O-Graph BT has been tested with the following frequencies: ® Measurement of interference Test level Compliance level emissions RF interference 380 - 390 MHz 380 - 390 MHz emissions according to 27 V/m; PM 50%; 18 Hz 27 V/m;...
Need help?
Do you have a question about the Tel-O-Graph BT and is the answer not in the manual?
Questions and answers