IEM Mobil-O-Graph NG Operating Instructions Manual
Ambulatory 24-hour blood pressure monitoring system
Hide thumbs
Also See for Mobil-O-Graph NG:
- Operating manual (385 pages) ,
- Operating manual (322 pages) ,
- Operating instructions manual (92 pages)

Related Manuals for IEM Mobil-O-Graph NG


Summary of Contents for IEM Mobil-O-Graph NG
- Page 1 Operating instructions Ambulatory 24-hour blood pressure monitoring system 0044 Blood pressure monitor Evaluation units: ® HMS for WINDOWS Version 7.x Dealer:...
- Page 2 ® Copyright © Mobil-O-Graph NG Revision 1.5 05/2007 I.E.M. GmbH All rights reserved. The contents may not be copied or published without written permission from I.E.M. GmbH. Manufacturer: I.E.M. Industrielle Entwicklung Medizintechnik GmbH Cockerillstraße 69 D-52222 Stolberg Tél.: +49 2402 - 9500 0 Fax: +49 2402 - 9500 11 email: iem.office@iem.de homepage: www.iem.de...
-
Page 3: Table Of Contents
CONTENTS TABLE OF CONTENTS 1. Introduction Foreword ......................... 1.1 The operating instructions ....................1.2 Clinical tests...................... ... 1.3 CE mark........................ ..1.4 Scope of delivery...................... 1.5 2. Operating instructions Correct use ........................2.1 Incorrect use ........................2.2 Indication......................... 2.3 Side effects of long-term blood pressure monitoring ............2.4 Important instructions for the doctor ................2.5 Important instructions for the patient ................2.6 3. Product description Introduction ........................ - Page 4 CONTENTS Analysis........................... 4.8 Profile display ............................4.8.1 Histogram ............................... 4.8.2 Table of measurements ......................... 4.8.3 Report of findings (statistics) ......................... 4.8.4 Comparing two series of measurements ....................4.8.5 Hourly mean values ..........................4.8.6 Changes in blood pressure ........................4.8.7 Correlation ............................. 4.8.8 Comments .............................. 4.8.9 Settings ........................... 4.9 5. Care and maintenance 6. Troubleshooting Principal sources of error ....................6.1 Battery voltage curve ...................... 6.2 Transmission errors ......................
-
Page 5: Introduction
® The Mobil-O-Graph NG blood pressure monitor fulfils the requirements of the ESH (European Society of Hypertension). 1.4 CE mark ® The Mobil-O-Graph NG fulfils the requirements of the Medical Products Directive 93/42/EEC and bears the CE mark. ® The Mobil-O-Graph NG fulfils the requirements of the R&TTE Directive 1999/5/EU and bears the CE mark. The declaration of conformity for this product can be downloaded from the I.E.M. website www.iem.de. This device fulfils the requirements of the standards applicable in accordance with the Directives. In particular, it fulfils the applicable requirements of the following standards: 1. EN 1060-1 Noninvasive blood pressure measuring equipment – Part 1: General requirements 2. EN 1060-3 Noninvasive blood pressure measuring equipment – Part 3: Supplementary requirements for electromechanical blood pressure measuring systems 1.5 Scope of delivery Basic set: Analysis options: 1. ABP monitor Mobil-O-Graph NG ® ® Analysis unit HMS for Windows 2. S , M und L Cuffs 1. HMS software on CD... -
Page 6: Operating Instructions
The equipment must never be connected to a PC or other unit while still fitted to the patient. The use of components not supplied with the equipment can lead to incorrect readings. ® The air tube between the Mobil-O-Graph NG recorder and the cuff must never be knotted, compressed or stretched. -
Page 7: Important Instructions For The Patient
® The Mobil-O-Graph NG fulfils the requirements of EMC standards; nevertheless, the Mobil-O-Graph NG® should not be exposed to strong electromagnetic fields, as outside the limits they may cause malfunction. The cuffs and the tube are made of electrically nonconductive material. They thus protect the device from the effects of a defibrillator discharge. -
Page 8: Product Description
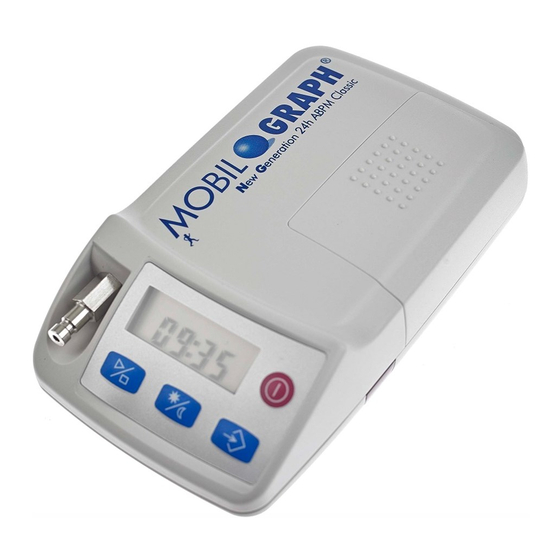
3. PRODUCT DESCRIPTION 3. Product description 3.1 Introduction ® The Mobil-O-Graph NG system consists of two principal components: ® Mobil-O-Graph NG Basic set with various cuffs and further accessories Interpretation software for the doctor to evaluate the readings. Readings from the ABP monitor can be interpreted using the Analysis unit (either: HM Client software or HM Windows software). Using the software, saved readings can be downloaded to a PC, presented on the screen in various forms, as diagrams, lists and statistics, and printed out. ® The Mobil-O-Graph NG can then be prepared immediately for the next patient. With little practice, this procedure can be completed in just a few minutes. This allows the doctor to use the equipment on each working day, around the clock. ® The Mobil-O-Graph NG monitoring system is designed to allow the recording and display of a blood pressure profile throughout the day and night. Additional parameters are detected, such as nocturnal values and blood pressure variati- ons. This allows the doctor to prescribe the optimum medication for the individual and to monitor the therapeutic outco- 3.2 Unpacking All parts supplied are packed carefully for despatch and checked for completeness and correct function. Should the goods supplied be incomplete or damaged, please notify the supplier without delay. 3.3 The monitor Components: 1: Cuff tube/air connector 2: Cuff connection 3: START key 4: DAY/NIGHT key 5: EVENT key... -
Page 9: Display
Both the doctor and the patient should be aware that the metal plug (air connector) must always engage with an audible click. Otherwise there will be a leaky connection between the ® Mobil-O-Graph NG and the tube that will produce incorrect measurements. 3.3.6 Data port The data port is located on the left-hand side of the housing (see Figure 3.1 Monitor, top view). The connector cable... -
Page 10: Preparing For Monitoring
Current 24-hour time: 21:45 (Example) If a fault occurs during the internal test, the recorder shows E004 on the display and emits an acoustic signal. For safety reasons, use of the recorder is blocked. Return the recorder to your specialist dealer or direct to IEM GmbH for repair without delay. 3.4.2 Clearing the memory The memory must be cleared before each monitoring session, i.e. no blood pressure data from the previous patient must be left in the memory. However, should values still be present, you can delete them with the delete function of the software. You can delete the memory manually by pressing and holding down the start button for at least 5 seconds. While holding down, all segments of the LCD are highlighted followed by a single beep. Subsequently the number of the recordings is shown, followed by “clr”. -
Page 11: Specifying The Measurement Protocol Required
3.4.5 4. PRODUKTBESCHREIBUNG 3. PRODUCT DESCRIPTION 3.4.5 Specifying the measurement protocol required You can use the Protocol key to choose one of nine (1–9) protocols. Once you have completed one measurement, the protocol cannot be changed until deletion of all data has been com- pleted. The protocols can be set using the analysis software. You can set the protocols manually by holding down the Day/Night and then pressing the Event key. Use the Start/Stop key to change the protocol, and confirm with the Event key. Protocol Day time Night time Measurements Acoustic Value shown on per hour signal display 08:00 23:59 YES 00:00 07:59 08:00 22:59 YES 23:00 07:59 07:00 21:59 YES 22:00... -
Page 12: Technical Data
Diastolic 30 to 195 mmHg Accuracy: +/- 3 mmHg in the range indicated Static pressure range: 0 to 300 mmHg Pulse range: 30 to 240 beats per minute Method: oscillometric Measurement intervals: 0, 1, 2, 4, 5, 6, 12 or 30 measurements per hour Monitoring protocols: 2 modifiable interval groups Storage capacity: 300 measurements Battery capacity: > 300 measurements Operating temperatures: +10°C to +40°C Operating humidity: 15% to 90% Storage environment: - 20°C to 50°C and 15% to 95% humidity Dimensions: 128 x 75 x 30 mm Weight: approx. 240 g including batteries Power supply: 2 NiMH batteries, each 1.2 V and at least 1500mAh (AA, Mignon) 2 alkaline 1.5 V batteries (AA, Mignon) Interfaces: Serial (cable) Infrared IEM-specific Bluetooth (Class 1/100 m I.E.M. GmbH, Mobil-O-Graph®, Bedienungsanleitung, Rev. November 2000 ® Mobil-O-Graph NG , Operating instructions, Rev. 1.5 05/2007, GmbH... -
Page 13: Symbols
4. PRODUKTBESCHREIBUNG 3. PRODUCT DESCRIPTION 3.6 Symbols Battery symbol Meaning: The symbol shows the type of voltage. Disposal of used electrical and electronic appliances Meaning: This symbol on a product or its packaging indicates that the product should not be treated as normal household waste, but must be returned to a recycling point for electrical and electronic appliances. You can obtain further information from your local authority, local waste disposal plants or specialist dealers. Defibrillator rating Meaning: BF defibrillator rated equipment Caution, consult accompanying documents Meaning: caution, consult accompanying documents Manufacturing date Meaning: Date of manufacture CE mark Meaning: The device fulfils the basic requirements of the European Directives on medical products. I.E.M. GmbH, Mobil-O-Graph®, Bedienungsanleitung, Rev. November 2000 ® Mobil-O-Graph NG , Operating instructions, Rev. 1.5 05/2007, GmbH... - Page 14 ® 4. Hypertension Management Software for Windows ® Hypertension Management Software for Windows Blood pressure is measured by the ABP monitor and the reading stored. On completion of measurements, the stored readings are transferred to your computer, and you can then evaluate them according to your requirements. A patient file is prepared, containing all important data such as: * Personal patient ID number (obligatory entry) * Name (obligatory entry) * Address, telephone number * Personal data (age, sex etc.) * Medication The software program offers you various options for analysis. You can choose to display the results on your screen or print them out directly as: * Display of all individual measurements * Statistical analysis with mean blood pressure values for the whole day, and for the daytime and night-time periods and the first hour after waking, plus hourly mean values * Extreme values (maximum and minimum values) * Percentage incidence of values above a predetermined limit * Standard deviation (variability) * Calculation of day/night reduction * Graphs such as: * Curve of measurements * Bar chart of measurements * Histogram of blood pressure distribution * Curve comparison for optimising treatment * Envelope curve of hourly mean values * Curve of blood pressure changes * Correlation * Pie chart of percentage of values exceeding limits This equipment allows rapid and simple visualisation of the course and fluctuations in blood pressure over the day and night. Medication can be adjusted to take the best possible account of these changes. ® ® Using the same program, readings from the “Klock ” - the blood pressure monitor wristwatch - and the Stabil-O-Graph - the upper arm blood pressure monitor - can also be entered and the data managed. An infrared eye is required for data transfer. For further information, please contact your specialist dealer or I.E.M. GmbH direct. 4.1 Installation 4.1.1 Installation in Windows 95 / 98 / NT / 2000 / ME / XP Switch on your PC. Insert the CD into the CD-ROM drive. If installation does not start automatically, choose “Start”, enter <cd>:\SETUP and click ENTER (<cd> represents the CD-ROM drive).
-
Page 15: Hypertension Management Software For Windows
® 4.2.2 4. Hypertension Management Software for Windows Network installation: Contact your practice IT manager 4.1.2 Update installation ® Should an older version of HMS for Windows already be installed on your PC, proceed exactly as for the initial installation (see 4.1.1). All existing patient data and measurements will be retained. ® To use the Mobil-O-Graph NG you need Version 7.0 or later. 4.2 Program structure The program is designed to allow you to move step by step through it from the first screen displayed. You can either use the mouse or move by using the function keys F1–F12. You can also use the program with the “Alt” key + the underlined letters and/ or the cursor keys (arrow keys). The description given below in this manual is for mouse opera- tion only, as this is the most convenient method, but you can, of course operate without a mouse, as is clear from the instructions. 4.2.1 Menu bar The menu bar displays all operating or selection criteria for the screen in question. Figure 4.2.1: Menu bar (excerpt) 4.2.2 Toolbar Using the toolbar (see Figure 9.1: Menu bar (excerpt)) you can simplify and speed up your work, as the main func- tions (buttons shown on the active areas) are directly available by clicking the appropriate symbol. If you do not wish to use the toolbar, you can remove it from the screen, by going to the “Settings” menu and clik- king on the “Toolbar” command. Click this command again to make the toolbar visible again. Figure 4.2.2: Toolbar 4.3 Brief instructions 1) Load existing patient or set up a new patient. Note: After setting up a new patient, selection of the available series of measurements must be discontinued, as no monitoring session has yet been recorded. 2) Connecting to the recorder (co mode). See section Preparing the monitor. 3) Send patient ID number to recorder, and check the protocol used and time. 4) Close HMS for WINDOWS and disconnect the monitor from the computer. 5) Switch recorder off and on again. When the time is displayed, the recorder is ready to be fitted to the patient as described in the section Preparing for monitoring. -
Page 16: Help
® 4. Hypertension Management Software for Windows 4.4.4 Evaluations: Now simply run through the various evaluations by clicking on the symbols.. This will give you an initial overview of the variety of analysis and display options offered by the program. You will always return to the basic screen when you click Close. 4.4.2 Help You can call up various Help topics from all parts of the program. It is also possible, for example, to call up the Direct help screen, which gives explanations on the topic you are currently processing. In addition, however, you can also have displayed detailed help screens on particular questions or topics. To make use of this option, call up the menu. Under the menu commands “Contents”, “Search” and “Use help”, you have a wide variety of question options, topic overviews and explanations of functions. 4.4.3 Window Using the “Window” menu you can see how many windows you have opened at one time. Click the appropriate window to move backwards or forwards between the various analyses. 4.4.4 Closing the program To leave the program click “Close” either using the button or the command in the “Patients” menu. 4.5 Patient data 4.5.1 Entering new patients in the database Using the button or the “New” command in the “Patients” menu, call up the input screen for entering new patients Figure 4.5.1: Patient data Move through the record sheet during input using the tabulator key. For later allocation of measurements, however, the only other important feature apart from the ID number is the name (both inputs are sort and search criteria). All other information is voluntary. Using the “Diagnosis” field, you can enter your diagnosis for the patient in a text field. The “Extended” switch opens a box for entering more detailed patient information, such as medication, telephone number, email address or the one-off blood pressure result taken manually. Once entered, the values are available at all times and can also be changed. ® Mobil-O-Graph NG , Operating instructions, Rev. 1.5 05/2007, GmbH... -
Page 17: Loading Stored Patient Data
® 4.5.3 4. Hypertension Management Software for Windows To save the new patient, click OK If you do not wish to save the data entered, click Close. You will again be asked whether the data should be saved. If you click “No”, the data will not be saved and the win- dow will be closed. 4.5.2 Loading stored patient data From this list, select a patient, to see their findings to date, to program the recorder for this patient or to allocate a new series of results to the patient. From this list, select a patient, to see their findings to date, to program the recorder for this patient or to allocate a new series of results to the patient. Figure 4.5.2: List of patients You can load the patient either by double-clicking his or her name in the list, or by marking the name with a single click and then opening using the “OK” button. Search: Enter the surname of the patient in the “Name search” field to find him or her quickly. Alternatively, you can enter the patient’s ID number in the “Pat. no. search” field. List: If you click on the “Print list” field, the whole list of patients will be printed, sorted either alphabetically by name or by patient ID numbers, depending on the sort criterion selected. 4.5.4 Exporting readings (ANSI file) It is possible to store the reading from long term monitoring, which have been loaded from the recorder and then evaluated, as a report of readings, so that they are available to your practice system. Set up: If, after selecting a series of measurements for a patient in the “Measurements” menu, you click the command “Save values in ANSI format“, the program automatically converts the data into an ANSI file. You can then access these data from your practice system. Export file: If you wish to change the specified name of the export file, you can do so via the “Settings” menu with the command “ANSI export file”. In this dialogue box you can enter the required name and directory of the export file. ®... -
Page 18: Mobil-O-Graph Ng ® Blood Pressure Monitor
® 4. Hypertension Management Software for Windows 4.5.4 ® 4.6 Mobil-O-Graph NG blood pressure monitor” 4.6.1Preparing the monitor Connection via cable: Make sure that your PC is switched off. Connect the interface cable supplied to the selected interface of your PC. The other end of the cable is now connected to the recorder, which must be switched off. The plug is inserted in the port on the recorder until it engages. Please do not force it! Switch on the monitor. The letters “co” should be visible on the display. If your PC does not have a free serial port, you can also use a USB port with the USB combi cables. Connection ® via infrared: Switch on the Mobil-O-Graph NG . Open the interface menu by pressing and holding the Start key, and then pressing the Day/Night key. You can now choose between the flashing messages “co”, “bt” and “PAIr” with the Start key. Select “co” and confirm this with the Event key. The letters “co” now longer flash and the inter face is active. Now point the “IR-Med” IR interface, which is connected to your PC, towards the ® IR interface of the Mobil-O-Graph NG at a distance of 10–15 cm. Two IR interfaces are available from I.E.M. (see also Figure 4.7.1): - IR-Med with serial interface to PC - IR-Med with USB interface to PC Note: - The devices are not compatible with existing built-in infrared interfaces, for example in laptops. - If there is no activity, the “co” mode will stop after 10 minutes. Set-up: You must first decide on a free serial port on your PC. In the “Settings” menu you can use the “Interface for monitor” command to open a dialogue window, in which you can select the serial... -
Page 19: Downloading From The Monitor After The 24-Hour Monitoring Session
® 4.6.2 4. Hypertension Management Software for Windows Figure 4.6.1: Monitor test Click the individual test functions to test the equipment accordingly. Patient ID number: The patient ID number just stored in the monitor is saved by clicking the active area, so that readings can later be allocated to the patient automatically when downloaded to the PC. Switching off: Now switch the recorder off, and disconnect the PC connector cable. Now switch the equipment on again; after the battery voltage has been displayed, the display will show the time. Protocol: By pressing and holding the Day/Night key while pressing the Event key, check whether the right measurement protocol has been saved (protocols1 and 2 can be changed as you wish). The protocol can also be selected directly from the PC in “Preparing the monitor”, by marking the button with an X by clicking. Note: It is extremely important always to check the protocol set before starting the long-term moni toring process, since no further change can be made to the protocol once the first measurement is under way. Measurement: Please follow the instructions in the sections Preparing for monitoring, section. 3.4/ Putting on the Monitor and starting measurements section. 3.4.6 and Instructions for the patient section.2.6. 4.6.2 Downloading from the monitor after the 24-hour monitoring session Reconnect the monitor to your PC, and the switch the monitor on. “co” is shown again on the display. If you are using the IR interface, select “co” using the keys of the Mobil-O-Graph NG® (see section 4.6.1). If you stored the patient’s ID number in the recorder during preparation of long term monitoring, you now only need to select the “Download” command from the basic screen in the “Monitor” menu or click the button, to have the measurements allocated automatically to the patient. However, if you have not stored the patient ID number in the recorder, you must first load the patient (see section 4.5.2), in order to use the “Download” com- mand in the “Monitor” menu. After downloading you will be asked whether you wish to delete the data in the recorder. If the transfer was completed without an error message, click “Yes” to allow you to prepare the recorder for the next patient. If you do not delete the data at this point, you will be reminded to do so again later when you are setting up the new patient. ® Mobil-O-Graph NG , Operating instructions, Rev. 1.5 05/2007, GmbH... -
Page 20: Stabil-O-Graph (Optional)
® 4. Hypertension Management Software for Windows 4.7.2 ® 4.7 “Stabil-O-Graph ” (optional) ® 4.7.1 Infrared data transmission using the “Stabil-O-Graph ” ® The Stabil-O-Graph provides a wireless method of exchanging data with a computer (PC) via an infrared interface. Data exchange is possible as soon as the infrared connection between the device and the computer has been established. I.E.M. provides two IR interfaces: - IR-Med with serial interface to PC - IR-Med with USB interface to PC Note: The devices are not compatible with existing built-in infrared interfaces, for example in laptops. ® The IR interface provided by I.E.M. can also be used for your Mobil-O-Graph NG System requirements * Computer with a free serial 9-pole interface, or computer with a free USB interface. * Successfully installed HMS software * Separate infrared interface (see Fig. 4.7.1) Figure 4.7.1: Infrared interface with 9-pole serial connection Installation instructions for the serial infrared interface 1. Take care to ensure that your PC is switched off. Connect the infrared interface to a free serial port at the rear of the computer and tighten the screws. Figure 4.7.2: Connecting infrared interface to the computer 2. Switch on the computer and start the software. -
Page 21: Analysis
® 4.7.3 4. Hypertension Management Software for Windows Figure 4.7.3: Pointing the infrared interface • Start your Hypertension Management software for Windows.. • Either create a new patient using the function, or use the function to select an existing patient; confirm with “OK”. • Click the function to prepare the unit. • In the window that opens Figure 4.7.4 you can enter, activate and send reminder times, perform various tests, and set the current time. • Now click the . field • Click to close the program. • After data transmission is complete, please pick up the monitor and press any key (time and date are shown). • Now the device is ready to carry out blood pressure monitoring again. 4.8 Analysis After you have downloaded the readings into the HMS program, you have many analysis and representation possibili- ties to choose from. These are described below. Important: To enter the basic screen for the individual representations, you must first call up the personal data for the patient you require via the “Patient” menu using the “Load” command. After you have clicked “OK”, you can decide on particular measuring series by marking it and clicking “OK”, or double-clicking the measuring series. Now you are taken to the modified basic screen by displaying the various analyses for the selected measuring series. ® Mobil-O-Graph NG , Operating instructions, Rev. 1.5 05/2007, GmbH... -
Page 22: Profile Display
® 4. Hypertension Management Software for Windows 4.8.1 Profile display The Profile display shows the following values from the selected measuring series graphically as a function of time in a diagram: * systolic values * mean values * diastolic values * pulse You can call up the Profile display either via the “Measurements” menu using the “Profile” command, or by clicking the button. A diagram is drawn, from which you can read off the following details: Blood pressure: On the left edge of the screen you can see the ordinate for blood pressure in mmHg units. You can move the axis up and down using the scroll bar. The systolic, diastolic and mean blood pressures are related to this left-hand axis. Use the check box on the lower edge of the screen to switch the display of mean values on and off. Use the next selection field at the lower edge of the screen to select whether, and which hourly mean values to show additionally (up to a mean over 8 hours. Pulse: On the right edge of the screen is the ordinate scale for pulse. The unit is 1/min. Here, too, you can use the scroll bar to shift the axis. Pulse readings are related to this right-hand axis. Use the check box on the lower left edge of the screen to switch the pulse curve on and off. Time: The lower axis of the diagram shows time in hours. The bars above it show the intervals for day (red) and night (blue).Day counts all three daytime intervals together. “M” signifies manual measurements. Curve colours: The area enclosed by the curves for systolic and diastolic values is filled in with a colour that contrasts with the background. You can change the curve and background colours as you wish, by clicking the Colours button at the bottom right edge of the screen. In the window that now appears you can change the colours by clicking the colours button for the curve in question, select a colour and confirm your selection with “OK”. Limits: The upper limits set for the individual values for single measurements and mean values are entered as a theoretical curve (dotted line). If you wish to change the values for these blood pressure limits, use the “Limit” command in the “Settings” menu. Individual values: You can have the exact values for a measurement displayed by clicking any point on the blue screen at the time of the measurement. A vertical bar and a small window with the exact details of time and readings are then displayed. -
Page 23: Histogram
® 4.8.2 4. Hypertension Management Software for Windows 4.8.2 Histograms The histogram displays the frequency distributions of systolic and diastolic values and pulse in the form of three bar charts. You can call up these charts from the “Measurements” menu using the “Histogram” command, or by clicking the button. This chart displays the percentage within each decile occupied. In other words: the percentages of values measured for systolic and diastolic blood pressure, in the ranges, for example, 80–89 mmHg, 100–109 mmHg etc., are calcu- lated. Similarly for pulse, the frequencies of values in the ranges 50–59 1/min, 60–69 1/min etc., are calculated. These percentages are displayed as a bar chart. For example, the bar over the number 130 for systolic values shows the frequency of all systoles in the 130s, that is, all values in the range 130 to 139 mmHg. Basis: Using the selection field, choose a period to be used as the basis for calculations. “Total” means that all measurements are to be included; with “day” only measurements taken during the three daytime intervals will be considered, similarly, with “night” only values during the night interval. Should no data be available for any interval, you will be informed accordingly. %-Skala: Using the button, set the maximum frequencies that can be displayed. The lower the maximum values you choose, the higher the resolution you will obtain. Should frequencies occur that are higher than the maximum set, the bars concerned will be displayed in dark green and a small warning field will flash on the left next to the chart in question. In this case, choose higher maximum values for the percentage axis. Recalculate: The "Recalculate" button is active only if (with the frequency display open at the same time) you have switched the Inclusion in statistics setting on and off for at least one measurement in the table of measurements and, on returning to the histogram you have answered No to the question “Recalculate?”. This button recalculates the frequencies retrospectively, taking the changes into account. Comments: Click the "Comments" button to open a window in which you can make entries relating to the series of measurements. These entries in the Comments field apply to all other Comments fields. Printout: If you wish to print out the frequency distributions, please click the button, or on the “Print” command in the “Patients” menu. By selecting “Page 2 (Frequency distributions)” with the appropriate base you can print out the histogram. -
Page 24: Report Of Findings (Statistics)
® 4. Hypertension Management Software for Windows 4.8.4 4.8.4 Report of findings (statistics) The Report of findings can provide various statistical statements on systolic and diastolic blood pressure. Open this window by clicking the “Report of findings” command in the “Measurements” menu, or just by clicking the button. Evaluations for day and night are performed separately. Intervalle: The Day and Night displays show the mean values and scatter (empirical standard deviation) for blood pressure values. The List field is used to calculate the number of readings lying above a certain limit. The individual values from the “Global limits” dialogue field are used as standard. The result shows how many values from all valid measurements satisfy the comparison; the percentage is shown by the bars underneath. If no data are available for an interval, the grid remains empty. This may be the case if no measurements were taken during the period in question, or if all measurements have been excluded from statistical evaluation (by corresponding marking in the Table of measurements). Reduction: This field shows the percentage reduction in mean blood pressure values (= mean values) between the day and night intervals, and the mean blood pressure value within one hour of starting the daytime interval. Recalculate: The Recalculate button is active only if (with the frequency display open at the same time) you have switched the Inclusion in statistics setting on and off for at least one measurement in the table of measurements and, on returning to the histogram you have answered No to the question “Recalculate?”. This button recalculates the frequencies retrospectively, taking the changes into account. Comments: Click the "Comments" button to open a window in which you can make entries relating to the series of measurements. Note: the BDT Export file contains all the information from the Report of findings. Printout: If you wish to print out the Report of finding, please click the button, or on the “Print” command in the “Patients” menu. Select “Page 4 (Report of findings)” to print out a statistical analysis of the measurement series Close: Close the “Report of findings” statistical analysis by clicking the "Close" button. -
Page 25: Hourly Mean Values
® 4.8.5 4. Hypertension Management Software for Windows Comments: Click the "Comments" button to open a window in which you can make entries relating to the main series of measurements. Close: Close the comparison of two series of measurements by clicking the "Close" button. 4.8.6 Hourly mean values It is also possible to display in tabulated form the hourly mean values for blood pressure and pulse rate from the series of measurements selected. To do this, open the tabulated display from the “Measurements” menu using the “Hourly mean values” command. Selection: You can now also select which hourly mean values you wish to display. You can select hourly values up to a mean value over 8 hours. Comments: Click the "Comments" button to open a window in which you can make entries relating to the series of measurements. Close: Close the tabulated display of hourly mean values by clicking the "Close" button. 4.8.7 Changes in blood pressure Use the “Measurements”-”Change in blood pressure” menu to monitor your patient’s morning rise in blood pressure. 4.8.8 Correlation Activate the “Measurements”- “Correlation” menu option, to open a window showing a correlation of diastolic and systolic blood pressure. Each point on the graph corresponds to a measurement. From the Total combination box you can select whether all readings, only daytime measurements or only night measurements, should be included in the correlation. In the “day” and “night” settings, the limits set are also displayed (see also 4.9 Settings, section Limits). 4.8.9 Comments As already described in previous sections, you can enter any notes and comments on a particular series of measurements for a selected patient in a special window. As well as being shown when viewing an evaluation by activating the appropriate button, these comments can also be called up by clicking the “Comments” command from the “Measurements” menu. For each monitoring session for a patient there are specific entries, relating for example to medication or a Report of findings. In this window you can enter as many lines as you wish, but only the first 20 lines will be printed (from the “Patients”... -
Page 26: Care And Maintenance
5. Care and maintenance ® To ensure the lasting optimum functioning of your Mobil-O-Graph NG , regular care and maintenance of the unit is necessary. Cleaning and disinfection: The user (doctor) decides, whether and when disinfection of the cuff sleeve is necessary for reasons of hygiene (e.g. after each use). For disinfecting the cuff sleeve, I.E.M. has successfully tested and recommends the following solutions: 1. Terralin Liquid (manufacturer: Schülke & Mayr) 2. Promanum N (manufacturer: B. Braun) Important: It is vital to observe the manufacturer’s instructions for the use of these products. Always leave the solution to dry completely. Avoid disinfecting the cuff bladder and connected rubber tube. Before disinfecting, take the bladder and the tube carefully out of the cuff sleeve. The bladder and tube may be damaged by disinfectants. Do not place the cuff sleeve in the disinfectant solution. This might damage it. When using other disinfectants not recommended by IEM, the user is responsible for proving harmless application. Never use disinfectants that leave a residue on the product or which are unsuitable for use in contact with skin. Caution: Some patients have intolerances (e.g. allergies) to disinfectants or their components. If you have such a patient or you are not sure, remove possible residues with careful washing. The cuff sleeve can be washed in a washing machine at max. 30°C using a mild washing powder. Do not use fabric softeners or other aids (e.g. disinfectant rinses, textile deodorants). These solutions may leave residues and damage the material. The cuff sleeve is not suitable for drying in a tumble dryer. The Velcro must always be fastened before washing. Bladder: Wash the bladder only with lukewarm water, adding a mild cleaning solution if neces sary, and wipe off. Take care to ensure that no water enters the tube opening. ® Monitor: Clean the Mobil-O-Graph NG only with a damp cotton cloth. Do not use corrosive liquids or solvents. Take care to ensure that no water enters the device. IMPORTANT: If liquid does penetrate the unit, switch it off immediately and send it to I.E.M. for testing. - Page 27 5. CARE AND MAINTENANCE Batteries: Rechargeable batteries age. Batteries that are damaged, or with which 24-hour monitoring is no longer possible, must be replaced immediately. The batteries will last substantially longer if they drain completely before charging them. The batteries supplied are of the nickel-metal hydride (NiMH) type. Self-discharge of these batteries depends on the ambient temperature. It is therefore recommended to leave the batteries in the charger until they are actually needed. We recommend using I.E.M. batteries exclusively, as their capacity and quality has been tested. Care should always be taken that the batteries’ capacity is above 1500 mAh. Battery charger: Follow the operating instructions included with the charger. ® Mobil-O-Graph NG , Operating instructions, Rev. 1.5 05/2007, GmbH...
-
Page 28: Troubleshooting
6. TROUBLESHOOTING 6. Troubleshooting 6.1 Principal sources of error The following may cause faulty readings or undesired results: • Arm movement by the patient during the measurement • Switching off the device (e.g. at night) • Incorrect cuff size fitted • Slipping of the cuff in use • Absence of successful manual measurement at the surgery • Failure to take medication • Incorrect protocol set by the user • Batteries not fully or correctly charged, or worn out • Defect in the charging unit 6.2 Battery voltage curve Figure 6.2.1 Figure 6.2.2 Rechargeable batteries OK / Batteries OK Rechargeable batteries old or too little capacity or wrong batteries 6.3 Transmission errors To avoid errors in data transfer, the monitor checks the data transmitted. If an error has occurred, E004 appears on the display 6.4 Check list Please run through the following check list if errors occur when using the Mobil-O-Graph NG®. Many faults are easily... -
Page 29: Error Tables
6. TROUBLESHOOTING 6.5 Error tables ® 6.5.1 Troubleshooting, Mobil-O-Graph NG Error symptom Possible cause Remedy After replacing batteries, the clock still The internal buffer battery is empty. The date and time can be set after shows 00:00 and the date 01.01.2006 The biennial calibration has not been each change of batteries. performed. The buffer battery is Send the device for calibration to your changed at the metrological check dealer or directly to IEM GmbH. The measurement data can no longer An error has occurred during saving of Delete the patient concerned (menu be called up or displayed. patient data. bar) and re-enter. The connection from the Mobil-O- 1. The incorrect COM interface is set. 1. Set the correct interface in the ® Graph NG to the PC is faulty. utilities program. 2. The cable plug or port is defective. 2. Examine the plug and socket on ®... - Page 30 2. Cuff not correctly fitted on the arm 2. Check the fit of the cuff and the unit Err 3 1. Battery voltage too low 1. Replace the batteries 2. Blood pressure outside 2. If this message continues, the measurement range monitor is not suitable for the patient Err 4 1. Data transfer cable not correctly 1. Plug the cable into the monitor inserted in the recorder correctly (see section Preparing the monitor) 2. Pins in plug of data transfer cable 2. Check the plug to see whether pins have suffered mechanical damage. inside are damaged. If so, call your dealer or IEM. 3. Measurement value not correctly 3. Start the transfer again. transferred. Err 5 1. Battery voltage too low 1. Replace the batteries bAtt 2. The battery voltage is correct, but 2. Batteries defective during cuff inflation, bAtt is shown on display. Replace the batteries. 3. Battery contacts are corroded 3. Clean the battery contacts with a cotton cloth and some alcohol Err 6 + possible continuous alarm until 1. Air tube blocked 1. Check the cuff for a blockage a key is pressed or kink in the tube. If there is a kink in the cuff tube, release the tube. Otherwise send the equip...
-
Page 31: Communication Errors, Stabil-O-Graph
6.5.2 6. TROUBLESHOOTING Error symptom Possible cause Remedy Err 9 + possible continuous alarm 1. Pressure remains in the cuff 1. Wait for the cuff to deflate until a key is pressed completely. 2. Zero-point adjustment could not be 2. Send the unit without delay to your performed successfully. dealer or direct to IEM GmbH for checking. Err 10 + continuous alarm until a key 1. Serious fault due to pressure Send the unit without delay to your is pressed buildup outside the measurement dealer or direct to IEM GmbH for chek- process (pump has switched on king and repair illegally) 2. These error messages all indicate a serious error in the program code. The analysis unit does not react to 1. Data transfer cable is not plugged 1. Check whether the 9-pole plug of data transmission, but co is shown in into PC the data transfer cable is sitting the display securely in the interface port 2. see also Err 4 2. see also Err 4 ® The Mobil-O-Graph NG... -
Page 32: Charging Units
7.2 CHARGING UNITS 4. PRODUKTBESCHREIBUNG 7 Charging units A common reason for reduced battery life is incorrect charging. If these batteries are used incorrectly they lose capa- ® city and are no longer able to supply the Mobil-O-Graph NG with power for 24 hours. Should the batteries have lost their charge during storage, please recharge accordingly. For further information, please see the notes in the Operating Instructions for the charging unit. Tips: • Charge these batteries fully before using them for the first time. • Please note that these NiMH rechargeable batteries reach full charging capacity only after their 4th charging cycle. • Recharge the batteries if they have been unused for some time. • Do not use batteries that have been stored at above 45°C or below 0°C. • To protect your batteries, avoid deep discharging. • Should the service life of the batteries sink significantly, replace all the batteries simultaneously. Never use old, used batteries together with new, unused ones! Care and maintenance: • Do not immerse the unit in water. • Clean the unit only when it is separated from the power supply. • Clean the unit with a soft, dry cloth. • Do not use cleaning fluids Safety instructions: • Never load non-rechargeable batteries. These may leak or explode and cause damage to health. • Do not dismantle the unit or the charger cable. • Cease using the unit if it has been damaged. 7.1 M2X If you are using the M2X or a structurally identical charging unit, you must observe the following instructions: • Before using it for the first time, plug the power plug supplied into a mains socket and the small plug into the jack on the charging unit. • Open the cover of the unit and place 1 to 4 rechargeable batteries individually into the upper level of the charger. (Check their polarity!) Each shaft has a separate charging circuit, and each of these four circuits can charge a battery. LED red light: Battery is being charged (quick charge) LED green light: Battery is charged (trickle charge) Bild 7.1 M2X model If the red LED light does not come on, check whether the battery is placed correctly in the shaft and is touching the contacts. Should the red light still not come on, the battery can no longer be charged. If the red light does not change... -
Page 33: Tl 4+4 Ultrafast Charger
4. PRODUKTBESCHREIBUNG 7. CHARGING UNITS 7.2 TL 4+4 Ultrafast Charger If you are using the TL 4+4 Ultrafast Charger or a structurally identical charging unit, you must observe the following instructions: • Before using the unit for the first time, remove the coloured adhesive strip beside the magazine (if available) and connect the power cable with the charging unit and a mains socket. • Place 1 to 4 rechargeable batteries individually into the upper charger. (Check their polarity!) • Note the signals of the upper red LEDs. They indicate the charging process and the completion of charging. • Remove the charged batteries. (The red light in question must be flashing!) Charging station LED red light: Batteries are being charged (quick charge) LED flashing red light: Batteries are charged (trickle charge) Note: when battery is correctly loaded, the light will flash once per sec- ond. Fast flashing (5 times a second) indicates a faulty rechargeable battery or a non-rechargeable battery. -
Page 34: Guarantee And Repair Conditions
Caution: Do not open the housing. If the unit has been opened, all guarantees become invalid Metrological checks: In accordance with the basic requirements and general Directives (e.g. 93/42/EEC, Medical ® Device Operators Ordinance Art. 11 and Appendix 2) the Mobil-O-Graph NG monitor must be subject to metrological checks every two years. Liability clause: In all cases in which I.E.M. is obliged by contractual or legal reasons to damages or reimbursement of expenses, we shall only be liable insofar as we, our executive personnel or auxiliary staff can be charged with intent or gross negligence. Liability regardless of fault shall remain unaffected in... -
Page 35: Appendix
Field strengths from fixed transmitters, such as base stations for radio (cellular/cordless) telephones and land mobile radios, amateur radio, AM and FM radio broadcast and TV broadcast cannot be predicted theoretically with accuracy. To assess the electromagnetic environment due to fixed RF transmitters, an electromagnetic site ® survey should be considered. If the measured field strength in the location in which the Mobil-O-Graph NG blood pressure monitor is used exceeds the applicable RF ® compliance level above, the Mobil-O-Graph NG blood pressure monitor should be observed to verify normal operation. If abnormal performance is observed, additional ® measures may be necessary, such as reorienting or relocating the Mobil-O-Graph NG blood pressure monitor. Recommended separation distances between ® portable and mobile RF communications equipment and the Mobil-O-Graph NG blood pressure monitor ® The Mobil-O-Graph NG blood pressure monitor is intended for use in an electromagnetic environment in which radiated RF disturbances are controlled. The customer ® or the user of the Mobil-O-Graph NG blood pressure monitor can help prevent electromagnetic interference by maintaining a minimum distance between portable and ® mobile RF communications equipment (transmitters) and the Mobil-O-Graph NG blood pressure monitor as recommended below, according to the maximum output power of the communications equipment. Separation distance according to frequency of transmitter in m... - Page 36 The cuff connection (air connector) must always engage with an audible click. Otherwise there ® will be a leaky connection between the Mobil-O-Graph NG and the tube that will produce incorrect measurements.
- Page 37 9. APPENDIX M a s t e r c o p y 9.3 Accessories order form Mobil-O-Graph NG ® ABP monitor Mobil-O-Graph NG ® - The long-term blood pressure monitor Practice: Dealer’s stamp: Street: Postcode/town: Tel.: Fax: Please give full address! Please provide a quotation for the following items I wish to order the following items Item Number Cuff S (20-24 cm) Cuff M (24-32 cm)
- Page 38 12. ANHANG 9. APPENDIX M a s t e r c o p y 9.4 Blood pressure self-monitoring device order form / HeartBeat / Klock ® ® Sabil-O-Graph Practice: Dealer’s stamp: Street: Postcode/town: Tel.: Fax: Please give full address! Please provide a quotation for the following items I wish to order the following items Item Number ®...
Need help?
Do you have a question about the Mobil-O-Graph NG and is the answer not in the manual?
Questions and answers
Do I press the day/ night button once or one long press on the 24 hour bp monitor?? Urgent!
To operate the DAY/NIGHT button on the IEM Mobil-O-Graph NG 24-hour blood pressure monitor, press the button when going to bed and again when getting up in the morning. This adjusts the measurement interval to match your sleep and wake phases and helps in evaluating your blood pressure profile. If you do not press the button, the monitor will follow a preset protocol for interval changes.
This answer is automatically generated
when we want to start a new patient, it says that there is still data from the last patient, and that it is not possible to start with a new before this data is registrated. But we do not know which patient, all has been transfered as we can see from the last use.
If the monitor accidentally turned off for ten minutes and then I turned it back on, will I lose the data that it had measured up to this point?