Advertisement
Quick Links
Chipsmall Limited consists of a professional team with an average of over 10 year of expertise in the distribution
of electronic components. Based in Hongkong, we have already established firm and mutual-benefit business
relationships with customers from,Europe,America and south Asia,supplying obsolete and hard-to-find components
to meet their specific needs.
With the principle of "Quality Parts,Customers Priority,Honest Operation,and Considerate Service",our business
mainly focus on the distribution of electronic components. Line cards we deal with include
Microchip,ALPS,ROHM,Xilinx,Pulse,ON,Everlight and Freescale. Main products comprise
IC,Modules,Potentiometer,IC Socket,Relay,Connector.Our parts cover such applications as commercial,industrial,
and automotives areas.
We are looking forward to setting up business relationship with you and hope to provide you with the best service
and solution. Let us make a better world for our industry!
Contact us
Tel: +86-755-8981 8866 Fax: +86-755-8427 6832
Email & Skype: info@chipsmall.com Web: www.chipsmall.com
Address: A1208, Overseas Decoration Building, #122 Zhenhua RD., Futian, Shenzhen, China
Advertisement

Related Manuals for ambiq micro Apollo2 EVB


Summary of Contents for ambiq micro Apollo2 EVB
- Page 1 Chipsmall Limited consists of a professional team with an average of over 10 year of expertise in the distribution of electronic components. Based in Hongkong, we have already established firm and mutual-benefit business relationships with customers from,Europe,America and south Asia,supplying obsolete and hard-to-find components to meet their specific needs.
- Page 2 Quick Start Guide for Apollo2 EVB (Rev 1.0) Revision 1.0, June 2017 Apollo2 EVB Quick Start Guide Doc ID: QS-A2-1p00 Revision 1.0 June 2017 QS-A2-1p00 Page 1 of 11 ©2017 Ambiq Micro, Inc. All rights reserved.
-
Page 3: Table Of Contents
Introduction ................................3 Documentation Revision History ........................3 Overview of the Apollo2 EVB ..........................4 Debug Interface ..............................6 Software Development Tools for the Apollo2 EVB ....................9 Measuring MCU Power Consumption on the EVB ..................10 QS-A2-1p00 Page 2 of 11 ©2017 Ambiq Micro, Inc. -
Page 4: Introduction
Quick Start Guide for Apollo2 EVB (Rev 1.0) Revision 1.0, June 2017 Introduction This document provides guidance in setting up the Apollo2 Evaluation Board (EVB), revision 1.0, to get started executing code examples, measuring power consumption in various configurations, and beginning software development. -
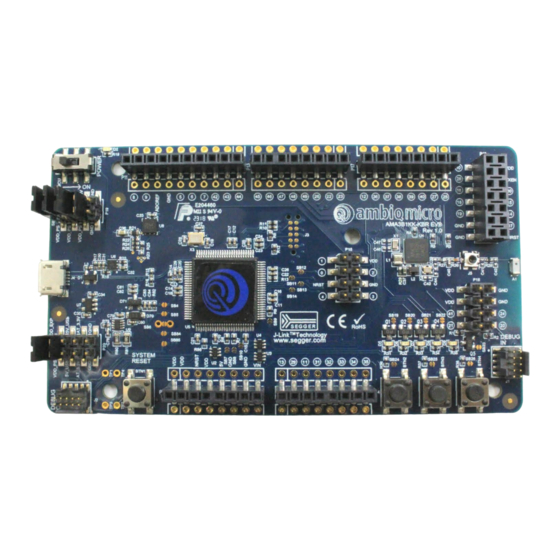
Page 5: Overview Of The Apollo2 Evb
Quick Start Guide for Apollo2 EVB (Rev 1.0) Revision 1.0, June 2017 Overview of the Apollo2 EVB The Apollo2 EVB features Arduino-compatible headers and an integrated J-Link debugger: Segger J-Link Adapter Figure 1. Apollo2 EVB This EVB has these additional features: •... - Page 6 Quick Start Guide for Apollo2 EVB (Rev 1.0) Revision 1.0, June 2017 • Segger J-Link debugger • Debugger-in / debugger-out ports • Five user-controlled LEDs • Three push buttons for application use, plus a reset push button • Power slide switch with LED power indicator •...
-
Page 7: Debug Interface
Apollo2 EVB (Rev 1.0) Revision 1.0, June 2017 Debug Interface Figure 2 shows the Apollo2 EVB set up for standard debug using the on-board J-Link debugger and on-board 3.3V power supply. Figure 2. Apollo2 EVB using On-board J-Link Debugger NOTE: Due to an I/O voltage contention issue with the J-Link processor, the EVB only supports 3.3V operation. - Page 8 Apollo2 EVB (Rev 1.0) Revision 1.0, June 2017 Figure 3. Apollo2 EVB’s Cortex DEBUG IN Header (J2) No jumper changes are required to use an external debug adapter. Simply connect the external debug adapter with a 10-pin ribbon cable connector to the “DEBUG IN” header.
- Page 9 Apollo2 EVB (Rev 1.0) Revision 1.0, June 2017 Figure 4. Apollo2 EVB’s DEBUG OUT Header (J3) To utilize this functionality, use a 10-pin low-pitch standard debug connector to connect the “DEBUG OUT” header (J3) on the EVB to the debug header on the target board. The EVB will automatically detect when the “DEBUG OUT”...
-
Page 10: Software Development Tools For The Apollo2 Evb
Software Development Tools for the Apollo2 EVB The standard Segger J-Link debug interface is used on the Apollo2 EVB. Please install the latest Beta Segger J- Link software, and configure your preferred development IDE (Keil, IAR, or Eclipse) to use J-Link debug interface. -
Page 11: Measuring Mcu Power Consumption On The Evb
Quick Start Guide for Apollo2 EVB (Rev 1.0) Revision 1.0, June 2017 6. Measuring MCU Power Consumption on the EVB To measure only the current consumed by the MCU you can connect a current meter to the header next to the power switch, P8, by removing the red jumper in Figure 5 below and measure current across these two pins. - Page 12 PARAMETERS, INCLUDING “TYPICALS” MUST BE VALIDATED FOR EACH CUSTOMER APPLICATION BY CUSTOMER’S TECHNICAL EXPERTS. AMBIQ MICRO DOES NOT CONVEY ANY LICENSE UNDER NEITHER ITS PATENT RIGHTS NOR THE RIGHTS OF OTHERS. AMBIQ MICRO PRODUCTS ARE NOT DESIGNED, INTENDED, OR AUTHORIZED FOR USE AS COMPONENTS IN SYSTEMS INTENDED FOR SURGICAL IMPLANT INTO THE BODY, OR OTHER APPLICATIONS INTENDED TO SUPPORT OR SUSTAIN LIFE, OR FOR ANY OTHER APPLICATION IN WHICH THE FAILURE OF THE AMBIQ MICRO PRODUCT COULD CREATE A SITUATION WHERE PERSONAL INJURY OR DEATH MAY OCCUR.
Need help?
Do you have a question about the Apollo2 EVB and is the answer not in the manual?
Questions and answers