Table of Contents
Advertisement
Quick Links
For the full product user guide, please scan QR code
or visit www.oricom.com.au
Pack contents
• UHF CB Radio Transceiver
• H eavy Duty Controller Speaker
Microphone
• M icrophone mounting bracket
Please read before installing or operating your Oricom radio
The operation of your UHF radio in Australia and New Zealand is subject to
conditions in the following licenses: In Australia, the ACMA Radio communications
(Citizen Band Radio Stations) and in New Zealand by MED the General User Radio
License for Citizen Band Radio.
When a new narrowband radio receives a transmission from an older wideband radio the speech may sound loud
and distorted – simply adjust your radio volume for the best listening performance. When an older wideband
radio receives a signal from a new narrowband radio the speech may sound quieter - simply adjust your radio
volume for best listening performance. When operating a narrowband radio or Channel 41 - 80 interference is
possible from wideband radios transmitting on high power or on adjacent frequency.
The issues described above are not a fault of the radio but a consequence of mixed use of wideband and
narrowband radios.
This unit complies with all relevant Australian and New Zealand approval requirements
AS/NZS 4365:2011
Need help? Contact Oricom Support
If you need assistance setting up or using your Oricom product now or in the future,
call Oricom Support.
Australia
New Zealand
DTX4200X Quick Start Guide
(02) 4574 8888
www.oricom.com.au
Mon-Fri 8am – 6pm AEST
0800 67 42 66
Mon-Fri 10am – 8pm NZST
• Transceiver mounting bracket
• Pack of supplied mounting screws
• Quick Start Guide
1
Advertisement
Table of Contents

Subscribe to Our Youtube Channel
Related Manuals for Oricom DTX4200X


Summary of Contents for Oricom DTX4200X
- Page 1 Pack contents • UHF CB Radio Transceiver • Transceiver mounting bracket • H eavy Duty Controller Speaker • Pack of supplied mounting screws Microphone • Quick Start Guide • M icrophone mounting bracket Please read before installing or operating your Oricom radio The operation of your UHF radio in Australia and New Zealand is subject to conditions in the following licenses: In Australia, the ACMA Radio communications (Citizen Band Radio Stations) and in New Zealand by MED the General User Radio License for Citizen Band Radio. When a new narrowband radio receives a transmission from an older wideband radio the speech may sound loud and distorted – simply adjust your radio volume for the best listening performance. When an older wideband radio receives a signal from a new narrowband radio the speech may sound quieter - simply adjust your radio volume for best listening performance. When operating a narrowband radio or Channel 41 - 80 interference is possible from wideband radios transmitting on high power or on adjacent frequency.
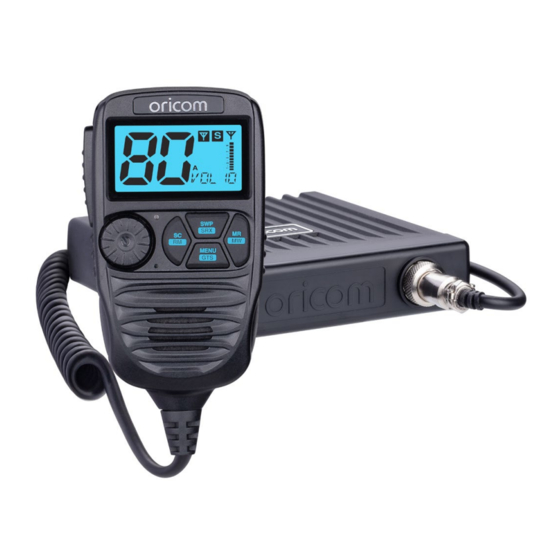
- Page 2 Front View LCD display Scan (open scan/memory group scan)/scan skip Light sensor Main & Sub channel swapping/ (Jog Wheel) Power on/off and Volume/channel/ SRX on/off squelch and SVL (sub receiver volume) MENU Memory recall/memory write Menu/Group tone scan Microphone Oricom offer a unique Jog Wheel, which makes using the Controller Speaker Microphone simple and intuitive. Rear View Power supply connection 3.5mm external jack for optional 8 ohm speaker Antenna connection LCD Icons & Indicators 1. Sub channel busy 6. G roup display (A, B, C 2. Sub channel on groups) 3. Main receiver busy 7. Group address channel...
- Page 3 Installation of Your Oricom Radio Fitting the Controller Speaker Microphone The controller speaker microphone uses a 6-pin telephone style plug and socket: 1. P osition the microphone plug so the plastic flap faces upward, and insert the plug into the socket until it ‘clicks’. 2. Gently press the rubber boot into the hole surrounding the socket so that the slot around the boot fits neatly inside the rim of the entry hole. Disconnecting the Controller Speaker Microphone It is recommended that the Controller Speaker Microphone be left permanently connected to the radio, but if it must be disconnected, proceed as follows: 1. L ift the rubber boot and the lip of the raised area on the front panel. 2. E ase the rubber boot out of the cable entry hole and slide it along the cable away from the front panel. 3. I dentify the plug locking lever, and move the lever towards the plug body. At the same time gently pull the plug from the socket. Wiring Methods There are two possible wiring configurations for connecting to the vehicles power supply. A. Radio stays ON when the ignition is switched OFF Connect the radio’s negative (black) lead to the vehicle chassis, or directly to the battery’s negative terminal.
- Page 4 Quick Overview of Basic Controls Turning on the Power Press and hold the Jog Wheel. MENU Setting the Volume Rotate the Jog Wheel clockwise to adjust the sound level for comfortable reception. MENU Selecting a channel Press Jog Wheel once. "CH" will appear on the LCD. Select the channel by rotating the Jog Wheel. Turn the Jog Wheel clockwise to adjust channel UP. Turn the Jog Wheel anti-clockwise to adjust channel DOWN. MENU Setting the Squelch Level 1. Press Jog Wheel 2 times. The current squelch level is displayed. 2. Select the squelch level by rotating the Jog Wheel. 1 - Max sensitivity (Min. squelch) 15 - Min. sensitivity (Max/Tight squelch) MENU Off - Squelch open Setting SRX (Sub Receiver) Volume 1. Press Jog Wheel 3 times, then "SVL" is displayed. 2. Rotate the Jog Wheel to adjust the SRX volume. Note : If a button is not pressed within 2 seconds the radio will automatically exit the sub display of "VOL" "CH"...
- Page 5 Nominal Carrier Table 1 Nominal Carrier Frequency UHF CB channels and frequencies Freq Freq Freq Freq Channel Channel 476.4250 476.4250 476.9250 476.9250 476.4375 61‡ — — 476.4500 476.4500 22† 476.9500 476.9500 476.4625 62‡ — — 476.4750 476.4750 23† 476.9750 476.9750 476.4875 63‡...
- Page 6 Failure by you to adhere to the warnings and follow the instructions set out in this user guide for the proper installation and use of the product; Wilful misconduct or deliberate misuse by you of the product; Any external cause beyond our control, including but not limited to power failure, lightning or over voltage; or Modification to the product or services carried out on the product by anyone other than Oricom or Oricom’s authorised service provider. How to make a claim under your Express Warranty in Australia Oricom has a simple warranty process for you to follow: • P lease call or email our Customer Support Team, (02) 4574 8888 or support@oricom.com.au. • A Customer Support Team member will verify after troubleshooting with you if your product qualifies under warranty. If so, they will give you a Product Return Authorisation number. • W e will then email or fax a Return Authorisation form and a Repair Notice (if necessary), together with instructions on how to return the goods for warranty service. Please note that if a Customer Support Team member advises that your product does not qualify for return, this warranty does not apply to your product. Products that are authorised to be returned to Oricom in Australia must include all of the following: • A completed Return Authorisation form • A copy of your Proof of Purchase (please keep your original copy) • The faulty product, including all accessories.
Need help?
Do you have a question about the DTX4200X and is the answer not in the manual?
Questions and answers