
Related Manuals for Oricom DTX4200X


Summary of Contents for Oricom DTX4200X
- Page 1 Operating Instructions DTX4200X 80 Channel UHF Citizen Band Radio Keep this user guide for future reference. Always retain your proof of purchase in case of Warranty service. www.oricom.com.au...
- Page 2 When a narrowband radio receives a transmission from an older wideband radio the speech may sound loud and distorted – simply adjust your radio volume for the best listening performance. When an older wideband radio receives a signal from a new narrowband radio the speech may sound quieter - simply adjust your radio volume for best listening performance.
-
Page 3: Table Of Contents
Controls and Indicators ..............8 Operations ..................12 UHF CB channels and frequencies ..........27 Express Warranty (Australia) ............31 Need Help? If you need assistance setting up or using your Oricom product now or in the future, call Oricom Support. Australia (02) 4574 8888 www.oricom.com.au Mon-Fri 8am –... -
Page 4: Introduction
Introduction Introduction Thank you for choosing the Oricom DTX4200X 5 watt UHF CB Radio. Oricom is a 100% Australian owned and operated company, engineering radio communication products specifically for the diverse and unique conditions of Australia and New Zealand since 2003. This product was manufactured in Korea under strict quality control. -
Page 5: Important Information
Important information Please read before installing or operating your Oricom Radio The operation of your UHF radio in Australia and New Zealand is subject to conditions in the following licenses: In Australia the ACMA Radio communications (Citizen Band Radio Stations) and in New Zealand by MED the General User Radio License for Citizen Band Radio. -
Page 6: Installation Of Your Oricom Radio
Installation of your Oricom Radio When installing your radio in your vehicle, check that during installation you do not damage any wiring or vehicle components CAUTION that may be hidden around the mounting position. Ensure the installation does not interfere with the operation of the vehicle and meets all regulatory and safety requirements for accessories fitted to your vehicle. - Page 7 3. For best performance always mount your antenna as high as possible and away from all other antennas or poles. Optional Accessories The following Oricom accessories can be purchased directly from Oricom. Visit oricom.com.au. Optional Magnetic Microphone Holder Mounting bracket for easy installation. Model number MMM100.
-
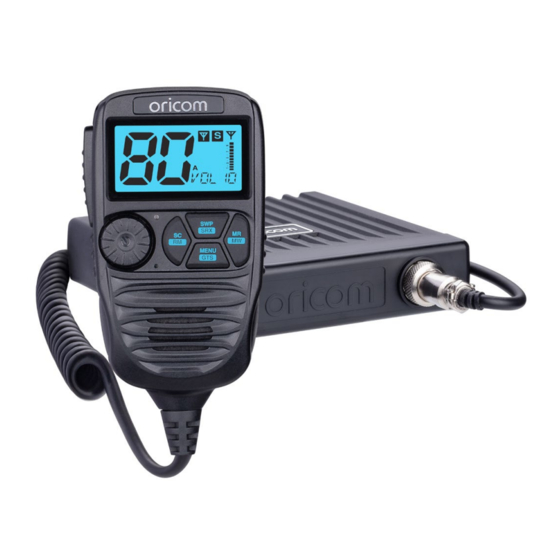
Page 8: Controls And Indicators
Controls and Indicators Controls and Indicators Front View Oricom offer a unique Jog Wheel, which makes using the Controller MENU Speaker Microphone simple and intuitive. 1. (Jog Wheel) Power on/off and Volume/channel/squelch and SVL (sub receiver volume) 2. Scan (open scan/memory group scan)/scan skip 3. - Page 9 Controls and Indicators Rear View 1. 3.5mm external jack for optional 8 ohm speaker 2. Power supply connection 3. Antenna connection...
- Page 10 9. CTCSS or DCS on 5. Signal strength & TX power 10. Channel display & SWR meter Installation of the DTX4200X and fitting optional accessories Mounting the UHF radio The universal mounting bracket supplied with your UHF radio allows overhead/dash mounting.
- Page 11 Controls and Indicators Installation Diagram ANTENNA CONNECTOR DC POWER CABLE-Connects to 12V. Pay attention to polarities. EXTERNAL SPEAKER JACK SPE85 MICROPHONE HANGER - Fit the supplied microphone hanger in the desired location. (Optional Magnetic microphone mount is available online - Model no. MMM100) CONTROLLER SPEAKER MIC ANTENNA CABLE NOT INCLUDED TRANSCEIVER...
-
Page 12: Operations
Operations Operations Turning on the Power Press and hold the Jog Wheel. MENU Setting the Volume Rotate the Jog Wheel clockwise to adjust the sound level for comfortable reception. MENU Selecting a channel Press Jog Wheel once. "CH" will appear on the LCD. - Page 13 Operations Setting the Squelch Level 1. Press Jog Wheel 2 times. The current squelch level is displayed. 2. Select the squelch level by rotating the MENU Jog Wheel. 1 - Max sensitivity (Min. squelch) 15 - Min. sensitivity (Max/Tight squelch) Off - Squelch open Setting SRX (Sub Receiver) Volume 1.
- Page 14 Operations Scanning The Scan feature allows you to search for active channels automatically. There are 3 scanning modes: Open Scan, Group Memory Scan and Group tone Scan (a special case of Group Memory Scan). Open scan Press SC/RM to start scan. The OS-SC sub menu display will appear on the LCD display.
- Page 15 Operations For example we are removing CH02 from the scan. You may want to remove this channel due to constant noise. 1. Press SC/RM button for 2 seconds. 2. Scanning will resume. 3. Channel 02 is removed from this scan. Scan 1-2-3-4-5-6-7 …..
- Page 16 When A, B and C are flashing, press SC/RM button to start all memory group scanning. For scanning A, B or C only, select non flashing preferred group (A, B or C) press SC/RM. The DTX4200X has no information stored in the memory channels.
- Page 17 4. Rotate Jog Wheel until 8 is shown in group channel display. 5. Press and hold MR/MW button to save & exit from memory write. SWP (Swapping Dual RX channel) The DTX4200X can receive two channels simultaneously. The main receiver default channel is 12 and Sub receiver default channel is 40.
- Page 18 Operations SRX On/Off Press and hold SWP/SRX button to turn SWP/SRX off. To return to Dual RX mode, press and hold the SRX button for 2 seconds. Menu list * Press MENU/GTS button to access menu. * Use the Jog Wheel to change the value of each setting.
- Page 19 Operations Function Step Display Default Duplex On/Off CTCSS and DCS CT1(67Hz) Group Tone CT1 (67Hz) Scan DCS104 Backlight LED 87(Sky Blue) colour Auto Backlight Dimmer User Factory Reset User reset Factory Squelch tail...
- Page 20 Operations Busy channel lock Key Beep Logo Display Scan resume time 5,10,15 Auto power Off 1H,2H,4H Software ver--3 version...
- Page 21 Operations Duplex General Your radio has a Repeater Access function to allow use of local repeater stations (if available in your area). Repeaters are shared radio systems installed by interested parties (clubs, local business etc.) that receive transmissions on specific channels and re-transmit (or repeat) the received signal to another channel.
- Page 22 Operations Simplex mode Transmit/Receiver Duplex mode Transmit/Receiver CH and Number Frequency (MHz) Frequency (MHz) 476.425 477.175 CH31 476.450 477.200 CH32 476.475 477.225 CH33 476.500 477.250 CH34 476.525 477.275 CH35 476.550 477.300 CH36 476.575 477.325 CH37 476.600 477.350 CH38 476.4375 477.1875 CH71 476.4625 477.2125 CH72 476.4875...
- Page 23 Operations CTCSS and DCS setting This feature allows you to receive signals only from callers who have selected the same CTCSS and DCS code. DCS is similar to CTCSS. It provides 104 extra, digitally coded, squelch codes that follow after the 38 CTCSS codes. CTCSS 1 - 38, followed by DCS 1 - 104.
- Page 24 Operations Squelch Tail Squelch Tail is the noise heard after the transmitting party releases the PTT and is heard by the receiving party. If Squelch tail is turned on, on both radios this squelch noise will be muted. Busy channel Lock If the channel is already in use, you can prevent the UHF CB radio from accidentally transmitting over a channel already in use.
- Page 25 Operations Correct Antenna install with 5W VSWR 1.2 with 4.5W BLINKING VSWR 2.6 with 4W BLINKING VSWR 3.5 with 3.5W BLINKING VSWR 4.4 with 3W BLINKING < 3W The VSWR and Power test can vary depending on installation conditions. If TPI feature is turned off in the settings menu, the TPI indicator will show 5 bars during TX.
- Page 26 Operations Scan resume time You can select 5, 10, or 15 sec depending on your selection. SCAN will start again after a 5, 10, or 15 sec pause even though a signal is still present. If P5 is selected, SCAN will stop on all channels as long as a signal is present.
-
Page 27: Uhf Cb Channels And Frequencies
UHF CB channels and frequencies UHF CB channels and frequencies... - Page 28 UHF CB channels and frequencies * The primary use for these channels is repeater operation using 750 kHz offset. Channels 1-8 inclusive are used for mobile reception and channels 31-38 for mobile transmission. Note that additional channels 41-48 and 71-78 are also available for repeater operation to supplement channels 1-8 and-31-38 respectively as approved by the ACMA CBRS Class Licence in Australia and the MED GURL in New Zealand.
- Page 29 UHF CB channels and frequencies 38 CTCSS CODE LIST CODE Frequency(Hz) CODE Frequency(Hz) 131.8 67.0 136.5 71.9 141.3 74.4 146.2 77.0 151.4 79.7 156.7 82.5 162.2 85.4 167.9 88.5 173.8 91.5 179.9 94.8 186.2 97.4 192.8 100.0 203.5 103.5 210.7 107.2 218.1 110.9...
- Page 30 UHF CB channels and frequencies...
-
Page 31: Express Warranty (Australia)
You are also entitled to have the goods repaired or replaced if the goods fail to be of acceptable quality and the failure does not amount to a major failure. In the event of a minor failure, Oricom reserves the right to choose to repair or replace the product. - Page 32 No change to the conditions of this Express Warranty is valid unless it is made in writing and signed by an authorised representative of Oricom. Oricom will not be liable under this Express Warranty, and to the extent permitted by law will not be liable for any defect, loss, damage or injury arising out of or in connection with a: 1.
- Page 33 Please note that if a Customer Support Team member advises that your product does not qualify for return, this warranty does not apply to your product. Products that are authorised to be returned to Oricom in Australia must include all of the following: •...
- Page 34 Oricom Support - Australia For all product enquiries, troubleshooting or to discuss the range of Oricom products, feel free to contact Oricom or visit our website for answers to frequently asked questions. (02) 4574 8888 Monday - Friday 8am –...
Need help?
Do you have a question about the DTX4200X and is the answer not in the manual?
Questions and answers