
Related Manuals for BluStream Multicast IP250UHD-TX


Summary of Contents for BluStream Multicast IP250UHD-TX
- Page 1 Blustream Multicast IP250UHD-TX/RX User Manual RevA1_IP250UHD_Manual_210615 M U L T I C A S T...
-
Page 2: Table Of Contents
Advanced Dante Settings Do not substitute or use any other power supply other than approved PoE network InfraRed Control products or approved Blustream power supplies. Remote Control - REM100 Do not disassemble any Blustream Multicast products for any reason. Doing so will void the manufacturer’s warranty. - Page 3 Accessing the IP250UHD Web-GUI Interface Multicast Web-GUI - IP250UHD 29 - 35 Changing a Computer IP Address 36 - 38 Application Diagrams - Matrix Configuration Terminating the interconnecting Network CAT cable Specifications Package Contents Maintenance Installer Notes Contact: support@blustream.com.au support@blustream-us.com support@blustream.co.uk...
-
Page 4: Introduction
Please take care to make sure that you have read and understood the instructions in this manual and that you have setup your network switch correctly prior to connecting any Blustream Multicast products. Failure to do so will result in problems with configuration of the system and video performance. -
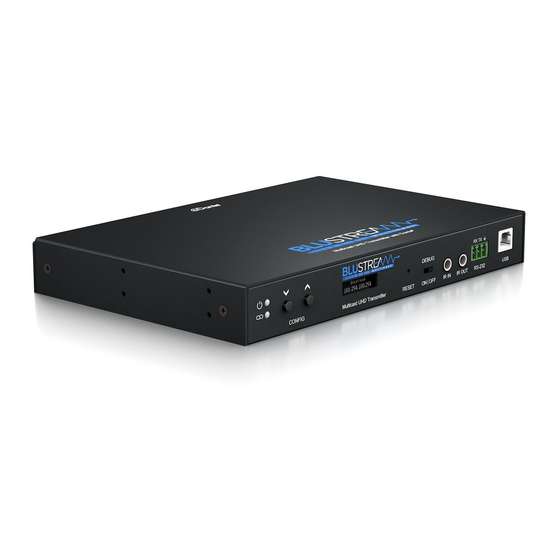
Page 5: Panel Description - Ip250Uhd-Tx Transmitter
Receiver for dedicated screen control (see Fixed Routing section). Please use supplied Blustream IRR 5V IR Receiver. When using the Blustream IRCAB cable (optional) ensure cable direction is correct IR OUT - (IR output) - 3.5mm mono jack – routed IR from any IP250UHD-RX (zone output) allowing source control. -
Page 6: Panel Description - Ip250Uhd-Rx Receiver
IR IN (IR input) – 3.5mm stereo jack. Transmits IR to the IP250UHD-TX transmitter currently being viewed for IR source control. Please use supplied Blustream IRR 5V IR Receiver. When using the Blustream IRCAB cable (optional) ensure cable direction is correct IR OUT - (IR output) - 3.5mm mono jack –... -
Page 7: Network Port Configuration
Network Port Configuration The Blustream IP250UHD system features dual RJ45 LAN connections as well as an SFP connection to support greater cabling distances via the user of optic fibre cables. The Video signal and the Dante signal are distributed together via the LAN 1 RJ45 output, as well as via the SFP output simultaneously at the same time. -
Page 8: Understanding Product Status Lights
Dante audio device on the network. Please note: The source input must be PCM 2ch audio for the analogue audio output to work. The Blustream Multicast products do not down-mix Dolby Digital, DTS or 5.1ch audio signals. -
Page 9: Audio Connections - Receiver
Dante can be used to select any Dante audio source on the network. Please note: The HDMI stream must be PCM 2ch audio for Analogue L/R audio output to work. The Blustream Multicast products do not down-mix Dolby Digital, DTS or 5.1ch audio signals. -
Page 10: Interoperability
MCU of the unit must be updated before updating the firmware to a later version. • The MCU firmware update can only be undertaken by a member of the Blustream Support Team, and is not available for installers / integrators to carry out. Please contact Blustream on the email address noted below. -
Page 11: Advanced Dante Settings
Dante products that are set up with the same sample rate. A mismatch in sample rate may stop audio from transmitting. Under the “Device Config” screen we can also adjust the network device latency from 1, 2 or 5 milliseconds. Contact: support@blustream.com.au support@blustream-us.com support@blustream.co.uk... -
Page 12: Infrared Control
80x source devices (IP250UHD-TX) the ACM200 control module is required. For the complete database of Multicast IR commands, please visit the Blustream website page for any Multicast product, click on the "Drivers & Protocols" button, and navigate to the folder named "Multicast IR Control". -
Page 13: Infrared Distribution
The Blustream range of Multicast products include multiple options for control and routing of IR. IMPORTANT: Blustream InfraRed products are all 5V and NOT compatible with alternative manufacturers InfraRed solutions. When using third party 12V IR control solutions please use the Blustream IRCAB cable for IR conversion. -
Page 14: Infrared Pass-Through (Source Control)
The IRE1 - IR emitter is connected to the IR OUT socket on the IP250UHD-TX and the bud should be located directly on top of the IR receiver window of the source device. Rx Tx HDMI IN DC IN Line IN RS-232 24 56V Rx Tx Gnd Link MULTICAST UHD IP100UHD-RX CH Select RS-232 MENU www.blustream.com.au www.blustream-us.com www.blustream.co.uk... -
Page 15: Infrared Pass-Through (Display Control)
Connections: When using third party 12V IR control solutions please use Blustream IRCAB cable for IR conversion from 12V to 5V. If the control system uses a 5V IR line, then a straight-through stereo 3.5mm cable can be used. Connect the IR output of the third party control system to the IR IN of the IP250UHD-TX. -
Page 16: Rs-232 (Serial) Bi-Directional Pass-Through
RS-232 (Serial) Bi-Directional Pass-Through Multicast products feature bi-directional RS-232 pass-through for control of products using serial commands. There are multiple methods for distribution of RS-232 using the Blustream Multicast solution which include: 1) Type-1 Redirection Mode: 1-to-1 routed RS-232 A link is programmed that creates an open connection between ANY Multicast product in the system (Transmitters or Receivers). -
Page 17: Type 1 Redirection Mode - 1 To 1 Routed Rs-232
For example: 169.254.6.1 is the default IP address for RX ID 1. Check the checkbox for 'Enable Serial over IP' Select the checkbox for 'Type 1' Select the System tab and navigate to the 'Utilities' section. Select the 'Reboot' button to restart the Multicast unit. Contact: support@blustream.com.au support@blustream-us.com support@blustream.co.uk... - Page 18 MAC Address. Use this MAC Address to create the routed RS-232 connection. Next, send the following messages directly into the Blustream Multicast TX or RX serial port. Rx Tx Gnd The command will open a connection between the Blustream products. Connect...
-
Page 19: Type 2 Guest Mode - Telnet/Ip Conversion To Rs-232
Once a connection is established, any characters sent from the ACM200 will be transmitetd to the IP250UHD-TX or RX it is connected with, and vice versa. To close the connection send the escape command 0x02 (02 in Hex). If using Telnet, close the connection by pressing CTRL + B. Contact: support@blustream.com.au support@blustream-us.com support@blustream.co.uk... -
Page 20: Manual Product Configuration
USER MANUAL Manual Configuration of Multicast Products The Blustream Multicast system can be configured without the need of a computer, allowing basic setup options such as addressing of products (IP configuration), EDID selection (TX), and Scaler output selection (RX). Manual configuration does not require the product to be connected to a network switch in order to be set-up, it only requires the unit to be powered either by local power supply (24V 1A) or by a PoE switch/injector. - Page 21 Once the scaler value required has been selected, press both Channel 'UP' and 'DOWN' buttons to finalise the manual configuration process. "Applying Configuration" will be shown on the display and then the Multicast Receiver will reboot with the new settings applied. Contact: support@blustream.com.au support@blustream-us.com support@blustream.co.uk...
-
Page 22: Front Panel Menu System - Transmitter
Front Panel Menu System - Transmitter The Blustream Multicast System allows you to adjust key settings and view configuration information through the front panel LED display. To access the configuration menu, press and hold the 'UP' arrow button on the front panel of the unit for 5 seconds. -
Page 23: Front Panel Menu System - Receiver
Back Return to previous menu F/W Info ASpeed Aspeed: A7.4.2 Shows Aspeed firmware version Web UI A2.0 Shows Web UI firmware version A1.7 Shows MCU firmware version Back Return to previous menu Exit Exits configuration menu Contact: support@blustream.com.au support@blustream-us.com support@blustream.co.uk... -
Page 24: Edid Control
In the Blustream Multicast system each source device only communicates with a single Blustream IP250UHD-TX Transmitter meaning there is only a single EDID handshake. As each Blustream Multicast IP250UHD-RX Receiver has its own in-built video scaler, it is advised that the source EDID is set to output the best video signal possible as this can be down-scaled (as required) at each IP250UHD-RX Receiver (max 4K 60Hz 4:2:0 or 4K 30Hz 4:4:4). -
Page 25: Scaler Output Control
USER MANUAL Scaler Output Control The Blustream Multicast Receiver has an in-built video scaler which can both up-scale and downscale video signals allowing for differing image resolutions at each display. Configuration of Multicast Scaler settings can be achieved in several ways:... -
Page 26: Supporting Documentation & Downloads
USER MANUAL Supporting Documentation & Downloads The relevant supporting documents for Blustream Multicast products can be found on the Blustream website: www.blustream.co.uk / www.blustream.com.au / www.blustream-us.com The following download buttons are available on the IP250UHD-TX and RX pages for supporting documentation: Download example schematics of the IP250UHD products in differing scenarios. -
Page 27: Ip250Uhd Firmware Update
(sold separately) 2) In order to communicate with the Blustream IP250UHD product a computer must also be in the same IP range as the Blustream IP250UHD-TX/RX's default IP address. Instructions to update a computers IP range can be found in the ‘Changing your computer IP address’... -
Page 28: Accessing The Ip250Uhd Web-Gui Interface
Accessing the IP250UHD Web-GUI Interface Each Blustream Multicast product is shipped with a fixed IP address of 169.254.100.254. Once the PC network is amended to work in the same IP range as the fixed IP of the Multicast products, it is possible to communicate directly with the built-in web server in each Multicast IP250UHD Transmitter or Receiver. -
Page 29: Multicast Web-Gui - Ip250Uhd
Version Information: an overview of the individual unit, including model number and firmware version. Update Firmware: it may be necessary to update the firmware of the Blustream Multicast products. It is advised to check the Blustream website to see if any firmware updates have been uploaded. Download these files and save them to a PC. - Page 30 Set EDID (Transmitter units only) - as per page 22 fix the EDID value for a Transmitter (source). Console API Command - only to be used as instructed by a member of the Blustream Technical Support team. Output - feedback from the API command inserted above.
- Page 31 All Blustream units are shipped with Multicast set as default. The Lan 2 RJ45 port can also be allocated to output either VoIP or Dante signals.
- Page 32 The web address of the device will need to be prefixxed with HTTPS:// in order to access the web GUI once enabled. Enable 802.1X - enabling this feature will enable 802.1X functionality. Your network infrastructure will need to support this to allow this function to operate correctly. www.blustream.com.au www.blustream-us.com www.blustream.co.uk...
- Page 33 Receivers output when accepting a stream from the Transmitter. It is recommended to keep this setting at 100%. Audio over IP: allows you to assign the source input (Analogue in, HDMI in, Dante in) for each of the avialable audio outputs (Receiver out / Analogue out / Dante out). Contact: support@blustream.com.au support@blustream-us.com support@blustream.co.uk...
- Page 34 Timeout for Detecting Video Lost: 10 seconds by default. Adjust this setting to hold the last frame of media received by the Receiver device before reverting to the Blustream Multicast splash screen where source device is turned off, or the connection is lost between the source and Transmitter.
- Page 35 Serial over IP: enable RS232 pass-through from the Transmitter, utilise this section to configure serial settings of the system. Please note: within any of the Transmitter or Receiver web-GUI sections, click 'Apply' to save new or amended settings. Contact: support@blustream.com.au support@blustream-us.com support@blustream.co.uk...
-
Page 36: Changing A Computer Ip Address
In the Windows toolbar navigate to ‘CONTROL PANEL’ . Select ‘NETWORK AND INTERNET’ . Select ‘NETWORK AND SHARING CENTER’ . Under ‘View your Active Networks’ see connection types available. Select ‘Local Area Connection’ as this is the method of communication being used with the switch. www.blustream.com.au www.blustream-us.com www.blustream.co.uk... - Page 37 IP250UHD USER MANUAL In the next window select ‘PROPERTIES’ A. In the ‘NETWORKING’ window highlight/select ‘INTERNET PROTOCOL VERSION 4 (TCP/IPv4)’ B. Select ‘PROPERTIES’ , or double click on ‘INTERNET PROTOCOL VERSION 4 (TCP/IPv4)’ Contact: support@blustream.com.au support@blustream-us.com support@blustream.co.uk...
- Page 38 Click ‘OK’ and exit the network setup Enter the default Network Switch, ACM200 or Blustream Multicast address into a web browser and check for connection to the unit. If the Transmitter and Receiver products have already been configured, enter the address of one of these (it is advised to use 169.254.3.1 - this will be the first default Transmitter IP address).
-
Page 39: Application Diagrams - Matrix Configuration
IP250UHD USER MANUAL Contact: support@blustream.com.au support@blustream-us.com support@blustream.co.uk... -
Page 40: Terminating The Interconnecting Network Cat Cable
When installing CAT cables it is advised to use the best CAT cable quality possible. HDMI distribution products will only work if used with CAT5e standard cable or above. Blustream recommends using a CAT6 cable for installations, especially when running over longer distances, in areas of high EMI, or with 4K signal distribution. -
Page 41: Specifications
• 1 x Serial 3-pin Phoenix connector • 2 x Audio Input/Output 5-pin Phoenix connector • 1 x Audio Output 5-pin Phoenix connector Maintenance Clean this unit with a soft, dry cloth. Never use alcohol, paint thinner or benzene to clean this unit. www.blustream.com.au www.blustream-us.com www.blustream.co.uk... - Page 42 To return your used device, please use the return and collection systems or contact the retailer where the product was purchased. They can take this product for environmentally safe recycling. Contact: support@blustream.com.au support@blustream-us.com support@blustream.co.uk...
- Page 43 www.blustream.co.uk...
Need help?
Do you have a question about the Multicast IP250UHD-TX and is the answer not in the manual?
Questions and answers