
Related Manuals for Forward STM-6600


Summary of Contents for Forward STM-6600
- Page 1 FULL Combo Finder Meter STM-6600 HD DVB-S2/S+DVB-T2/T+Spectrum Meter User manual...
-
Page 2: Table Of Contents
STM6600 Table of Contents Description....................... 3 Safety instructions................... 3 Safety of persons....................3 General information..................4 Appropriate Usage..................4 Delivery range ....................4 Device overview....................5 Start of operation.....................8 Battery......................8 Switch-on the Device..................8 ................... 8 Lithium-ions-battery Charging the battery..................8 Storing of the batteries .................. -
Page 3: Description
Signal strength and quality are displayed as numerical values and bar graphs. Another measurement value is the forward error correction (FEC) and the bit error rate (BER), In addition, the picture quality can be revised on the Modulation error rate(MER), high-resoluted 4.3-inch TFT LCD screen. -
Page 4: General Information
STM6600 security use a rope on sloping roofs. General information Attention! The devise should only be operated with the supplied AC adapter at the mains. Do not open the meter or the included AC adapter. There is danger of life through electric shock! Wrong usage of the ports can lead to the destruction of the measuring device. -
Page 5: Device Overview
STM6600 device meter a carrying bag an extern charger an power cable AV cable F connnector an user manual CD If the delivery should be incomplete, contact your specialist dealer Device overview LNB IN : Connect this port to the satellite atn cable RF IN: Connect this port to the T/T2 cable USB: Connect the USB disk DC 14V: Power supply port... - Page 6 STM6600 Ethernet: Connect this port to Internet cable HDMI: Connect this port to TV HDMI port via HDMI cable 6 |ENG...
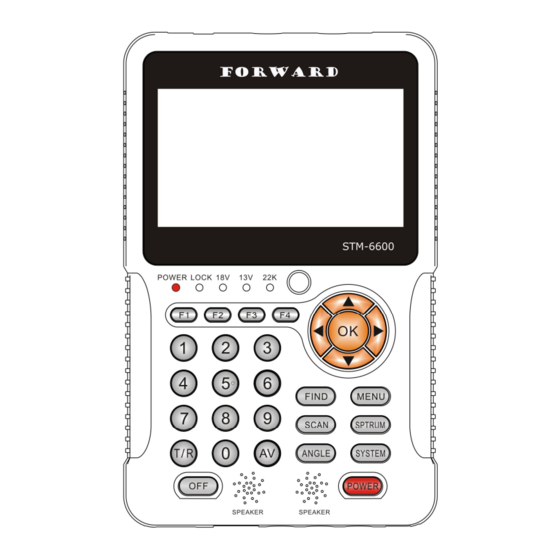
- Page 7 STM6600 Figure: Front of the meter Description Digital satellite signal input LNB1-IN LNB2-IN LC-Display Display of the TV picture, the menu and the measured values Display of the energy state: POWER-LED Operation: red: the measuring devise is switched on. Off: the measuring devise is switched off. In charge: Green: The battery is charged Red: The battery is full charged...
-
Page 8: Start Of Operation
STM6600 Start of operation Battery Before the first operation with the measuring device charge the battery completely. (see also chapter “Lithium-Ion battery” on page 10). Load the accumulator during the first loading procedure at least 5 hours. The maximum battery charging time is approximately 12 hours. Switch-on the Device ð... -
Page 9: Storing Of The Batteries
STM6600 meter The Power-LED shows the battery status: Red : the battery is charged G reen: the battery is completely loaded Storing of the batteries Storing the batteries between 0° Celsius and 40° Celsius. Loading the accumulator at a longer storage every two weeks to avoid a depth discharge. -
Page 10: Factory Default
STM6600 INFO Factory Default Press the SYSTEM button to change the menu language. _ Select the point Factory Default. _ Press OK to make the factory setting Factory reset 10 |ENG... -
Page 11: Satellite Finding
STM6600 Attention! All programs and settings, configured by you, will be reset to delivery status. Satellite finding In this menu you have the option to search for single channels or using the display for lining a satellite dish up. ð Press the FIND button to display the Satellite Finding menu. -
Page 12: Finding Channels Manual
STM6600 Figure 4: Satellite Finding ð Press the ◄- or ►- button to select a satellite.. ð Press the ◄- or ►- button to select a LNB type.. ð Input the Frequency using the NUMERIC buttons.(press◄- or ► first, then input the number you want) ð... -
Page 13: T/T2 Finding
STM6600 Notice! The satellite call sign (see Figure 4) registers which satellite you receive at the moment. At some satellites, as for example "Türksat", a wrong satellite call sign is cosent on single transponders, hence, the announcement can be falsified. Therefore, we recommend to leave the setting on the preset first transponder with the search of a satellite. -
Page 14: Lining T/T2 Antenna
STM6600 Finding channels manual Figure 6:T/T2 Finding è Press the T/T2 Finder button to display the menu T/T2 finding. è Press the ◄- or ►- button to select Scan method at Manual/Auto.. è Press the ◄- or ►- button to select Kind of service at All services/Only free services/Only encrypted services è... -
Page 15: Installation
STM6600 Once a signal is found, the bar graph shows the signal strength and quality. In addition C/N, SNR, PowerLevel and a.BER (after BER) are displayed. In addition an acoustic signal is represented. Notice! The satellite call sign (see Figure 7) registers which frequency you receive at the moment. -
Page 16: Dish Set
STM6600 Figure 5: Satellite setup _ Select the point Dish Setup and press the OK button. Figure 9: Dish set-up settings _ Press the ▲- or ▼- button to move to the desired item Press the ◄- or ►- button to modify the value of the selected item. Use the NUMERIC buttons if necessary. -
Page 17: Diseqc Setup
STM6600 ANGLE:To enter the Angle menu _Press F2 to enter the DiSEqC1.2 menu Select Satellite:Press the ◄- or ►button to choose the Satellite name Edit/Select ref Transponder:Press ◄- or ►button to choose the TP Motor Position:Press ◄- or ►button to choose the Motor positon at the off/1-64 Movement style:Press ◄- or ►button to choose he movement style at the Step/Continuous/1 second Move left/Right:Press ◄- or ►button to choose move left or right... -
Page 18: Usb
STM6600 _F1: press F1 to enter the Dish setup menu _F2: Add the new satellite _F3:Remove this satellite _Finder: To enter the Finder menu _ANGLE: Calculation the satellite Degree _Scan: Scan this satellite program _ Press the Channel Scan button to enter the channel scan menu. _ In Select satellite button ,press the ◄- or ►- button choose the Satellite name _ In the Scan method button ,press the ◄- or ►- button choose the scan method mode at the Atuo/Blind/Manal... -
Page 19: Updating
STM6600 Figure 11: USB _Press the File viewer to play usb file _ Press the Updating- button or use the updating the sw _ Press the Backup Data to backup data Figure 12: SW updating 19 |ENG... -
Page 20: Backup Data
STM6600 Figure 13: Backup Data Angle calculation _ Press the ANGLE button to display the Calculation menu. _ Press the ◄- or ►- button or use the NUMERIC keys to change the configuration of the selected menu point. Figure 11: Angle Calculation _ Press the ▲- or ▼- button to select the following points: ·... -
Page 21: Spectrum
STM6600 _Satellite: Select the desired satellite _Longtitude: Input your local longtitude _Location: Input the direction _Latitude: Input your local latitude _Longitude: Input your local longtude _ A fter the completion of all values select Angle Calculation and press the OK button. _Azimuth: shows the azimuth of the chosen satellite _Elevation:... -
Page 22: Av Setup
STM6600 Figure 13: Spectrum analyzer Adjustment è F1 Span FULL:Changes the sampling –frequency between 50MHz/100MHz/200MHz è F2 LNB setting:To enter the LNB setting menu è F3 POLVER:To display the Power lever è OK Search:To enter the program search AV Setup ■... -
Page 23: Disposal
STM6600 ◄- or ►button to choose the Save screen capture to usb _Save screen capture to: Press ◄- or ►button to choose the Digital audio out put at _Digital audio output : Press PCM/Original ◄- or ►button to choose the Lip sync mode at Auto/Manual _Lip sync mode: Press Audio delay:Press ◄- or ►button to choose the Audio delay at 0ms/20ms/40ms/…... - Page 24 STM6600 Help to keep our environment clean which we are living in! 24 |ENG...
-
Page 25: Technical Specifications
STM6600 Technical specifications LNB/Tuner input F-type connector IEC 169-24 Frequency range 950 MHz ~ 2150 MHz Input level -65 dBm bis -25 dBm LNB power supply 13/18 V, max. 400 mA LNB control signal 22 kHz DiSEqC control Version 1.0 Demodulator Front-end-modul QPSK/8PSK... - Page 26 STM6600 SCPC- und MCPC Spectral inversion Auto conversion Tuner input F-type connector IEC 169-24 Frequency range 110 MHz ~ 862 MHz RF Input/Output impedance: -75Ω Unbalance Demodulator Front-end-modul QPSK/16QAM/64QAM FFT mode 2K/8K Channel Bandwidth: 6MHz/7MHz/8MHz Corde Rate: 1/2,2/3,3/4,5/6,7/8 Guard Internal: 1/4,1/8,1/16,1/32 SCPC- und MCPC Spectral inversion...
-
Page 27: Warrenty
STM6600 Connectors USB2.0 USB 2.0 Enternet Rj45 Hdmi output CVBS 3RCA[Video,L-Autio,R-Audio] Power supply Supply voltage 14 V Li-oN battery 3000 mA Charger 90 – 240 V Supply voltage (charger) 175 - 250 V ~, 50/60 Hz Dimensions Length x width x height Gross-weight 0,5 Kg Temperature...
Need help?
Do you have a question about the STM-6600 and is the answer not in the manual?
Questions and answers