
Subscribe to Our Youtube Channel
Related Manuals for Vesper AIS WatchMate 850


Summary of Contents for Vesper AIS WatchMate 850
- Page 1 WatchMate ® Class B AIS Transponder WatchMate 850 Model WMX850 WMX850-505F-1703...
-
Page 2: Trademarks
Copyright © 2012, Vesper Marine Ltd. All rights are reserved. Unless otherwise indicated, all documentation and operating software contained within this product or distributed with this product is copyrighted by Vesper Marine Ltd. All rights are reserved. Except for short quotations in a review, no portions of this document or the software contained within this product may be reproduced or transmitted in any form or by any means without prior written permission of Vesper Marine Ltd. -
Page 3: Vhf Antenna Warning
Vesper Marine AIS/VHF antenna splitter. Transmitting without an antenna may damage this device. RF Emissions Warnings WARNING: Changes or modifications not expressly approved by Vesper Marine could void the user’s authority to operate this equipment. CAUTION: This device generates and radiates electromagnetic energy. This device must be installed and operated according to the instructions contained in this manual. - Page 4 INDUSTRY CANADA WARNING: To satisfy RF exposure requirements for mobile transmitting devices, a separation distance of 1 metre or more should be maintained between the antenna of this device and persons during device operation. To ensure compliance, operations at closer than this distance is not recommended. The antenna used for this transmitter must not be co-located in conjunction with any other antenna or transmitter.
-
Page 5: Mmsi Programming Warning
GPS antenna. See the GPS Installation section for more information on installing an external GPS antenna. WARNING: If an external antenna is required, only use a Vesper Marine GPS antenna. Performance cannot be assured with any other antenna. Any damage caused by using an incompatible GPS antenna is not covered under your warranty. -
Page 6: Compass Safe Distance
Do not use acid, ammonia, solvents, or any abrasive products. Declaration of Conformity Vesper Marine declares that this AIS Aid to Navigation is in compliance with Directive 2014/53/EU. The full text of the EU Declaration of Conformity is available at the following internet address: www.vespermarine.com/compliance. -
Page 7: Table Of Contents
Table of Contents Trademarks ......................... 2 Copyright Notice ......................... 2 Technical Accuracy ......................2 General Warnings ....................... 2 VHF Antenna Warning ...................... 3 RF Emissions Warnings ....................3 MMSI Programming Warning .................... 5 GPS Antenna ........................5 Compass Safe Distance ....................6 Electronic Waste Recycling .................... - Page 8 Weather Reports ......................36 GPS Position Display ...................... 36 GPS Status Display ......................36 AIS Status Display ......................37 Using the Anchor Watch ....................39 Displaying Information About your AIS WatchMate ............42 Placing Individual DSC Calls ................... 43 Target Filters ........................44 Target Alarms ........................
-
Page 9: Glossary
Glossary Universal Shipborne Automatic Identification System. A system of transponders installed on vessels which send continuously updated navigation information. An AIS receiver or transponder is used to monitor these transmissions and the WatchMate is used to display this information and trigger alarms when there is a risk of collision. -
Page 10: Introduction
Introduction WatchMate is a device which provides information to assist in avoiding collisions at sea. It works by receiving and transmitting data as part of the Universal Shipborne Automated Identification Systems (AIS). The AIS system uses two dedicated VHF channels designated for this purpose and with the installation of the WatchMate to receive signals from other AIS-equipped vessels you can view this information. -
Page 11: Important Information
Closest point of The CPA is the closest a target will come to your vessel if both your approach (CPA) vessel and the target maintain their existing course and speed. It is displayed in nautical miles to the nearest tenth or hundredth. As either your vessel or the target changes its course or speed, the CPA (along with all other computed data) is automatically recomputed and redisplayed. -
Page 12: Specifications
Specifications Size (not including cables or 208mm wide x 135mm high x 76mm depth (8 3/16” x 5 5/16” x 3”) mounting bracket) 17mm (11/16”) Flush mount thickness Mounting template Included Power supply 10-32 VDC 1A max, 3W nominal Environmental Watertight (USCG CFR-46, IPx7) Operating temperature -25°C to +55°C (-13°F to 131°F) - Page 13 SO-239 VHF antenna required PL-259 connector. 50 ohm, max 2:1 VSWR Vesper Marine is committed to continuously improving our products. As a result, specifications may change and there may also be differences between the product and this manual. - 13 -...
- Page 14 - 14 -...
-
Page 15: Installation
If you are not able to mount the unit with an unobstructed view of the sky or if your mounting location and / or other equipment interferes with the built-in GPS antenna, then an optional external GPS antenna is required. You must use a Vesper Marine dedicated GPS antenna which cannot be shared with any other equipment. However,... -
Page 16: Gps Antenna Installation
Do not place the GPS antenna near or in the path of radar or HF antennas. It is not necessary to change any settings when using the optional Vesper Marine GPS antenna. Simply connect it to the TNC connector on the back of the unit. -
Page 17: Connectors
Connectors Power/Data Cable Wiring A 2m (6.5') power/data cable with attached connector is supplied with the WatchMate. You may extend this cable as necessary. It is recommended that any splices made in the cable be done in a weather tight area to prevent corrosion and failed connections. Consult a marine electronics technician if you have any difficulties or concerns about installation. -
Page 18: Minimum Connections
Minimum Connections Connecting an Optional Heading Sensor or Chart Plotter - 18 -... -
Page 19: Connecting An Optional External Alarm
Connecting an Optional External Alarm Using a Relay to Control a High Current External Device When your external device requires more than 150mA you must use an external relay. Ensure a spike suppression diode (eg. 1N4001) is either provided by the relay or fitted externally. -
Page 20: Gps Backup Power
USB cable with a Mini-B (male) connector. One has been included with your WatchMate. These are also widely available from computer stores. Vesper Marine has available an optional waterproof USB cable which is highly recommended if your WatchMate is installed in a location where it is possible to get wet. -
Page 21: Configuration: Entering Your Mmsi And Vessel Details
Configuration: Entering Your MMSI and Vessel Details Your vessel data, including MMSI number, must be entered into the WatchMate. Your MMSI may have been entered already by your dealer. Once entered, this information will be retained and it is not necessary to enter it again. Until this information has been entered, the WatchMate will receive other vessel's AIS data but will not transmit yours. - Page 22 MMSI for your vessel. If you need to change the MMSI number in your unit you must contact an authorized dealer or Vesper Marine. WatchMate will not transmit your data until your MMSI has been entered.
-
Page 23: Using The Vmais Configuration Program
Using the vmAIS Configuration Program An alternative method for entering your MMSI and vessel details is the vmAIS program supplied on the included CD. You can copy this program to your PC or run it directly from the CD by clicking on “Configuration Utility”. Note: This program only works with Microsoft Windows XP, Vista, 7 or later. - Page 24 8. When all the information is correct, click on the “Save Vessel Data” button. You will receive the following confirmation. Click “OK” if you wish to proceed. 9. When you are finished, click the “Disconnect” button. - 24 -...
-
Page 25: Power Button
Power Button Press the power button momentarily to turn on the WatchMate. Press and hold the power button for 2 seconds to turn it off. While the WatchMate is turned on, pressing the power button momentarily allows you to change the display brightness. One Minute Startup Time WatchMate will not begin to transmit for one minute after it has been switched on. -
Page 26: Display Screens
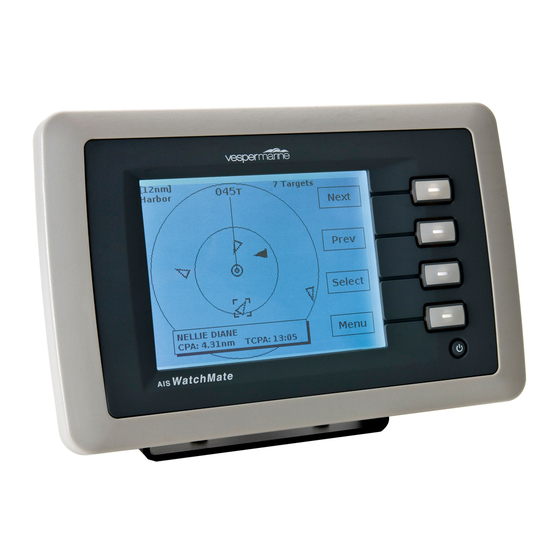
Display Screens Home Page – Situation Display The home page displays targets using a graphical situation display similar to a radar. The display is oriented either Heading-Up or North-Up depending on the profile and settings. If heading data is not available for your vessel, then it is oriented course-up or north-up. The heading or course may be displayed in magnetic or true degrees depending on a setting in setup mode. - Page 27 Range Rings The outer range ring corresponds to the current plotting range. The inner range ring is ½ the plotting range. If the guard alarm is enabled an additional dotted range ring is drawn to indicate its position. Plotting Range The plotting range may be changed by using the Menu button.
-
Page 28: Main Menu
This startup time is required to determine background noise levels on the AIS frequencies. During this time, the warning symbol will be shown. When used with a Vesper Marine AIS/VHF antenna splitter this symbol indicates the VHF radio is in-use and AIS transmissions are temporarily disabled. - Page 29 the plotting range. Profile Choose a profile of alarm and filter settings. This allows you to quickly select from pre-programmed groups of settings as your situation changes. See the Profiles section for more details. Clear Selection Deselects the currently selected target and removes the popup information window.
-
Page 30: Target List
Target List The target list contains all non-filtered targets. You can scroll through the list to select a target to view in detail. By default, the target list is continuously ordered by priority. The priority of a target is based on its CPA, TCPA, range, and speed. Higher priority targets are shown at the top of the list. -
Page 31: Target Display
Target Display The target display screen is shown when you select a target from the target list or situation display. This screen contains detailed information about the target. The information displayed will vary depending on how much data has been received from the target and the type of target. - Page 32 will be blinking (eg. for a guard alarm and for a CPA alarm). The blinking stops when the alarm is muted or the target is no longer in an alarm condition. If a target has an age greater than 15 minutes, it is automatically removed from the target list.
-
Page 33: Cpa Graphical Display
CPA Graphical Display When a target is converging and has a CPA shown, the CPA button is available on the target display. This button brings up a graphical plot showing the relative position of the target at the time of CPA. The display is oriented either Heading-Up or North-Up depending on the current profile settings. -
Page 34: Safety Message List
Safety Message List The message list displays safety messages received from other vessels and shore stations. Safety messages are free-form text and may pertain to emergencies, port operations, hazard warnings, weather or other important information. They may be broadcast to all AIS-equipped vessels within range or may be specifically addressed to your vessel. -
Page 35: Safety Message Display
Safety Message Display The message display screen is shown when you select a message from the safety message list. The sender and full text of the message is shown on this screen. When a safety message is first received, this screen is automatically shown. When the safety message screen is displayed, you can use the following buttons: ▲... -
Page 36: Fleet List
Fleet List If targets have been marked as being members of your fleet, they may be displayed in the fleet list. Use this list to view your fleet or remove members from your fleet. To add a vessel to the fleet list, use the Menu button on the target details screen. Weather Reports If meteorological / hydrographic messages are transmitted in your area they will be placed in a list for you to review. -
Page 37: Ais Status Display
AIS Status Display This screen displays information about your AIS transponder's status. In the box at the top of the screen the tick marks indicate the primary operational state. If any items require attention they will be indicated by this symbol: If this symbol is shown, the WatchMate is not transmitting your vessel's AIS data. - Page 38 Frequency The radio frequency assigned to each channel. You cannot change this value. Mode The operating mode for each each channel. You cannot change this value. RSSI The background noise level for each channel. This is for informational purposes. Rx Msg Count The number of AIS messages that have been successfully received on each channel.
-
Page 39: Using The Anchor Watch
Using the Anchor Watch The anchor watch may be used to sound the alarm if your vessel moves outside a preset circle. To use the anchor watch, follow these steps: 1. Prior to anchoring, select “Anchor Watch” from the main menu. 2. - Page 40 Use the following buttons from the Anchor Watch screen: Reset Reset the anchor location to your current position. Dist Adjust the alarm distance (radius of the circle). Enable Turn the alarm on or off. Disable Home Return to the situation display. Note: If the alarm is enabled, it will remain active.
- Page 41 Icon Meanings Within Anchor Watch Your vessel. The reference position of your GPS antenna is not known or heading data is not available. Your vessel. The dot at the bow indicates that your position is referenced to the bow of your vessel. The alarm is enabled and will sound if your vessel moves outside the circle.
-
Page 42: Displaying Information About Your Ais Watchmate
Displaying Information About your AIS WatchMate You can display the following information by selecting About your AIS WatchMate from the display settings menu. This information is provided for reference and technical support purposes. - 42 -... -
Page 43: Placing Individual Dsc Calls
NOTE: This feature requires a compatible VHF radio that accepts the NMEA-0183 DSC sentence. This will work with certain Icom radios and may work with other brands. Some radios may require a firmware upgrade. Vesper Marine publishes a list of compatible radios on its website at www.vespermarine.com. -
Page 44: Target Filters
Target Filters There are several filters which allow you to control which targets are included in the target list and may be displayed. These give you the ability to limit the target list and are most useful when operating in areas with large amounts of vessels. Any filter can be turned off. If all filters are turned off, then all possible targets are included in the target list and all targets may trigger alarms. -
Page 45: Guard Alarm
alarms may be silenced for some targets but will still remain active for other targets. When an alarm is sounded, the display immediately shows the target that has triggered the alarm. Pressing the Mute button silences the alarm and all subsequent alarms for that target only. -
Page 46: Profiles
re-enable CPA alarms for this target again, use the Enable Alarms menu item. Naturally, if the target is still within the parameters established for triggering a CPA alarm, the alarm will immediately sound again for that target! There are several settings that control when a target triggers a CPA alarm: CPA alarm The distance (in nautical miles) which causes a CPA alarm to be triggered. -
Page 47: Harbor
Harbor This profile is intended to be used when navigating within a harbor where frequent shipping and AIS traffic is expected. Coastal This profile is intended to be used when navigating along a coast or shore where occasional shipping and AIS traffic is usually encountered. Offshore This profile is intended to be used when navigating in open ocean situations where little shipping and AIS traffic is expected. -
Page 48: Setup Mode
Setup Mode Setup mode is entered by selecting Setup from the main menu on the situation display. In setup mode the list of available setting groups are displayed. Scroll through the list and select the setting group you wish to change. You may then follow the same procedure to select the specific setting you wish to change and a pop up box is displayed with the available options for that setting. -
Page 49: Alarm Settings
Alarm Settings Lost position alert Choose whether to enable or disable an alert which sounds if your vessel's position becomes unavailable for more than 15 seconds. This alert sounds the alarm with a single short beep and may indicate a problem with GPS reception, your GPS device, or wiring. -
Page 50: Display Settings
available. This data may be output from a heading sensor or autopilot. Consult the manual for these devices. The WatchMate accepts NMEA 0183 sentences HDG, HDT, or HDM for heading data. Note: If heading data is not available then relative bearings will be shown relative to your course rather than your heading. -
Page 51: Ais Transponder
Metric or imperial Select the units (metres or feet) to use for displaying target dimensions. Button sound Enable or disable a brief sound whenever a button is pressed. AIS Transceiver Silent Mode Enable or disable the AIS transmitter. This feature may be used in situations where you do not wish to transmit your vessel data. - Page 52 Display orientation Choose the orientation of the display when this profile is activated. The orientation can be Heading-Up, North-Up or Use Default. If you select Use Default then the default display orientation (determined in the Display Settings Group) will be used. This allows you to override the default for one or more profiles, for example setting the default to Heading-Up but overriding it to be North-Up when anchored.
- Page 53 Target CPA filter This specifies the maximum CPA value a target can have and still be displayed. Any targets with a CPA greater than this value will be filtered. Use this filter to eliminate targets which will pass at a safe distance. Alarms are not triggered for filtered targets.
- Page 54 CPA alarm - Time This value specifies the maximum amount of time (in minutes) that a target's CPA must occur for it to trigger an alarm. If a target has a CPA which is “too close” but the TCPA is greater than this value, no alarm will be triggered.
-
Page 55: Built-In Integrity Test (Biit)
Built-in Integrity Test (BIIT) WatchMate continuously monitors its transceiver performance. If it detects an error condition you will be notified with a message box and the alarm will beep briefly. For certain messages you are able to press the Confirm button to acknowledge the situation and prevent the message from reappearing. -
Page 56: Device Alerts
Device Alerts WatchMate will display device alerts (sentence $xxALR) received from other instruments. These alerts may indicate operational status or problems. When a device alert arrives, the message associated with it is displayed and you are given the opportunity to send a confirmation back to the device that generated the alert. -
Page 57: Troubleshooting
Silent Mode using the “AIS Transceiver” setup option. CAUTION: Never operate this device unless it is connected to a suitable VHF antenna or Vesper Marine AIS/VHF antenna splitter. - 57 -... -
Page 58: Examining Received Nmea Data
Examining Received NMEA Data As a troubleshooting aid it is possible to have the WatchMate display the raw sentence data received on its NMEA input port. This can help you to resolve wiring and other installation problems. When using this mode, normal operation is not performed. Only the raw data display is done. -
Page 59: Warranty - North America
ABOVE LIMITATIONS MAY NOT APPLY TO YOU. Vesper Marine retains the exclusive right to repair or replace the product or offer a full refund of the purchase price at its sole discretion. SUCH REMEDY SHALL BE YOUR SOLE AND EXCLUSIVE REMEDY. -
Page 60: Warranty - Australia And New Zealand
Vesper Marine retains the exclusive right to repair or replace the unit or offer a full refund of the purchase price at its sole discretion. In addition, Vesper Marine retains the exclusive right to replace the unit with a factory reconditioned unit or a new unit at its sole discretion. -
Page 61: Warranty - European Union
Vesper Marine retains the exclusive right to repair or replace the unit or offer a full refund of the purchase price at its sole discretion. In addition, Vesper Marine retains the exclusive right to replace the unit with a factory reconditioned unit or a new unit at its sole discretion. -
Page 62: Obtaining Warranty Service
Obtaining Warranty Service To obtain warranty service, please contact us. If you are unable to contact Vesper Marine directly, then contact the dealer where you purchased the unit. You must have the original sales receipt. Online auction confirmations are not acceptable as an original sales receipt.
Need help?
Do you have a question about the AIS WatchMate 850 and is the answer not in the manual?
Questions and answers