Advertisement
Quick Links
Advertisement

Related Manuals for Ovela OVKIDSSWWA


Summary of Contents for Ovela OVKIDSSWWA
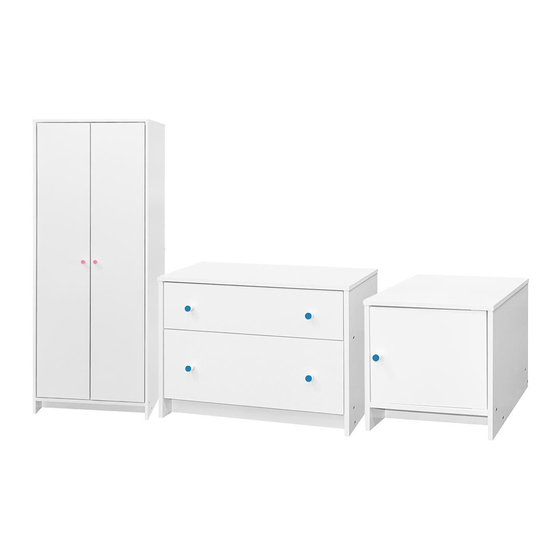
- Page 1 KIDS BEDROOM FURNITURE PACKAGE (WHITE) OVKIDSSWWA...
- Page 2 Bedside Table Wardrobe Chest of Drawers...
- Page 3 COMPONENTS Lay all components out on a clean floor and ensure all parts are included. If any pieces are missing, check all packaging thoroughly, then contact help.Kogan.com for assistance. Bedside Table Part List Part Description Part Description Left Panel Top Panel Right Panel Door Plinth Panel (x2)
- Page 4 Hardware List A Wood Dowel M6x25mm (x12) B CAM Nut 15mm (x4) C CAM Bolt (x4) D PVC Nail (x4) E CSK Screw M4x45mm (x8) F Nail (x8) G Knob Handle H CSK Screw M4x30mm I Sticker 20mm (Pink x4 & Blue x4) L Door Holder AC 75 (L) J BR Magnet K Plate...
- Page 5 Tools Required (not provided) Philips Head Screwdriver Soft Head Mallet Warning: The use of power tools to assemble this product may cause damage this product making it unsafe.
- Page 6 ASSEMBLY Step 1: A (x12) B (x4) C (x4) D (x4)
- Page 7 Step 2: E (x4) Step 3: E (x4)
- Page 8 Step 4: Step 5:...
- Page 9 Step 6: F (x8) Step 7: L (x2)
- Page 10 Step 8: Step 9: M (x3)
- Page 11 Step 10: Step 11:...
- Page 12 Step 12: Completed!
- Page 13 COMPONENTS Lay all components out on a clean floor and ensure all parts are included. If any pieces are missing, check all packaging thoroughly, then contact help.Kogan.com for assistance. Wardrobe...
- Page 14 Part List Carton 1 of 2: Part Description Left Panel Right Panel Left Door Right Door Back Panel (x2) Carton 2 of 2: Part Description Bottom Panel Front Plinth Panel Back Plinth Panel Back Support Panel Front Support Panel Top Panel...
- Page 15 Hardware List A Wood Dowel B VK-43 Aluminium C Oval Pipe 598mm (x2) M6x25mm (x20) Bracket (x4) D Hinges 7/8" (x6) E CSK Screw F CSK Screw M3.5x16mm (x41) M4x25mm (x2) G CSK Screw H PVC Nail (x4) I Knob Handle (x2) M4x45mm (x14) J CSK Screw M4x30mm (x2) K Sticker 20mm...
- Page 16 Tools Required (not provided) Philips Head Screwdriver Soft Head Mallet Warning: The use of power tools to assemble this product may cause damage this product making it unsafe. Two People Required...
- Page 17 ASSEMBLY Step 1: A (x20) B (x4) D (x6) E (x20) H (x4)
- Page 18 Step 2: G (x5)
- Page 19 Step 3: G (x5)
- Page 20 Step 4: G (x4)
- Page 21 Step 5: F (x2)
- Page 22 Step 6: E (x8) L (x2)
- Page 23 Step 7: N (x24)
- Page 24 Step 8: C (x2)
- Page 25 Step 9: D (x6) E (x12) I (x2) J (x2)
- Page 26 Step 10: Adjusting the door gaps (optional) Door Door Front to rear adjustment Lateral adjustment Door Vertical adjustment...
- Page 27 Step 11: O (x2) P (x2) Q (x2) TOPPLING FURNITURE WARNING: • It is strongly recommended that this product is permanently fixed to the wall. • The pack only contains screws for fastening the bracket itself to the product. • Please seek professional advice if you are in doubt of what fixing device to use. •...
- Page 28 Step 12: K (x2) R (x2) Wall WARNING: Risk of crush injury or death, secure to the wall using parts provided. Do not store heavy items on top as this can cause the product to topple.
- Page 29 Step 13: Completed!
- Page 30 COMPONENTS Lay all components out on a clean floor and ensure all parts are included. If any pieces are missing, check all packaging thoroughly, then contact help.Kogan.com for assistance. Chest of Drawers Part List Part Description Part Description Left Panel Lower Drawer Right Panel Right Panel Lower Drawer Front Panel...
- Page 31 Hardware List A Wood Dowel B CAM Nut 12mm (x6) C CAM Nut 15mm (x4) M6x25mm (x18) D CAM Bolt (x10) E PVC Nail (x4) F CSK Screw M4x45mm (x10) G Nail (x20) H PVC Nose Handle (x4) I CSK Screw M4x30mm (x4) J Sticker 20mm K Metal Runner L Metal Runner 12"...
- Page 32 Tools Required (not provided) Philips Head Screwdriver Soft Head Mallet Warning: The use of power tools to assemble this product may cause damage this product making it unsafe.
- Page 33 ASSEMBLY Step 1: A (x18) B (x6) C (x4) D (x10) E (x4) K (x2) M (x12)
- Page 34 Step 2: F (x5)
- Page 35 Step 3: F (x5)
- Page 36 Step 4:...
- Page 37 Step 5: G (x14)
- Page 38 Step 6: N (x8)
- Page 39 Step 7: Step 8:...
- Page 40 Step 9: G (x6) L (x2) M (x12)
- Page 41 Step 10: H (x4) I (x4)
- Page 42 Step 11: J (x4)
- Page 43 Step 12: Completed!
- Page 44 Need more information? We hope that this user guide has given you the assistance needed for a simple set-up. For the most up-to-date guide for your product, as well as any additional assistance you may require, head online to help.kogan.com...
Need help?
Do you have a question about the OVKIDSSWWA and is the answer not in the manual?
Questions and answers