Table of Contents
Advertisement
Quick Links
Advertisement
Table of Contents

Subscribe to Our Youtube Channel
Related Manuals for Elikon EVD2-40IN


Summary of Contents for Elikon EVD2-40IN
- Page 1 EJikon 2 WIRE INTERCOM SYSTEM USER MANUAL EVD2-401N • Please read this manual carefully before using the product you purchase,and keep it well for future use. • Please note that images and sketch maps in this manual may be different from the actual product.
- Page 2 PRECAUTIONS • Slots or openings in the back of the monitor, are provided for ventilation and to ensure reli- able operation of the video monitor or equipment and to protect it from overheating. These openings must not be blocked or covered. The monitor should never be placed near or over a radiator or heat register and should not be placed in a built-in installation such as a book- case unless proper ventilation is provided.
-
Page 3: Table Of Contents
CONTENTS Front panel ..........................4 Mounting ..........................5 Screen ............................ 6 Answering a call ........................7 Adjusting screen&volume ....................... 9 Door release .......................... 10 Calling other monitors......................10 Monitoring ..........................11 Openning staircase light ......................12 Transferring call ........................12 Monitor settings ........................ -
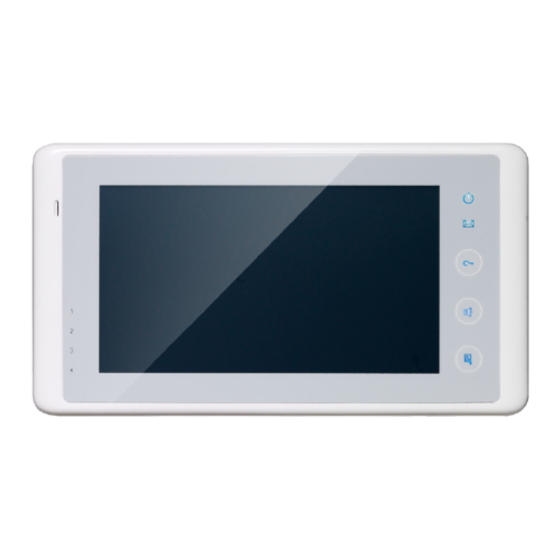
Page 4: Front Panel
Front panel [10] DIPS 1 2 3 4 5 6 Key functions Item Description • See the next page for details Digital LCD touch screen • Display the visitors' image Power indicator Light up when the monitor power-on Message indicator Light up when the monitor has missed call Unlock button Press to release the door... -
Page 5: Mounting
Mounting The unit 2 wire cable Mounting screw x 2(included) Mounting bracket The installation height is suggested to 145~160cm. 1. Use screws to fasten the mounting bracket to the wall with mounting box. 2. Connect the 2 wire cables to the unit. 3. -
Page 6: Screen
Screen Main Menu The Main menu is your starting point for using all the applications on your monitor. You can cus- tomize your Main menu to display your logo. Touch anywhere of the screen on monitor in standby mode, the Main menu will appear as follow: INNER CALL NAMELIST Touch it to activate inner call. -
Page 7: Answering A Call
Answering a call • When there is a call from a video door station.The call tone sounds, an image will be dis- played on the screen. TALK/MON button on the panel, begin communicat- • Touch icon on screen or press ing hands free with the visitor for 90 seconds. - Page 8 Compare the difference of these 2 image modes: To complete communication • Touch icon on screen or press the TALK/MON button on the panel to complete the communication. Note: Communication also ends automatically after 90 seconds. 1.Receiving a call while talking with a door station •...
-
Page 9: Adjusting Screen&Volume
Adjusting screen&volume While receiving a call from door station, or monitoring /communicating with the visitor,you can adjust the screen and speaker volume. Follow the steps: 00:10 DS-1 00:10 DS-1 00:10 DS-1 Normal Adjusting images Total 4 scene modes can be selected in sequence:Normal, Brightly, Soft and User.Whichever mode you choose, there will be a corresponding value for contrast,brightness and color. -
Page 10: Door Release
Door release It is available to release the door during a call-in, communication,or while monitoring a door station. 00:10 DS-1 Touch either icon on the screen or press UNLOCK button on panel to release door. The door lock is released for the set door release time. -
Page 11: Monitoring
Calling other monitors in the same system Touch [Name list] icon on monitor, the users in the same system will be displayed. Just select one target, touch icon to call the corresponding user. If the call is answered,conversation is activated. 00:10 DS-1 00:10... -
Page 12: Openning Staircase Light
Opening staircase light Note: The staircase light should be connected on the system, and this function should be sup-ported by EVD2-2RLC. Please refer to EVD2-2RLC user instruction in detail. Touch [Light] icon on main menu page or touch icon during monitoring or talking to open the staircase light, the staircase light will be turned off automatically after 60 seconds. -
Page 13: Monitor Settings
Two modes can be selected. 1. Simultaneously: When receives call from door station, diverts the call to the phone immedi- ately. At this mode,the monitor will always open the screen and show image from door station during diverted, if the monitor answers the call at this time,diverted will conclude at once. 2. -
Page 14: Ring Setting
Ring setting The ring call tone can be set individually to distinguish different calling sources. 1.On main menu page, touch Settings icon -> Ring. 2.Touch the setting target of door tone,intercom tone,door bell tone and ring volume individually, then touch + / - ,or icon to change the value. -
Page 15: Restoring To Default Setting
Restoring to default setting The restore to default function allows the user to recover the settings to factory setting. • On main menu page, touch [Logo] icon to enter About page. • Touch icon to restore to default. 00.00 AUTO 00.01.00 Entering installer setup •... - Page 16 The setting items and codes are as followings Code Setting Item Code Setting Item 2412 Reset To Default Setting 8016-8017 Bypass Enable/Disable 2499 Restore Factory Settings 8401-8499 Unlock Time 8000 Master Monitor 8018-8020 Video Display Standard 8001~8003 Slave Monitor 9015-9016 Enable/Disable Intercom Call 8006-8007 Setting Slave Monitor Panel On/Off 9017-9018 Scale Mode 4:3/16:9 8010-8011 Unlock Mode:Close/Open Entering Address setting page...
- Page 17 Setting slave monitor panel on In default mode,when receiving a call,the master and slave monitors will ring at the same time,and just the master monitor can display the image while the slave monitors will not. But the settings can be changed,you can set the master monitor and all the slave monitors to panel on at the same time when being called.
- Page 18 Manual Input Address It’s available to input the address manually for this monitor. • Total 32 numbers to be set, from 00~31. • When multi monitors need to be installed in one apartment, these monitors should use the same user code, and the master/slave mode should be set on the monitor. (Details refer to the section of Setting Slave Monitor) 1.On Address setting page,select Manual Input Address setting mode, then touch icon, a...
-
Page 19: Screen Calibration
Screen Calibration UNLOCK button on front panel and hold for 3 seconds. • In standby mode, press • Screen calibration menu is shown. • Click “+” to complete the calibration. Refer to the followings: Specification ● Power supply for indoor monitor: DC 24V ●... - Page 20 EVD2-40IN The design and specifications can be changed without notice to the user. Right to interpret and copyright of this manual are preserved.
Need help?
Do you have a question about the EVD2-40IN and is the answer not in the manual?
Questions and answers