Table of Contents
Advertisement
Quick Links
Advertisement
Table of Contents

Subscribe to Our Youtube Channel
Related Manuals for Ada Platinum Elite


Summary of Contents for Ada Platinum Elite
- Page 1 ZONE CONTROL SYSTEM INSTALLATION MANUAL...
-
Page 3: Table Of Contents
Wiring Diagram Commissioning Notes 20. Software Update 10. AC Control - Samsung No NASA 21. Downloading and Installing Wiring Diagram Platinum Elite App Commissioning Notes Accessing System Set Up 11. AC Control - Daikin 23. Adding a Zone Wiring Diagram Commissioning Notes 24. -
Page 4: Precautions
PRECAUTIONS 1. Precautions Refer to these installation instructions before commencing the installation or service of this product. WARNING This product should be installed and setup by qualified personnel. To reduce the risk of fire, electric shock or product damage: DO NOT expose to rain or moisture of any kind DO NOT place articles filled with water on or near this appliance DO NOT remove covers –... -
Page 5: Components
PEGD PEGP PEGF PEGT 2, 3 & 4-core AC Link Cable (PETCW, PE3CW, PE4CW) - for use with Platinum Elite Gateway Wireless Temperature Sensor (PEWZS) Duct Sensor (PEDS) Wireless Receiver (PEWRM) Plug-in Temperature Sensor (PEPZS) 30m Cat6 Coms Cable (PECC30) -
Page 6: Mounting The Control Box
Ideally, the standard AC Wall Controller should be mounted away from the Platinum Elite Tablet, ie. in a discrete but accessible location such as a utility room, a cupboard or in the roof space near a ceiling access panel. This allows for easy access should the AC unit require adjustments to the factory settings by qualified personnel. -
Page 7: Connecting The Ac
After completing wiring and setting the DIP switches, power up the system. AC Unit, Platinum Elite Gateway and Platinum Elite Zone Control System can be powered up at the same time, but if powered up separately, ensure AC Unit and Platinum Elite Gateway are on before the Platinum Elite Zone Control System. -
Page 8: Mounting The Tablet
MOUNTING THE TABLET 8. Mounting the Tablet Ÿ Mount the Tablet where the standard AC wall control would normally be mounted, approximately 1.5m above floor level and preferably on an internal wall in the return air flow. Ensure at least a 100mm ‘exclusion zone’ to any other wall mounted item. Ÿ... - Page 9 MOUNTING THE TABLET Tablet Coms Cable Mounting Screw Mounting Plate Plug Coms Cable into socket on the back of the Tablet, then simply push Tablet onto the Mounting Plate and slide down so it clips into place 100mm ‘exclusion zone’ to any other wall mounted items...
-
Page 10: Ac Control - Samsung Nasa
F3 F4 F3 F4 AC Indoor Unit PCB 2-core cable (PETCW) supplied with Platinum Elite Cable Kit Gateway Address Setting F3 F4 Gateway No. 1 (Default) Platinum Elite Gateway PEGSN A+ B- 24VDC Tablet Power Cat6 cable 2-core cable (PETCW) Supply... -
Page 11: Commissioning Notes
AC return air sensor. Ÿ AC Unit, Gateway and Platinum Elite Zone Control System can be powered up at the same time, but if powered up separately, ensure AC Unit and Gateway are on before the Platinum Elite Zone Control System. -
Page 12: Ac Control - Samsung No Nasa
AC Indoor Unit PCB 4-core cable (PE4CW) supplied with Platinum Elite Cable Kit Gateway Master/Slave Setting Master Slave F3 F4 V1 V2 Down/OFF Up/ON Platinum Elite Gateway PEGS A+ B- 24VDC Tablet Power Cat6 cable 2-core cable (PETCW) Supply supplied with Platinum... -
Page 13: Commissioning Notes
After commissioning, SW1.1 is left OFF. Gateway is in Slave mode. Ÿ AC Unit, Gateway and Platinum Elite Zone Control System can be powered up at the same time, but if powered up separately, ensure AC Unit and Gateway are on before the Platinum Elite Zone Control System. -
Page 14: Ac Control - Daikin
2-core cable (PETCW) supplied with Platinum Elite Cable Kit (P1P2 connection has no specific polarity) Gateway Master/Slave Setting Master Slave P1 P2 Down/OFF Up/ON Platinum Elite Gateway PEGD A+ B- 24VDC Tablet Power Cat6 cable 2-core cable (PETCW) Supply supplied with Platinum... -
Page 15: Commissioning Notes
After commissioning, SW1.1 is left OFF. Gateway is in Slave mode. Ÿ AC Unit, Gateway and Platinum Elite Zone Control System can be powered up at the same time, but if powered up separately, ensure AC unit and Gateway are on before the Platinum Elite Zone Control System. -
Page 16: Ac Control - Fujitsu
3-core cable (PE3CW) supplied with Platinum Elite Cable Kit Gateway Master/Slave Setting Master Slave B W R (3 2 1) Down/OFF Up/ON Platinum Elite Gateway PEGF A+ B- 24VDC Tablet Power Cat6 cable 2-core cable (PETCW) Supply supplied with Platinum... -
Page 17: Commissioning Notes
, SW1.1 is left OFF - Gateway is in Slave mode. Ÿ AC Unit, Gateway and Platinum Elite Zone Control System can be powered up at the same time, but if powered up separately, ensure AC unit and Gateway are on before the Platinum Elite Zone Control System. -
Page 18: Ac Control - Mitsubishi Electric
Wiring Diagram Wall Controller CN105 AC Indoor Unit PCB Cable with plugs, supplied with Gateway Fan Speed Setting 3 or 4 Down/OFF Up/ON Platinum Elite Gateway PEGM A+ B- 24VDC Tablet Power Cat6 cable 2-core cable (PETCW) Supply supplied with Platinum... -
Page 19: Commissioning Notes
AC control temperature is set to be measured from the AC return air sensor. Ÿ AC Unit, Gateway and Platinum Elite Zone Control System can be powered up at the same time, but if powered up separately, ensure AC Unit and Gateway are on before the Platinum Elite Zone Control System. -
Page 20: Ac Control - Mitsubishi Heavy
2-core cable (PETCW) supplied with Platinum Elite Cable Kit (XY connection has no specific polarity) Gateway Master/Slave Setting Master Slave Down/OFF Up/ON Platinum Elite Gateway Fan Speed Setting PEGMHI A+ B- 24VDC Tablet Power Cat6 cable 2-core cable (PETCW) Supply... -
Page 21: Commissioning Notes
AC control. Ÿ AC Unit, Gateway and Platinum Elite Zone Control System can be powered up at the same time, but if powered up separately, ensure AC unit and Gateway are on before the Platinum Elite Zone Control System. -
Page 22: Ac Control - Panasonic
R1 R2 R1 R2 AC Indoor Unit PCB 2-core cable (PETCW) supplied with Platinum Elite Cable Kit (R1R2 connection has no specific polarity) R1 R2 Platinum Elite Gateway PEGP A+ B- 24VDC Tablet Power Cat6 cable 2-core cable (PETCW) Supply... -
Page 23: Commissioning Notes
Check the unit User Manual for more information. Ÿ AC Unit, Gateway and Platinum Elite Zone Control System can be powered up at the same time, but if powered up separately, ensure AC Unit and Gateway are on before the Platinum Elite Zone Control System. -
Page 24: Ac Control - Toshiba
2-core cable (PETCW) supplied with Platinum Elite Cable Kit (AB connection has no specific polarity) Gateway Master/Slave Setting Master Slave Down/OFF Up/ON Platinum Elite Gateway Indoor Unit Setting PEGT Not Defined A+ B- VRF SMMS VRF SHRM 24VDC Tablet Power... -
Page 25: Commissioning Notes
After commissioning, SW1.4 is left OFF. Gateway is in Slave mode. Ÿ AC Unit, Gateway and Platinum Elite Zone Control System can be powered up at the same time, but if powered up separately, ensure AC Unit and Gateway are on before the Platinum Elite Zone Control System. -
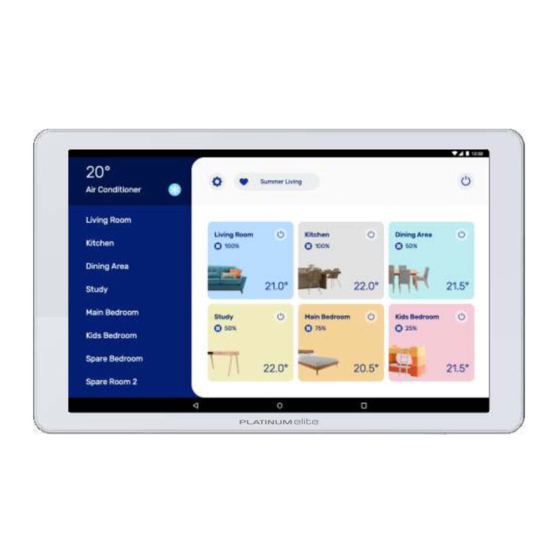
Page 26: Zone Setup
SYSTEM SETUP 17. Zone Setup When the system is first powered up, the Tablet will automatically initialise and detect installed components. Once the initialisation process is complete, the Zone setup screen is displayed. If the Zone Dampers have been installed correctly, all Zones should be shown. - Page 27 SYSTEM SET UP Once satisfied with the detected Zones, each Zone can be individually configured. Each room can be named by selecting one of the default names provided, or by entering a custom name. Room colour can also be changed to suit user preference.
- Page 28 SYSTEM SETUP If using Wireless Temperature Sensors, they must be linked to the relevant Zone. To link a Sensor, tap the ‘Add’ button. NOTE: In some extreme circumstances a Wireless Temperature Sensor may not be practical and a Plug-in Temperature Sensor may be required.
- Page 29 SYSTEM SET UP The Zone sensor code will show on the Zone Setup screen when successfully connected. ‘Disconnect’ can be used when it is required to link an alternate Wireless Temperature Sensor or if replacing a Wireless Temperature Sensor with a Plug-in Temperature Sensor.
-
Page 30: Setting Ac Control
18. Setting AC control When using a Platinum Elite Gateway, the Zone Setup screen will show ‘Continue Setup’. The system should automatically detect the brand Gateway and prompt the AC setup screen. - Page 31 SYSTEM SET UP Deselect unsupported AC modes for the installed AC system. For Advanced Installations (refer AC brand Commissioning Notes), if using external reference sensors, tap on ‘AC’ icon to select an alternate Reference Temperature Sensor. Depending on the installation configuration, this could be the ‘Tablet’...
-
Page 32: Wi-Fi Connection
Connecting to Wi-Fi will allow automatic software updates for the Tablet and enable use of the Platinum Elite App on your mobile phone. The connection will stay permanent unless settings on the chosen router change. The... -
Page 33: Software Update
SYSTEM SET UP 20. Software Update Once connected to Wi-Fi, the system may indicate an updated version of the software is available. Follow the onscreen prompts to update. -
Page 34: Downloading And Installing Platinum Elite App
SYSTEM SET UP 21. Downloading and Installing Platinum Elite App on Mobile Device Download and install Platinum Elite App onto device using Google Play or Apple store. Once installed, use the Settings icon to access the Devices tab and tap ‘Add a device’. -
Page 35: Accessing System Setup
SYSTEM SET UP 22. Accessing System Setup After the initial installation, access to Zone Setup and AC Setup functionality can be obtained by tapping the Settings icon. All user access to Software Version, Support, System information, Zones diagnostic information and connected Devices are available from this screen. - Page 36 SYSTEM SET UP Changes to Zone Setup can now be made. To access AC Setup, from the Settings screen, tap the System icon, then tap the box showing the AC name. It will require the 4- digit installer code to access the AC Setup screen.
- Page 37 SYSTEM SET UP For Advanced Installations (refer AC brand Commissioning Notes), if the Tablet is being used as the reference temperature for the AC system and is unable to be mounted in the optimum position, to ensure the best performance of the system it may be necessary to set a temperature offset on the temperature registered by the...
- Page 38 SYSTEM SET UP For Advanced Installations (refer AC brand Commissioning Notes), the Temperature Reference Sensor can be changed from the Settings screen - this is the Temperature Sensor that is controlling the setpoint of the AC system. If the system has been setup to allow use of an external Temperature Reference Sensor, this setting will normally be the...
-
Page 39: Adding A Zone
SYSTEM SET UP 23. Adding a Zone To add a Zone to the system, once the new Zone Damper has been installed, access the Zone setup screen and tap the ‘Recheck’ icon - the new Zone should appear in the list on the left and can then be setup using this screen. -
Page 40: Adding An Ac
SYSTEM SET UP 25. Adding an AC If upgrading a system to add a Platinum Elite Gateway to enable AC control, or if the Gateway is added after the initial setup process, on the Zone Setup screen it will be necessary to perform a ‘Recheck’... -
Page 41: Reset Default
SYSTEM SET UP 26. Reset Default This will remove all user/installer saved information and return the system to its original factory settings. Tapping 'Yes, reset' will reset the system, then return to the Zone Setup screen presented during an initial set up. NOTE: It is possible to do a factory reset of the Tablet by using a small pin or paperclip to press the... - Page 42 SYSTEM SET UP INSTALLATION MANUAL...
-
Page 43: Warranty
SYSTEM SET UP WARRANTY 20. Warranty This product is guaranteed against any defects in materials or workmanship under conditions of normal use for a period of up to 5 years (depending on the product) from the date of purchase. Full terms and conditions of the warranty can be found by using the QR Code right, which links to www.platinumzoning.com/warranty/ or by contacting Air Diffusion Agencies at this... -
Page 44: Troubleshooting
TROUBLESHOOTING WARRANTY 27. Troubleshooting All service to the Platinum Elite system must be carried out by an approved Air Diffusion Agencies service technician, and must not be done by unqualified personnel. Repairs carried out by unqualified personnel will void warranty. - Page 45 TROUBLESHOOTING Problem Cause Solution Tablet has no display Coms cable not plugged in. Check Coms cable connections at Control Box Assembly and back of Tablet. Power cable not plugged into Control Box Check power cable connection at Control Assembly. Box Assembly and 24V DC Power Supply. Power point not switched on at Control Switch on the power point.
-
Page 46: Zone Setup Sheet
ZONE SETUP SHEET Zone Room Zone Ø Relief Sensor ID INSTALLATION MANUAL INSTALLATION MANUAL... - Page 48 www.platinumzoning.com For the latest version of the Installation Manual, scan the QR code ADAPEI0521...
Need help?
Do you have a question about the Platinum Elite and is the answer not in the manual?
Questions and answers