Advertisement
Advertisement
Table of Contents

Related Manuals for GoPlus SP36126


Summary of Contents for GoPlus SP36126
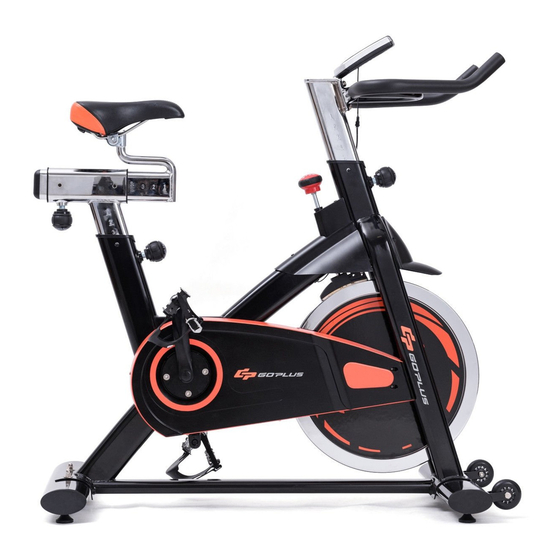
- Page 1 USER'S MANUAL Exercise bike SP36126...
- Page 2 Dear Customer, Please read this instruction very carefully before using this item. You will find important information regarding safety of your spinning bike. Note the following precaution before assembling or operating the machine. 1、 Keep children and pets away from the Spinning Bike at all times. DO NOT leave unattended children in the same room with the machine.
- Page 3 condition. 9、 Hold a routine inspection of the equipment. Pay special attention to components which are the most susceptible to wear off, i.e. connecting points and wheels. The defective components should be replaced immediately. The safety level of this equipment can only be maintained by doing so.
-
Page 4: Exploded View And Parts List
EXPLODED-VIEW & PARTS LIST:... - Page 6 NAME QUANTITY SPEC φ40*35/(M8X25) STOPPER REAR STABILIZER WEDLING CARRIAGE BOLT GB/T 12-1988 M8*67 END CAP 1 99x54x28 φ8 FLAT WASHER GB/T 802-1988 M8 (H=16mm) DOMED NUT PEDAL JD-301(9/16") FRONT STABILIZER WEDLING MAIN FRAME WEDLING φ50*92 (M16*1.5) SPRING ADJUSTMENT KNOB φ23*φ29*465 SPONGE SHEATH END CAP 2 70*30*1.5...
- Page 7 NAME QUANTITY SPEC φ56*28 CRANK COVER NUT 1 M12X1.25 φ12*155 SHAFT BEARING 2 6001ZZ FIXING BOLT M6*57 FLAT WASHER 2 GB/T 95-2002 12 FIXING NUT 3 M12X1.25 H=7 PlASTIC SLEEVE 2 70*30*1.5 PLASTIC PLUG 70*30*1.5 φ453*24*75 (13KG) FLYWHEEL φ16*φ12.1*36 LONG FIXING TUBE φ59*35 FLYWHEEL COVER NUT 2...
-
Page 8: Assembly Instruction
ASSEMBLY INSTRUCTION: 1.PREPARATION: A. Before assembling make sure that you will have enough space around the item. B. Use the present tooling for assembling. C. Before assembling please check whether all needed parts are available (at the above of this instruction sheet you will find an explosion drawing with all single parts (marked with numbers) which this item consists of. - Page 9 Convex point FIG.3-1 ATTENTION:: Connected with the computer line, to Gap(A1) corresponding to the convex point (A2) to insert link FIG.3 FIG.3: Put the Handlebar Post (pt.18) slip into the handlebar post tube on the main frame. You will have to slacken the Knob (pt.10) and pull the knob back. Then select the desired height. Release the knob and retighten the knob.
- Page 10 A.) Adjust the resistance: To increase resistance (requiring more strength to pedal), turn the Emergency Brake & Resistance Control Knob (pt.56) to the right. To decrease resistance (requiring less strength to pedla), turn the Emergency Brake & Resistance Control Knob (pt.56) to the left. B.) The Emergency Brake Function: The Emergency Brake &...
-
Page 11: Exercise Instructions
ADJUSTMENT *To adjust the seat height, slacken the spring knob on the vertical post stem on the main frame and pull back the knob. Position the vertical seat post for the desired height so that holes are aligned, then release the knob and retighten it. -
Page 12: Muscle Toning
2.The Exercise Phase This is the stage where you put the effort in. After regular use , the muscles in your legs will become Stronger. Work to your but it is very important to maintain a steady tempo throughout. The rate of work should be sufficient to raise your heart beat into the target zone shown on the graph below. - Page 13 CANADA UNITED KINGDOM RUSSIA GERMANY FRANCE UNITED STATES ITALY JAPAN SPAIN AUSTRALIA TIPS: Your suggestions and comments for Costway are really important to us! We sincerely solicit you to go back to our shop and leave a good rating in just a simple click.
Need help?
Do you have a question about the SP36126 and is the answer not in the manual?
Questions and answers
What is the bikes weight limit
The weight limit for the GoPlus SP36126 bike is 350 lbs.
This answer is automatically generated