Advertisement
Quick Links
Planet Astrophotography with a Dobsonian Manual
Thanks for downloading my guide to planet astrophotography with a Dobsonian manual telescope.
With this guide I hope to explain, how to end up with an image you will be proud of. However,
please don't expect to end up with a super image the first time, it will take a lot of practice, patience
and clear skies.
Why am I doing this tutorial? Basically help fellow Dobsonian users with the techniques I have
perfected in my quest to end up with a worthy image.
Contents
1. Equipment
6. Castrator Editing
Telescope
1. Equipment
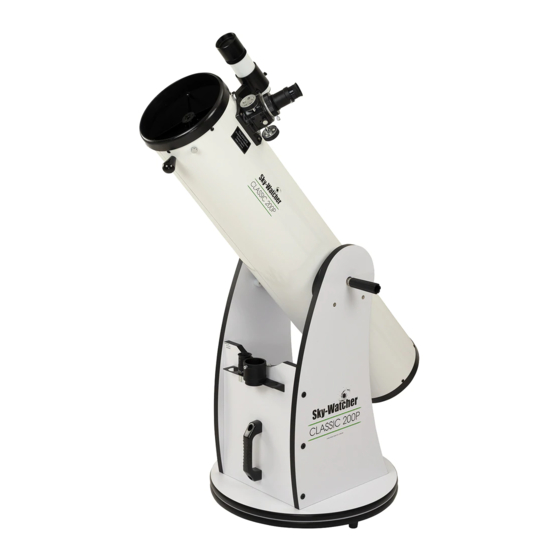
Dobsonian Telescope with Finderscope
This my Skywatcher Skyliner 200P. You can use
any Dobsonian you like as long as it good
quality. For this tutorial I will be using the
finderscope, however if you have a Telrad or
similar finder you can use that.
Advertisement

Related Manuals for SKY-WATCHER Skyliner 200P


Summary of Contents for SKY-WATCHER Skyliner 200P
-
Page 1: Table Of Contents
10. End Result 1. Equipment Dobsonian Telescope with Finderscope This my Skywatcher Skyliner 200P. You can use any Dobsonian you like as long as it good quality. For this tutorial I will be using the finderscope, however if you have a Telrad or... - Page 2 Barlow Lens You will need a barlow of reasonable quality, as this will affect the results. It is best to start with a barlow of 2x magnification, as it will be easier to locate the planet on the laptop. Converted Web Camera This is a Philips SPC900NC web camera.
-
Page 3: Software
2. Software All the software required, is available online for FREE. So click on the links provided and download the latest versions. Even though they are free, some of the websites do accept donations, if you wish to give them a few silvers for all their hard work in producing these excellent programs –... -
Page 4: Sharpcap Capturing
On your laptop, go to wherever the video documents are kept and create a new file, for example, this tutorial so I shall be capturing Jupiter, so I will rename the file - Jupiter 2Feb13 When the hour has passed you can then, take the laptop, barlow and webcam outside. Attach the barlow lens into the focuser tube and the webcam into that and plug into the laptop. - Page 5 3. Select your capturing settings from the drop down menu and load this. 4. We want to find the planet easily on the Sharpcap screen so we need to slide the exposure setting to the lowest figure. This will make the planet a white blob, that will make it easier to find and to focus too.
- Page 6 6. With one hand on the telescope focuser, the other on the scope and your eyes on the laptop, move the scope very, very slightly left, right, up, down etc. till you see what resembles a white disc. Once you found it adjust the focus till its nice and sharp on the screen. Did you see which direction the planet was drifting across the laptop screen? We want the planet to drift from left-to-right on the screen.
- Page 7 7. To do this, loosen the webcam in the barlow lens and get the planet visible on the screen again, let go of the scope and turn the webcam until the planet drifts left-to-right and re-tighten the webcam in the barlow lens. 8.
- Page 8 9. The next bit is really trial and error until you find the correct path. Looking through the finderscope, point the planet at the critical point then move the telescope so the planet is slightly right and up from the critical point. Let go of the telescope and look through the finderscope and watch the planet drift towards the critical point, once it reaches the critical point, take a look at the laptop screen.
-
Page 9: Virtualdub Editing
5. VirtualDub Editing 1. Open up the VirtualDub software and click file, then click open video file and find the video folder that you created earlier, where all the Sharpcap videos are stored and click on that. 2. Double click the first video - that will open up in the VirtualDub screen. - Page 10 3. Next, you need to add on the second video to the back end of the first. To do this, click on file and click Append AVI Segment. 4. This will bring up the video folder again, so double click on the next video and this will be added to VirtualDub.
- Page 11 As you can see from the above screen, Jupiter is half visible on the screen, this is the first frame of the first video we loaded up. This is no good, we want the planet 100% on the screen at all times, so we need to delete this section out.
- Page 12 On the frame bar you will now see that this section is in a different colour, we want to delete this bit. 7. Go to the top of the VirtualDub screen, click edit and then click delete. That section of the video is now gone.
- Page 13 Once it has saved we can move on to the next section.
- Page 14 6. Castrator With the planet jumping all over the place in the video, this will lead to poor stacking later on. So want to centre the planet in one place. 1. Open the program and leave the settings as they are displayed here. 2.
-
Page 15: Autostakkert Editing
7. AutoStakkert Editing 1. Open up the AutoSakkert program, you will see two separate boxes pop up as below. 2. Leave all the settings alone for now and click on the button that says Open and find the file you created in Castrator earlier –... -
Page 16: Registax Editing
4. On the right hand window, click the button that says Place APs in Grid, then click the Stack button on the left hand window. This will now take a few minutes to process and once completed, it will automatically create a file in your folder – along the lines of 'AS_p50_multi' 8. - Page 17 The screen will now change into this. 3. On the right hand side you can see a grid of boxes, select the one that says RGB Align. A small green square will appear on the image of the planet. Resize this square by clicking & dragging on the corner of the green square, so that the planet is completely inside and click Estimate on the pop up box.
- Page 18 4. On the left hand side of the screen, you will see the 6 wavelet slide bars, this where you can start to bring out the detail of the planet. There is no definite way of doing this, so you will just have to play around till you are happy with the image.
-
Page 19: Gimp/Photoshop Editing
9. Gimp/Photoshop Editing I'm going to leave this section a bit vague as I believe people will have different methods of doing the final editing. But I will give a quick run down on what I do in this section with Photoshop. 1. - Page 20 4. Click on Adjustments again and alter the colour, brightness and contrast settings 5. Click on the filter tab – Sharpen – Smart Sharpen and play around with this...
-
Page 21: End Result
6. Click on the filter tab – noise – despeckle 7. Repeat with the colour and contrast etc. if required. 8. Save the final image 10. End Result That's it you have created an image using a manual, push-to Dobsonian telescope. It does become easier with time and you will find that the quality of the end image will greatly improve with practice.
Need help?
Do you have a question about the Skyliner 200P and is the answer not in the manual?
Questions and answers