Table of Contents
Advertisement
Quick Links
Advertisement
Table of Contents

Subscribe to Our Youtube Channel
Related Manuals for Dahua Technology DHI-IVSS7008


Summary of Contents for Dahua Technology DHI-IVSS7008
- Page 1 IVSS User's Manual ZHEJIANG DAHUA VISION TECHNOLOGY CO., LTD. V5.0.0...
-
Page 2: Foreword
(hereinafter referred to as "the Device" or "IVSS"). Models Number of Models HDDs DHI-IVSS7008; DHI-IVSS7008-M;DHI-IVSS7108-M DHI-IVSS7012; DHI-IVSS7012-M;DHI-IVSS7112-M DHI-IVSS7016; DHI-IVSS7016D; DHI-IVSS7016DR; DHI-IVSS7116; DHI- IVSS7116DR; DHI-IVSS7016-M; DHI-IVSS7016DR-M DHI-IVSS7024; DHI-IVSS7024D; DHI-IVSS7024DR; DHI-IVSS7124; DHI- IVSS7024DR; DHI-IVSS7024-M; DHI-IVSS7024DR-M Refer to the interface of each model for function details. - Page 3 User's Manual Revision History Version Revision Content Release Time ● Added the talk function on the view window. October 2021 V5.0.0 ● Added the audio and light alarm. ● Deleted the strategy of shortcut RAID creation. ● Added 1:1 face recognition. ●...
- Page 4 User's Manual Version Revision Content Release Time V2.0.0 Updated figures of 16-HDD series IVSS. December 2018 V1.0.0 First release. November 2018 Privacy Protection Notice As the device user or data controller, you might collect the personal data of others such as their face, fingerprints, and license plate number.
- Page 5 User's Manual Icon/Button Description Display or hide icon. Click the icon to display the hidden menu. Now the icon is shown as / / . Click again to hide the menu items. Check the box. You can select multiple menu items at the same time. means selected.
-
Page 6: Important Safeguards And Warnings
User's Manual Important Safeguards and Warnings This section introduces content covering the proper handling of the Device, hazard prevention, and prevention of property damage. Read carefully before using the Device, comply with the guidelines when using it, and keep the manual safe for future reference. Operation Requirements ●... - Page 7 User's Manual ● Do not place the Device in a place exposed to sunlight or near heat sources. ● Keep the Device away from dampness, dust, and soot. ● Put the Device in a well-ventilated place, and do not block its ventilation. ●...
- Page 8 User's Manual Storage Requirements Store the Device under allowed humidity and temperature conditions.
-
Page 9: Table Of Contents
User's Manual Table of Contents Foreword .........................................I Important Safeguards and Warnings .............................. V 1 Overview ........................................1 1.1 Introduction ....................................1 1.2 Login Mode ....................................1 2 The Grand Tour ...................................... 2 2.1 8-HDD Series ....................................2 2.1.1 Front Panel ..................................2 2.1.2 Rear Panel .................................... - Page 10 User's Manual 3.4.2 Connection Diagram ..............................34 4 Starting the Device .................................... 35 5 Initial Settings ....................................... 36 5.1 Initializing Device..................................36 5.2 Quick Settings .................................... 38 5.2.1 Configuring IP Address ............................... 38 5.2.2 Configuring P2P Settings ............................40 5.3 Login ....................................... 41 5.3.1 Logging in to PCAPP Client ............................
- Page 11 User's Manual 6.3.2 Face Recognition by Camera ........................... 75 6.3.2.1 Configuration Procedure ..........................75 6.3.2.2 Enabling AI Plan ..............................75 6.3.2.3 Configuring Remote Face Database ......................75 6.3.2.3.1 Creating Face Database for Remote Devices ................75 6.3.2.3.2 Adding Face Images for Remote Devices..................77 6.3.2.4 Configuring Face Recognition (by Camera) ..................
- Page 12 User's Manual 6.3.4.7 Face Search ................................. 104 6.3.5 Face Detection by Device + Face Recognition by Device ..............105 6.3.5.1 Configuration Procedure ..........................105 6.3.5.2 Configuring Face Detection (by Device) ....................105 6.3.5.3 Configuring Device Face Database ......................106 6.3.5.4 Configuring Face Recognition (by Device) ..................106 6.3.5.5 Live View ................................
- Page 13 User's Manual 6.6 IVS ......................................... 132 6.6.1 Enabling AI Plan ................................132 6.6.2 Configuring IVS................................132 6.6.2.1 Switching IVS Model............................132 6.6.2.2 Global Configuration ............................. 132 6.6.2.3 Rule Configuration ............................133 6.6.3 Live View of IVS ................................137 6.6.3.1 Setting AI Display ............................137 6.6.3.2 Live View ................................
- Page 14 User's Manual 6.8.6.1 Searching by Property ........................... 157 6.8.6.2 Searching by Database ..........................159 6.9 Crowd Distribution Map ..............................160 6.9.1 Enabling AI Plan ................................161 6.9.2 Configuring Crowd Distribution Map ....................... 161 6.9.2.1 Global Configuration ............................. 161 6.9.2.2 Rule Configuration ............................161 6.9.3 Live View of Crowd Distribution .........................
- Page 15 User's Manual 7.1.3.1 PTZ Menu Settings ............................190 7.1.3.2 Configuring PTZ Functions ......................... 191 7.1.3.2.1 Setting a Preset ............................191 7.1.3.2.2 Setting a Cruise ............................193 7.1.3.2.3 Setting a Pattern ............................ 193 7.1.3.2.4 Setting Linear Scanning ........................194 7.1.3.2.5 Enabling Auxiliary Functions......................195 7.2 Recorded Files..................................
- Page 16 User's Manual 8.2 Device Management................................223 8.2.1 Viewing Device Information ..........................224 8.2.2 Remote Device ................................226 8.2.2.1 Viewing Remote Devices..........................226 8.2.2.2 Changing IP Address ............................226 8.2.2.2.1 Modifying IP of Unconnected Devices ..................227 8.2.2.2.2 Modifying IP of Connected Devices ..................... 229 8.2.2.3 Configuring Remote Devices ........................
- Page 17 User's Manual 8.4.1 Alarm Actions ................................257 8.4.1.1 Record ................................... 258 8.4.1.2 Buzzer ..................................259 8.4.1.3 Log ..................................259 8.4.1.4 Email ..................................259 8.4.1.5 Preset ..................................260 8.4.1.6 Snapshot ................................260 8.4.1.7 Local Alarm Out ..............................260 8.4.1.8 Remote Device Alarm Output........................261 8.4.1.9 Access ..................................
- Page 18 User's Manual 8.5.1.2.1 Creating RAID ............................282 8.5.1.2.2 Creating Hot Spare HDD ........................286 8.5.1.3 Network Hard Disk ............................288 8.5.1.3.1 iSCSI Application ........................... 288 8.5.1.3.2 iSCSI Management ..........................289 8.5.2 Video Recording ................................291 8.5.2.1 Storage Mode ..............................291 8.5.2.1.1 Setting Disk Group ..........................
- Page 19 User's Manual 8.7.3.1.2 Changing Password of Other User ....................312 8.7.3.2 Resetting Password ............................313 8.7.3.2.1 Leaving Email Address and Security Questions ..............313 8.7.3.2.2 Resetting Password on Local Interface ..................313 8.7.3.2.3 Resetting Password on the Web ....................317 8.7.4 ONVIF ....................................
- Page 20 User's Manual 9.7 Device Maintenance ................................339 9.7.1 Updating Device ................................. 339 9.7.1.1 Updating the Device ............................339 9.7.1.2 Updating AI Module ............................339 9.7.1.3 Updating Cameras ............................340 9.7.2 Default ..................................... 340 9.7.3 Automatic Maintenance ............................341 9.7.4 IMP/EXP ................................... 341 9.8 Disk Maintenance ..................................
-
Page 21: Overview
User's Manual 1 Overview 1.1 Introduction As an intelligent video surveillance server (hereinafter referred to as IVSS or the Device), IVSS delivers not only the basic video surveillance functions, but also a bunch of advanced AI features including face recognition, perimeter protection, video metadata and ANPR, providing AI-based all-in-one surveillance solution for customers. -
Page 22: The Grand Tour
User's Manual 2 The Grand Tour This section introduces front panel, rear panel, port function and button function, indicator light status, and so on. 2.1 8-HDD Series 2.1.1 Front Panel Figure 2-1 Front panel Table 2-1 Front panel description Button/Port Description Boot up or shut down device. -
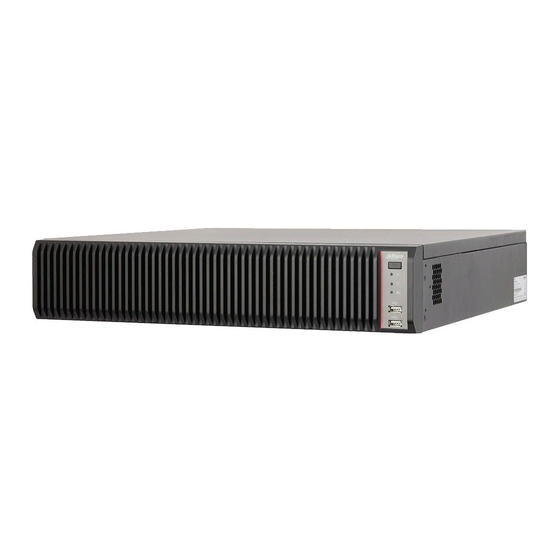
Page 23: Rear Panel
User's Manual 2.1.2 Rear Panel Figure 2-2 IVSS7008 rear panel Figure 2-3 IVSS7008-M rear panel Figure 2-4 IVSS7108-M rear panel Table 2-2 Rear panel description Button/Port Description Power Power on-off button. Power input Inputs 100-240 VAC power. Displays AI module status. ●... - Page 24 User's Manual Button/Port Description AUDIO IN Audio input port. AUDIO OUT Audio output port. High definition audio and video signal output port. The port outputs the uncompressed high definition video HDMI and multi-channel audio data to the connected display with HDMI port. The HDMI ports are different source output.
-
Page 25: Dimensions
User's Manual 2.1.3 Dimensions Figure 2-5 Dimension (mm [inch]) 2.2 12-HDD Series 2.2.1 Front Panel Figure 2-6 Front panel Table 2-3 Front panel description Button/Port Description Boot up or shut down device. Power indicator light status is as follows: ● When device is off (indicator light is off), press the button Power for a short period to boot up device. -
Page 26: Rear Panel
User's Manual Button/Port Description RESET button Click to restart the device. Displays power status. ● Amber light is on: The device has properly connected to Power indicator the power source. light ● The indicator light is off: The device has not connected to the power source. - Page 27 User's Manual Figure 2-8 IVSS7012 rear panel (the redundant series) Figure 2-9 IVSS7012-M rear panel Figure 2-10 IVSS7112 rear panel (the single-power series) Figure 2-11 IVSS7112 rear panel (the redundant series) Table 2-4 Rear panel description Name Description Power input port Inputs 100-240 VAC power.
- Page 28 User's Manual Name Description Displays AI module status. ● The yellow light flashes: AI module is running properly. AI module indicator light ● The yellow light is on: AI module is malfunctioning. This function is not available without AI module. SATA peripheral port.
-
Page 29: Dimensions
User's Manual Name Description 16 groups (1–16) alarm input ports, they are corresponding to ALARM 1–ALARM 16. The alarm becomes valid in low level. ● A and B: Control the A/B cable of the RS–485 Alarm input device. It is used to connect to the PTZ camera. Please parallel connect 120Ω... - Page 30 User's Manual Figure 2-13 Front panel with LCD Figure 2-14 Front panel without LCD Table 2-5 Front panel description Button/Port Description Once the front panel lock is secure, it can prevent HDD from Front panel lock being stolen or removed by mistake. Unlock the front panel lock and remove the front panel, you can view 16 HDD slots.
-
Page 31: Rear Panel
User's Manual Button/Port Description Connects to external devices such as USB storage device, USB port keyboard and mouse. After you remove the front panel, you can see there are 16 HDDs. From the left to the right and from the top to the bottom, it ranges from 1–4, 5–8, 9–12, and 13–16. - Page 32 User's Manual Figure 2-17 IVSS7016-M rear panel (single power) Figure 2-18 IVSS7016-M rear panel (redundant power) Table 2-6 IVSS7016 rear panel description Name Description Power input port Inputs 100-240 VAC power. Displays AI module status. ● The yellow light flashes: AI module is running properly.
- Page 33 User's Manual Name Description AUDIO OUT Audio output port SATA peripheral port. Connects to SATA port or eSATA port eSATA device. Connects to external devices such as USB USB port storage device, keyboard and mouse. SAS extension port. It can connect to the SAS SAS port extension controller.
- Page 34 User's Manual Figure 2-20 IVSS7116 rear panel (redundant power) Table 2-7 IVSS7116 rear panel description Name Description Inputs 100-127 VAC/200-240 VAC power. Some Power input port devices only have one power port. Displays AI module status. ● The yellow light flashes: AI module is running properly.
-
Page 35: Dimensions
User's Manual Name Description 16 groups (1–16) alarm input ports. They are corresponding to ALARM 1–ALARM 16. The alarm becomes valid in low level. ● A and B: Control the A/B cable of the RS–485 Alarm Input device. It is used to connect to the PTZ camera. -
Page 36: 24-Hdd Series
User's Manual Figure 2-22 Dimensions without LCD (mm [inch]) 2.4 24-HDD Series 2.4.1 Front Panel Figure 2-23 Front panel with LCD... - Page 37 User's Manual Figure 2-24 Front panel without LCD Table 2-8 Front panel description Button/Port Description Boot up or shut down device. The power on-off button has the indicator light. It can display device- running status. ● When device is off (indicator light is off), press Power on-off button the button for a short period to boot up device.
-
Page 38: Rear Panel
User's Manual 2.4.2 Rear Panel Figure 2-25 IVSS7024 rear panel (single power) Figure 2-26 IVSS7024 rear panel (redundant power) Figure 2-27 IVSS7024-M rear panel (single power) - Page 39 User's Manual Figure 2-28 IVSS7024-M rear panel (redundant power) Table 2-9 Rear panel description (1) Button/Port Description Power input port Inputs 100-240 VAC power. 16 groups (1–16) alarm input ports. They are corresponding to ALARM 1–ALARM 16. The alarm becomes valid in low level. ●...
- Page 40 User's Manual Button/Port Description VGA video output port. It outputs analog video VGA port signal. The VGA port and HDMI 1 port are same source output. High definition audio and video signal output port. The port outputs the uncompressed high definition HDMI port video and multi-channel audio data to the connected display with HDMI port.
- Page 41 User's Manual Table 2-10 Rear panel description (2) Name Description Power input port Inputs 100V-127V/200-240V AC power. 16 groups (1–16) alarm input ports. They are corresponding to ALARM 1–ALARM 16. The alarm becomes valid in low level. ● A and B: Control the A/B cable of the RS–485 Alarm Input device.
-
Page 42: Dimensions
User's Manual 2.4.3 Dimensions Figure 2-31 Dimensions with LCD (mm [inch]) Figure 2-32 Dimensions without LCD (mm [inch]) -
Page 43: Hardware Installation
User's Manual 3 Hardware Installation This section introduces HDD installation, cable connection, and so on. Some series product is heavy. It needs several persons to carry or move, in order to prevent person injury. 3.1 Installation Flow Follow Figure 3-1 to install the hardware. Figure 3-1 Installation flow 3.2 Unpacking the Box When you receive the Device, please check against the following checking list. -
Page 44: Hdd Installation
User's Manual 3.3 HDD Installation The section introduces the detailed operations to install HDD. Different models support different HDD numbers, and the actual product shall prevail. 3.3.1 8-HDD Series Step 1 Remove the 2 screws on the rear panel. Figure 3-2 Remove screws Step 2 Remove the chassis cover in the direction indicated by the arrow. - Page 45 User's Manual Figure 3-4 Remove HDD holder Step 4 Align the 4 screw holes on the HDD to the 4 screw holes on the HDD holder, and then tighten the screws. Figure 3-5 Install HDD (1) Step 5 Repeat step 4 to install the other HDDs on the holder. Figure 3-6 Install HDD (2) Step 6 Repeat step 5 to install HDDs on the other holder.
- Page 46 User's Manual Figure 3-7 Install HDD (3) Step 7 Align the left and right 2 pairs of holes of the two holders to the corresponding holes on the chassis, place the holders on the chassis, and then tighten the screws on the edge of the holders.
-
Page 47: 12-Hdd Series
User's Manual 3.3.2 12-HDD Series If you have not pushed the HDD box to the bottom, do not close the handle to avoid any damage to the HDD slot. Installing HDD ② Place one side of the HDD ① Press the button on the ③... -
Page 48: 16/24-Hdd Series
User's Manual 3.3.3 16/24-HDD Series If you have not pushed the HDD box to the bottom, do not close the handle to avoid any damage to the HDD slot. Installing HDD ③ Lock the screws on the back of the HDD box. Insert the box into the HDD slot, push it to the bottom, and ①... -
Page 49: Cable Connection
User's Manual ② Unlock the screws on the back of the HDD box. ① Press the button on the ③ Take out the HDD and front panel of IVSS, open the reinsert the box to the slot. The screws are at different handle, and then pull out the Push it to the bottom and positions for different HDDs,... - Page 50 User's Manual common-grounded with the Device.
-
Page 51: Alarm Port
User's Manual 3.4.1.2 Alarm Port Figure 3-9 8-HDD series Figure 3-10 12-HDD series Figure 3-11 16/24-HDD series (1) Figure 3-12 16/24-HDD series (2) -
Page 52: Alarm Input
User's Manual Table 3-2 Alarm port Icon Description They are corresponding to ALARM 1–ALARM 16. The alarm 1–16 becomes valid in low level. NO1 C1–NO8 C8 Eight groups of normally open linkage output (on-off value) +12V Constant power output, 500mA current. Grounding wire. -
Page 53: Alarm Output
User's Manual Figure 3-13 NC alarm input connection 3.4.1.4 Alarm Output ● The alarm output is on-off output (Normally Open Contact), and there should be external power supply to alarm output device. ● RS-485 A line and B line: connecting the A line and B line on the PTZ decoder. ●... -
Page 54: Connection Diagram
User's Manual Model HRB1-S-DC5V Operating ambient temperature -30 °C to +70 °C 3.4.2 Connection Diagram The following steps are to connect 16-HDD series device. See the actual product for detailed information. The following figure is for reference only. The actual product shall prevail. ●... -
Page 55: Starting The Device
User's Manual 4 Starting the Device ● Before starting the device, make sure that the input voltage shall match the device power requirement. ● To ensure stable operation of the device and prolong service life of HDD, provide stable voltage with less ripple interference by reference to international standard. -
Page 56: Initial Settings
User's Manual 5 Initial Settings When using the Device for the first time, initialize the device, and set basic information and functions first. 5.1 Initializing Device If it is your first time to use the device after purchasing or after restoring factory defaults, set a login password of admin (system default user). - Page 57 User's Manual Table 5-1 Time parameters description Parameters Description Time Zone The time zone of the Device. Set system date and time manually or by synchronizing with NTP server time. ● Manual setting: Select date and time from the calendar. ●...
-
Page 58: Quick Settings
User's Manual Figure 5-3 Password protection Step 7 Set password protection information. You can use the email you input here or answer the security questions to reset admin password. See "8.7.3.2 Resetting Password" for detailed information. ● Click to cancel the email or security questions. ●... - Page 59 User's Manual Device has 4 Ethernet ports by default. Make sure that at least one Ethernet port has been connected to the network before you set IP address. Step 1 On the completion page of initialization, click Enter Quick Setting. Figure 5-4 IP setting Step 2 Configure IP address.
-
Page 60: Configuring P2P Settings
User's Manual Parameters Description IP Type Select IPv4 or IPv6. When there is a DHCP server on the network, check Use Dynamic Use dynamic IP address IP Address, system can allocate a dynamic IP address to the device. There is no need to set IP address manually. Check Use Static IP Address, and then set static IP address, subnet Use static IP address mask and gateway to set a static IP address for the device. -
Page 61: Login
User's Manual Figure 5-6 P2P access Step 2 Click to enable P2P function. The function is disabled by default. Step 3 Click Finish to save settings. After the configuration, you can register a device to the APP to view remote video, playback record file, and so on. - Page 62 User's Manual Step 3 Log in to PCAPP. 1) There are two ways to enter PCAPP. ● On the installation completion page, click Run. ● Double-click the shortcut icon on the PC desktop. ● When PC theme is not Aero, the system will remind you to switch the theme. To ensure video smoothness, switch your PC to Areo theme.
-
Page 63: Logging In To Local Interface
User's Manual Figure 5-9 Live view Table 5-5 Home page description Name Description Displays enabled application icon. Point to the app and then click to close the app. Task column The live function is enabled by default and cannot be closed. -
Page 64: Preparation
User's Manual 5.3.2.1 Preparation Ensure that the Device is connected with display, mouse and keyboard. For cable connection, see "3.4 Cable Connection". 5.3.2.2 Operation Steps Step 1 Turn on the Device. Step 2 Enter username and password. ● Click Login. For your device safety, change the admin password regularly and keep it well. -
Page 65: Configuring Remote Device
User's Manual 5.4 Configuring Remote Device Register remote device to the system. You can view the live video from the remote device, change remote device settings, and so on. 5.4.1 Initializing Remote Device After you initialize the remote device, you can change remote device login password and IP address. Remote devices can be connected to the Device only after being initialized. - Page 66 User's Manual Using current device password and password protection information is enabled by default. Keep it enabled so as to automatically use current device admin password and email without manual configuration. Go to Step 6 if you keep it enabled. 1) To manually configure password, click to disable Using current device password and password protection information.
- Page 67 User's Manual Figure 5-12 Password protection 4) Set an email address. Enter an email address. You can use the email address here to reset password in case you forgot password in the future. Step 6 Click Next button.
- Page 68 User's Manual Figure 5-13 Modify IP Step 7 Set camera IP address. ● When there is DHCP server in the network, select DHCP, and the remote device gets dynamic IP address automatically. It is unnecessary to enter IP address, subnet mask and gateway.
-
Page 69: Adding Remote Device
User's Manual Figure 5-14 Initialize Step 9 Click Confirm and Add, or click OK. ● Click Confirm and Add: System completes initializing the remote device and then adds the remote device to the list. System goes back to Add device page. ●... -
Page 70: Smart Add
User's Manual Add Mode Description Fill in information about remote device in the template, import the template to add the device. For details, see "5.4.2.4 Batch Add". Batch add (by CSV template) For batch adding, when IP address, username and other information of remote device is inconsistent, it is suggested to use this mode. - Page 71 User's Manual To set search conditions, you can click Figure 5-16 Search results Table 5-8 Result description Parameters Description Click Start Search to start searching remote device. Now it becomes Stop Start Search Search button. Click Stop Search button to stop searching remote device. Password Enter the username and password of the selected device for adding it.
-
Page 72: Manual Add
User's Manual Figure 5-17 Live view Step 4 Adding a remote device. Select a remote device, click Password, and then enter the username and password of the selected device. Click OK. ● If you do not enter device username and password, the system will try to add the device by using the username and password of the Device. - Page 73 User's Manual Figure 5-18 Add device Step 4 Set parameters and then click OK. Figure 5-19 Remote device setting Table 5-9 Parameters of adding device Parameters Description Select a channel number for the remote device on IVSS. Channel No. If you select Auto Allocation, IVSS will provide a channel number automatically.
- Page 74 User's Manual Parameters Description Enter the RTSP port number. The default port number is 554. The value RTSP Port ranges from 1 through 65535. Select Self-adaptive or Customize. RTSP Mode When the Manufacturer is Onvif or Onvifs, you need to configure this parameter.
-
Page 75: Rtsp
User's Manual Figure 5-20 Confirm Step 6 Click Continue to add or Finish. ● Click Continue to add, device goes back to Smart add page to add more remote device. ● Click Finish to complete adding remote device process. Device displays Device page to view the newly added remote device information. -
Page 76: Batch Add
User's Manual 5.4.2.4 Batch Add Step 1 Click , and then select DEVICE. Step 2 Click , and then click the Batch Import tab. Figure 5-21 Import CSV file Step 3 Fill in template file. 1) Click Download Template to download template file. File path might vary depending on your operations. - Page 77 User's Manual ● If information about remote device is not filled in completely, improve it after importing template. ● If the system fails to add the remote device, check the reason on the Status column, change the remote device information and then click Retry to try to add again. Figure 5-22 Confirm Step 6 Click Continue to add or Finish.
-
Page 78: Ai Operations
User's Manual 6 AI Operations In addition to the basic video monitoring functions, the Device can also provide a number of AI functions including face recognition, people counting, video metadata, ANPR, and IVS (behavior detections such as fence-crossing, intrusion, loitering, crowd gathering, parking and more.). This chapter introduces how to configure the AI functions respectively. -
Page 79: Face Detection
User's Manual Figure 6-1 Overview indicates that the AI by camera is enabled. indicates that AI by device is enabled. AI Events by Device or Camera Table 6-1 AI Events by Device or Camera AI Event AI by Camera AI by Device Face Detection Face Recognition People Counting... -
Page 80: Configuring Face Detection
User's Manual ● AI plan is available on select models. ● The Device automatically shows the AI functions available on the connected cameras. Step 1 Click , or click on the configuration page, and then select EVENT. The EVENT page is displayed. Step 2 Select a camera in the device tree on the left. - Page 81 User's Manual Figure 6-2 AI by camera Figure 6-3 AI by device Step 4 Click AI by camera or AI by device, and then click to enable face detection. AI by camera supports Face Enhancefunction. After enabling Face Enhancefunction, system displays enhanced human face zone on the surveillance window. Step 5 Set detection area on the video (yellow area).
-
Page 82: Live View Of Face Detection
User's Manual Figure 6-4 Area ● Click or white dot on detect region frame, and drag to adjust its range. ● Click to set the minimum size or maximum size of the face detection area. System triggers an alarm once the size of detected target is between the maximum size and the minimum size. -
Page 83: Live View
User's Manual ● Click Sync from AI-Dis., obtain global smart detection display rule of IVSS. See "8.4.2.4.2 Setting AI Display" for detailed information. ● Click Apply to all windows to copy current configuration to other window(s). Figure 6-5 Face Step 2 Enable Show Tracking Boxby clicking After it is enabled, when the system detects face or human, the window will display corresponding rule box. -
Page 84: Face Records
User's Manual Figure 6-6 Live Point to a features panel, and the operation icons are displayed. Figure 6-7 Face database ● Click to add this image to the face database. See "6.8.3.2.3 Adding from Detection Results" for detailed information. ● Click or double-click the detected image, so the system starts to play back the recorded videos (about 10s) at the time of snapshot. -
Page 85: Face Search
User's Manual Figure 6-8 Detection image In the FACE TOTAL page, the following operations are available. ● Point to a piece of face record, click , and then you can quickly add this image to the face database. See " Adding from Detection Snapshots" for detailed information. ●... - Page 86 User's Manual Figure 6-9 Search by property Step 2 Select a remote device, and then set Event Type to be Face Detection. In the Event Type drop-down list, if you select All, the search results will include both face detection records and face recognition records. Step 3 Set face property and time.
- Page 87 User's Manual Figure 6-10 Search results Point to a piece of record, and then the following icons are displayed. Figure 6-11 Icons Table 6-2 Description Icon Operation ● Select one by one: Click the panel or move the mouse pointer onto the panel, and then click to select the panel.
-
Page 88: Searching By Image
User's Manual Icon Operation ● Export one by one: Click to export picture, video and video player. For details, see "6.2.4.3 Exporting Face Records". ● Export in batches: Select the panel and click to export picture, video or excel. For details, see "6.2.4.3 Exporting Face Records". After setting alarm linkage snapshot, during exporting images, the system exports detected images and panoramic images at the time of snapshot. - Page 89 User's Manual Figure 6-12 Choose picture from face database 2) Specify search conditions. 3) Click Query. 4) Select a face image. 5) Drag to set similarity. 6) Click OK to upload face image. ● Upload the image from the passerby database. 1) Click and select Passerby Database.
- Page 90 User's Manual Figure 6-13 By image ● When the uploaded image is half-length photo or full-body photo, the system automatically selects the frame of the uploaded image and only the face area will be retained. ● When there are multiple faces in the uploaded images, the system automatically identifies the faces in the images and uploads multiple face images according to the number of faces recognized.
-
Page 91: Searching Face Database
User's Manual Function ● : displays the number of images found. ● : Displays the number of face images found. ● : Displays the number of human body images found. The numbers are displayed only when related search is enabled. ●... -
Page 92: Searching Task Lists
User's Manual Figure 6-16 Search results Table 6-4 Search results page description Function ● Displays the selected search images. The number at the lower-right corner of the image represents the number of records found. ● Click the image to view detailed results. ●... -
Page 93: Exporting Face Records
User's Manual Step 7 Click Query. Figure 6-18 Search results Table 6-5 Search results page description Function ● Displays the selected search images. The number at the lower-right corner of the image represents the number of records found. ● Click the image to view detailed results. ●... - Page 94 User's Manual Figure 6-19 Search results of face records ● Export in batches Export more than one record. Support specifying file formats. Step 1 Select more than one record. To export all records, select the checkbox of All. Step 2 Click , and then select file formats.
-
Page 95: Face Recognition
User's Manual 6.3 Face Recognition The system compares captured face with the face database and works out the similarity. When the similarity reaches the threshold as you have defined, an alarm will be triggered. 6.3.1 Configuration Modes Face recognition can be configured in the following modes: ●... - Page 96 User's Manual Step 4 Enter Face database name. Figure 6-22 Create a face database for remote devices Step 5 Click Register Face or Save and close. ● To add faces into the database, click Register Face. For details, see "6.3.2.3.2 Adding Face Images for Remote Devices".
-
Page 97: Adding Face Images For Remote Devices
User's Manual ◇ One by one: Click ◇ In batches: Hover over the face database, and then select the database by clicking . After selecting multiple databases, click ◇ Delete all: Select All, and then click ● To clear a face database, select the face database, and then click Clear. 6.3.2.3.2 Adding Face Images for Remote Devices Add face images to the created face database in the way of manual add, batch import, bin import or detection. - Page 98 User's Manual ● When the uploaded image is half-length photo or full-body photo, the system automatically selects the frame of the uploaded image and only the face area will be retained. ● When there are multiple faces in the uploaded images, the system automatically identifies the faces in the images and uploads multiple face images according to the number of faces recognized.
- Page 99 User's Manual image automatically. For details about naming rule. Name is required and the rest are optional. For example, if you want to enter the name and ID number only, the naming can be Tim#S#B#N#P#T#M0000#A.jpg or Time#M0000.jpg. Table 6-6 Naming rules for batch import Item Description Name...
- Page 100 User's Manual You can select multiple face images by holding Shift and then clicking the first and the last face images, or holding Ctrl and then click the images one by one. ● Upload a folder: Click , select the folder with face images, and then click Upload. Step 5 Click OK.
-
Page 101: Configuring Face Recognition (By Camera)
User's Manual 6.3.2.4 Configuring Face Recognition (by Camera) Configure face recognition rules. Step 1 Click , or click on the configuration page, and then select EVENT. Step 2 Select remote device in the device tree on the left. Step 3 Select AI Plan >... - Page 102 User's Manual ● Click Sync from AI-Dis., obtain global smart detection display rule of IVSS. See "8.4.2.4.2 Setting AI Display" for detailed information. ● Click Apply to all windows, it is to copy current configuration to other window(s). Figure 6-29 Face Step 3 Enable Show Tracking Box.
-
Page 103: Live View
User's Manual 6.3.2.5.2 Live View Go to the LIVE page, enable view, and then device displays view video. ● The view window displays currently detected face rule box. ● The right side displays features panel. ◇ During face detection, features panel displays detection time, the detected face image and feature. -
Page 104: Face Search
User's Manual from Detection Snapshots" for detailed information. ● Play the detection video. Point to a piece of face record, and click or double-click the detected image, so the system starts to play back the recorded videos (about 10s) at the time of snapshot. ●... - Page 105 User's Manual Figure 6-32 Search by property Step 2 Select a remote device, and then set Event Type to be Face Recognition. Step 3 Select face mode and set face property and time. Step 4 Click Query.
- Page 106 User's Manual Figure 6-33 Search results Point to a piece of record, and then the following icons are displayed. Figure 6-34 Icons Table 6-7 Description Icon Operation ● Select one by one: Click the panel or move the mouse pointer onto the panel, and then click to select the panel.
-
Page 107: Searching By Property
User's Manual Icon Operation ● Export one by one: Click to export picture, video and video player. For details, see "6.2.4.3 Exporting Face Records". ● Export in batches: Select the panel and click to export picture, video or excel. For details, see "6.2.4.3 Exporting Face Records". After setting alarm linkage snapshot, during exporting images, the system exports detected images and panoramic images at the time of snapshot. -
Page 108: Face Detection By Camera + Face Recognition By Device
User's Manual Figure 6-35 1:1 face recognition Step 2 Click and then upload two images to be compared. Step 3 Click Start. The comparison result will be displayed. 6.3.3 Face Detection by Camera + Face Recognition by Device 6.3.3.1 Configuration Procedure Figure 6-36 Configure face detection (AI by camera) Figure 6-37 Configure face recognition (AI by device) 6.3.3.2 Enabling AI Plan... - Page 109 User's Manual Figure 6-38 AI by camera Step 4 Click AI by camera , and then click to enable face detection. AI by camera supports Face Enhancefunction. After enabling Face Enhancefunction, system displays enhanced human face zone on the surveillance window. Step 5 Set detection area on the video (yellow area).
-
Page 110: Configuring Device Face Database
User's Manual System triggers an alarm once the size of detected target is between the maximum size and the minimum size. Step 6 Click Deployment Time to select a schedule from the drop-down list. System triggers corresponding alarm actions only during the alarm deployment period. You can select an existing schedule from the Deployment Time drop-down list. -
Page 111: Exporting Face Database
User's Manual ● Number: The proportion of the number of added face images in the face databases and passerby databases to the allowed face images in total. ● Space: The proportion of the space occupied by the face databases and passerby databases to the allowed space in total. -
Page 112: Adding Face Image
User's Manual ● The Password is the one used when the file is being imported. If the bin file being exported is larger than 4 GB, the file is divided into multiple parts, with the first named as device name_database name_exporting time_part1.zip. 6.3.3.4.3 Adding Face Image Add face images to the created face database in the way of manual add, batch import, bin import or detection. - Page 113 User's Manual Figure 6-43 Face register ● When the uploaded image is half-length photo or full-body photo, the system automatically selects the frame of the uploaded image and only the face area will be retained. ● When there are multiple faces in the uploaded images, the system automatically identifies the faces in the images and uploads multiple face images according to the number of faces recognized.
- Page 114 User's Manual Figure 6-44 Face information Step 7 Click Save and continue to add or OK. ● Click Save and Continue to add to save current face image information and add another human face image. ● Click OK to save current face image information and complete registration. After adding the image, at the lower-left corner of the human face image, there is an icon .
- Page 115 User's Manual Item Description ID type Enter the corresponding number. 1. ID card, 2. Passport, 3. Others. ID number Fill in the corresponding ID number. Address Enter the detailed address. Procedure Step 1 On LIVE page, click , and then select FILE > Face Management > Face Database > Local.
- Page 116 User's Manual Bin Import To import face images from another device into the current device, you can import a bin file of face images exported from that device. Step 1 On LIVE page, click , and then select FILE > Face Management > Face Database > Local.
-
Page 117: Creating Passerby Database
User's Manual Figure 6-47 Face register Step 2 Select a face database, and fill in person information according to your actual situation. Step 3 Click OK to save the configuration. 6.3.3.4.4 Creating Passerby Database If you configure an alarm to link passerby database, when the detected face is not in the face database, system automatically captures the face image, and then save it to the passerby database. - Page 118 User's Manual Figure 6-48 Passerby database ● Number: The proportion of the number of added face images in the face databases and passerby databases to the allowed face images in total. ● Space: The proportion of the space occupied by the face databases and passerby databases to the allowed space in total.
- Page 119 User's Manual Parameter Description Set the allowed pitch angle and yaw angle of the face image. The value Face Angle ranges from 0 through 45 degrees. The smaller the angle, the more accurate the face image. Quality Only face images within the allowed quality range (1 to 100) can be added. The storage strategy when storage space is used up.
-
Page 120: Human Face Abstract
User's Manual ● To clear a face database, select the face database, and then click Clear. 6.3.3.4.5 Human Face Abstract The human face abstracting is to abstract the corresponding information of the face image and import to the database. After that, device can compare human face, and search for human face. ●... - Page 121 User's Manual Copying Face Pictures Step 1 In the face database, point to a face picture, and then click to select the face picture. ● You can select more than one pictures. ● To select all pictures, click All. Step 2 Click Copy to.
-
Page 122: Configuring Face Recognition (By Device)
User's Manual click Delete. The selected face pictures are deleted. ◇ Click All, and then click Delete. All the face pictures in this page are deleted. 6.3.3.5 Configuring Face Recognition (by Device) Configure face recognition rules. To use AI by device, enable face detection first. For details, see "6.2.2 Configuring Face Detection". Step 1 Click , or click... -
Page 123: Live View
User's Manual Parameters Description Click to enable features panel function. System displays Show feature panel stranger panel once there is an alarm. 3) Click Actions to set alarm actions. See "8.4.1 Alarm Actions" for detailed information. Step 7 Set linked face database. Repeat the step to trigger several human databases at the same time. -
Page 124: Face Recognition By Camera + Face Recognition By Device
User's Manual see "6.3.2.6 Face Search". 6.3.4 Face Recognition by Camera + Face Recognition by Device 6.3.4.1 Configuration procedure Figure 6-56 Configure face recognition (AI by camera) Figure 6-57 Configure face recognition (AI by device) 6.3.4.2 Enabling AI Plan To use AI by camera, you need to enable the corresponding AI plan first. For details, see "6.2.1 Enabling AI Plan". -
Page 125: Face Detection By Device + Face Recognition By Device
User's Manual 6.3.5 Face Detection by Device + Face Recognition by Device 6.3.5.1 Configuration Procedure Figure 6-58 Configure face detection (AI by device) Figure 6-59 Configure face recognition (AI by device) 6.3.5.2 Configuring Face Detection (by Device) Configure alarm rule of face detection. Step 1 Click or click... -
Page 126: Configuring Device Face Database
User's Manual Figure 6-61 Area ● Click or white dot on detect region frame, and drag to adjust its range. ● Click to set the minimum size or maximum size of the face detection area. System triggers an alarm once the size of detected target is between the maximum size and the minimum size. -
Page 127: Face Search
User's Manual 6.3.5.6 Face Search Search for face detection information, including face detection image, record and features. You can search by property or by image, export face records, and analyze similarity of two images. For details, see "6.3.2.6 Face Search". 6.3.6 Video Metadata + Face Recognition by Device 6.3.6.1 Configuration Procedure Figure 6-62 Configure video metadata (AI by camera) -
Page 128: People Counting
User's Manual 6.4 People Counting This section introduces the statistics of in-area people number, and queuing number. ● The people counting function is only available with AI by camera. Make sure that the camera has been configured with people counting rules. ●... -
Page 129: Configuring In Area No
User's Manual Figure 6-65 People counting Table 6-12 Parameter description of people counting Parameters Description People Counting Alarm Click Reset to reset the numbers of entry and exit. Enter No. Number of people that entered. Exit No. Number of people that exited. The number of stay is the result of entry number minus exit Stay No. -
Page 130: Configuring Queuing Detection
User's Manual ● Click to set the whole image as the detection area. Figure 6-66 In Area No. Step 5 Set parameters. Table 6-13 Parameter description of In Area No. Parameters Description 1. Click to enable the alarm. 2. Set people number threshold. ●... - Page 131 User's Manual Queuing. Step 3 Draw a queuing detection area. 1) Click to draw the first detection area. Click to draw more areas. You can draw 4 areas at most. 2) Click to edit the area. Figure 6-67 Queuing Step 4 Set parameters.
-
Page 132: Live View
User's Manual 6.4.5 Live View On the LIVE page, open a view window that contains people counting video. The live video which shows real-time people number and queuing time is displayed. Figure 6-68 Live view The live video displays real-time people number in the region, and the region frame flashes red once there is an alarm. - Page 133 User's Manual Step 5 Select a time period type from Daily, Monthly, and Yearly, and then set the corresponding date, month or year. Step 6 Click OK. The report is displayed. Figure 6-69 People counting report Figure 6-70 Average strand time report Figure 6-71 Queuing people counting report ●...
-
Page 134: Video Metadata
User's Manual people in different areas or the average strand time. ● For people counting report, click to select a strand time. The report shows the people numbers of which the strand time is greater or less than the selected strand time. - Page 135 User's Manual Figure 6-72 AI by camera Figure 6-73 AI by device Step 4 Click next to Feature Vector Extraction to enable feature extraction, and then the Device can extract features of human, vehicles and non-motor vehicles and display them on the live view.
-
Page 136: Live View Of Video Metadata
User's Manual ● Drag to adjust the detection area. ● Click to draw an excluded area which will not be detected. The Device does not detect target within the excluded area. ● Click to set the minimum size or maximum size of the face detection area. System triggers an alarm once the size of detected target is between the maximum size and the minimum size. -
Page 137: Live View
User's Manual Create view(s) before setting filtering conditions. To create a view, see "7.1.1 View Management". Step 1 Select a view from LIVE > View > View Group. Step 2 Click at the lower side of the LIVE page, and then select Face, Human, Vehicle or Non- Motor Vehicle. -
Page 138: Detection Statistics
User's Manual ● Rule box is displayed in real-time in the video image. Different detection targets correspond to different colors of rule box. ● Features panels are displayed on the right side of the video image. Figure 6-76 Live Point to the features panel, and the icons are displayed. Figure 6-77 Icons (vehicle detection) ●... -
Page 139: Motor Vehicle
User's Manual Figure 6-78 Human detection ● Point to the snapshot, and then click to add the face image to face database. For details, see " Adding from Detection Snapshots". This function is available when face image is captured. ● Point to the snapshot, and then click or double-click the picture to play back the video record (10 s before and after the snapshot). -
Page 140: Ai Search
User's Manual Figure 6-80 Non-motor vehicle detection ● Point to the detected information, and then click , or double-click detected picture to play back the video record (10 s before and after the snapshot). ● Point to the detected information, and then click to export the video record to specified saving path. - Page 141 User's Manual Figure 6-81 Search by human Step 2 Select one or more devices, and then select Human Detection as Event Type. Step 3 Select alarm type. Step 4 Set human properties and time period. Click to set the color. means more than one color.
- Page 142 User's Manual Figure 6-82 Search result Other Operations Click one displayed panel, and the icons are displayed.
-
Page 143: Searching By Image
User's Manual Figure 6-83 Icons (1) Figure 6-84 Icons (2) Table 6-15 Operation Icon Operation ● Select one by one: Click to select the panel. means the panel is selected. ● Select in batches: Select All to select all the panels on the page. Click or double-click the panel to play back the video record (10 s before and after the snapshot). - Page 144 User's Manual The search by image function is only available when feature vector extraction is enabled. For details, see Step 4 in "6.5.2 Configuring Video Metadata". Searching Devices Upload human body pictures to search the specific devices for similar targets. Step 1 On the LIVE page, click , and then select AI SEARCH >...
- Page 145 User's Manual the page. The latest 10 pictures are displayed by default. Up to 10 pictures can be selected at the same time. Step 4 (Optional) Click to enable related search. If related search is enabled, the system searches for both face detection results and human detection results. Figure 6-86 Related Step 5 Set similarity.
- Page 146 User's Manual Function ● : displays the number of images found. ● : Displays the number of face images found. ● : Displays the number of human body images found. The numbers are displayed only when related search is enabled. ●...
- Page 147 User's Manual Figure 6-89 Related Step 5 Set similarity. It is 80% by default. Step 6 Select a task to be searched. Step 7 Click Query. The results are displayed. Figure 6-90 Search results Table 6-17 Search results page description Function ●...
-
Page 148: Vehicle Search
User's Manual Function Filter the search results according to properties. ● : Sort the records by time. ● : Sort the records by similarity. Displays the face panels, including face image, feature property and similarity. 6.5.4.2 Vehicle Search Set event type and vehicle properties to search vehicle detection results. Step 1 On the LIVE page, click , and then select AI SEARCH >... - Page 149 User's Manual Figure 6-92 Search result Click one displayed panel, and the icons are displayed. Figure 6-93 Icons Table 6-18 Operation Icon Operation ● Select one by one: Click to select the panel. means the panel is selected. ● Select in batches: Select All to select all the panels on the page. Click or double-click the panel to play back the video record (10 s before and after the snapshot).
-
Page 150: Non-Motor Vehicle Search
User's Manual 6.5.4.3 Non-motor Vehicle Search Set event type and non-motor vehicle properties to search non-motor vehicle detection results. Step 1 On the LIVE page, click , and then select AI SEARCH > Search by NonMotor. Figure 6-94 Search by non-motor vehicle Step 2 Select the device you want to search. - Page 151 User's Manual Figure 6-95 Search results Figure 6-96 Icons Table 6-19 Operation Icon Operation ● Select one by one: Click to select the panel. means the panel is selected. ● Select in batches: Select All to select all the panels on the page. Click or double-click the panel to play back the video record (10 s before and after the snapshot).
-
Page 152: Ivs
User's Manual 6.6 IVS The IVS feature includes a number of behavior detections such as fence-crossing, intrusion, tripwire, parking, crowd gathering, missing object, abandoned object, and loitering. You can configure alarm notifications of those intelligent detections. This section introduces how to configure the intelligent detections. ●... -
Page 153: Rule Configuration
User's Manual Global configuration is needed only when AI by camera is used. Step 1 Click , or click on the configuration page, and then select EVENT. Step 2 Select a device in the device tree on the left. Step 3 Select AI Application >... - Page 154 User's Manual Table 6-20 IVS functions description Functions Description Scene When the target crosses tripwire from the defined motion Tripwire direction, an alarm is triggered, and then the system performs Scenes with sparse targets and no configured alarm linkages. occlusion among targets, such as the perimeter protection of unattended When the target enters, leaves, or area.
- Page 155 User's Manual Functions Description Scene When the target crosses the warning line toward the defined Scenes with median strips such as Crossing Fence direction, an alarm is triggered roads, and airports. and then the system performs configured alarm linkages. This section uses the configuration of tripwire as the example. Step 1 Click , or click...
- Page 156 User's Manual 1) Click Add Rule, and then select Tripwire. 2) Click to enable detection rule. Click to delete detection rule. 3) Click to edit the tripwire line. ● Drag to adjust position or length of the line. ● Click to set the directions.
-
Page 157: Live View Of Ivs
User's Manual If the schedule is not added or the added schedule does not meet actual needs, click Add Schedule. Step 7 Click Actions to set alarm action. See "8.4.1 Alarm Actions" for detailed information. Step 8 Click Save. Repeat Step 4 through Step 8 to add multiple detection rules. You can add max. 10 detection rules at the same time. - Page 158 User's Manual Figure 6-103 Human Figure 6-104 Vehicle Figure 6-105 Non-motor vehicle...
-
Page 159: Live View
User's Manual Step 3 Configure feature panel. 1) Click next to Features Panel to enable feature panel. 2) A features panel is displayed on the right side of the video when a target that meets the conditions is detected. 3) Click to select the panel type, for example, the Human Detection tab. -
Page 160: Detection Statistics
User's Manual beside the person and vehicle in the view. ● There is a feature panel on the right side of the video window. Figure 6-106 Live Point to features panel, and the operation icons are displayed. ● Click or double-click the detected image, so the system starts to play back the recorded videos (10 s before and after the snapshot). -
Page 161: Ivs Search
User's Manual video (10 s before and after the snapshot moment). ● Point to a picture and click to export video and picture. Make sure that USB storage device is connected during local operation. On the LIVE page, click . The NON-MOTOR VEHICLE TOTAL window is displayed. Click , and then select IVS. -
Page 162: Vehicle Recognition
User's Manual Name Operation ● Export one by one: Click to export picture, video and video player. For details, see "6.2.4.3 Exporting Face Records". Export file ● Export in batches: Select the panel and click to export picture, video or excel. For details, see "6.2.4.3 Exporting Face Records". 6.7 Vehicle Recognition Alarm is triggered when vehicle property that meets detection rule is detected. -
Page 163: Live View Of Vehicle Recognition
User's Manual Add Schedule. For details, see "8.8.4 Schedule". Step 5 Click Actions to set alarm action. For details, see "8.4.1 Alarm Actions". Step 6 Click Save. 6.7.3 Live View of Vehicle Recognition View vehicle recognition results on the LIVE page. 6.7.3.1 Setting AI Display Set the display rules of detection results. -
Page 164: Live View
User's Manual selected. 4) (Optional) Drag to adjust the transparency of panel. The higher the value, the more transparent the panel. 5) (Optional) Select the features to be displayed in the panel. ● Up to 4 features can be displayed. ●... -
Page 165: Searching For Detection Information
User's Manual Figure 6-113 Vehicle detection ● Point to the information panel, and then click to add license plate information to plate database. For details, see "6.8.3.2.3 Adding from Detection Results". ● Point to the information panel, and then click or double-click the picture to play back the video image (10 s before and after the snapshot). -
Page 166: Configuring Vehicle Database
User's Manual 6.8.3 Configuring Vehicle Database Set vehicle database, and then the Device can compare vehicle plates with information in the database. 6.8.3.1 Creating Vehicle Database Create vehicle database, and then classify and manage the database. Database of safe trusted vehicle list and blocked vehicle list can be created. -
Page 167: Registering Vehicle Information
User's Manual Table 6-22 Related Operations ● : Database name. ● : Number of vehicle plates in the database. View database information and ● Allowlist/Blocklist: The database is in the allowlist or blocklist. status ● : The database is not linked to channel for vehicle plate comparison. - Page 168 User's Manual Figure 6-117 Vehicle register Step 4 Set the parameters. Table 6-23 Vehicle register parameters Parameters Description Country or Region The country or region that the vehicle belongs to. Name Driver name. Driver ID Driver license number. Cell Phone Driver phone number.
-
Page 169: Batch Import
User's Manual Figure 6-118 Vehicle type Step 5 Click Save and continue to add or OK. ● Click Save and continue to add: Save the current vehicle information, and then Continue to add next vehicle. ● Click OK: Save the current vehicle information. 6.8.3.2.2 Batch Import Import vehicle information in batches. - Page 170 User's Manual Figure 6-119 Batch import Step 4 Acquire and fill in the template file. 1) Click Download Template to download the template to local PC or USB storage device. The saving path might vary when operating on client or local interface. ●...
-
Page 171: Adding From Detection Results
User's Manual Figure 6-120 Vehicle information 6.8.3.2.3 Adding from Detection Results Add plate information from vehicle recognition or detection results to the database. Step 1 On the LIVE page, select the vehicle information to be added. ● Click , move the mouse pointer to the information panel, and then click ●... -
Page 172: Editing Vehicle Information
User's Manual 6.8.3.3.1 Editing Vehicle Information Step 1 Point to the database, and then click Step 2 Modify vehicle information according to actual needs. Step 3 Click OK. 6.8.3.3.2 Copying Vehicle Information Copy the vehicle information in a database to another database. You can only copy and apply the vehicle information to a database of the same type. -
Page 173: Deleting Vehicle Information
User's Manual 6.8.3.3.3 Deleting Vehicle Information ● Delete one by one: Point to the database, and then click at the upper right corner to delete the database. ● Delete in batch ◇ Point to the database, and then click at the upper left corner to select the database. Select multiple databases in this way, and then click to delete selected databases. -
Page 174: Live View Of Anpr
User's Manual Figure 6-123 Associate vehicle without database Step 7 Link database. Repeat the following steps to link multiple databases. 1) Click Associate Vehicle Database, and select the database to be linked. Figure 6-124 Database linkage Table 6-24 Database linkage parameters Parameters Description AI Alarm Rule... -
Page 175: Live View
User's Manual Step 2 Click , and then select Vehicle tab. Figure 6-125 Vehicle Step 3 Click next to Show Tracking Box to enable tracking box function. A tracking box is displayed in the video image when target meeting detection rule is detected. -
Page 176: Detection Statistics
User's Manual ● Tracking box is displayed in the video image. ● Features panel is displayed at the right side of the video image. Figure 6-126 Live Point to the features panel, and the operation icons are displayed. Figure 6-127 Icons ●... -
Page 177: Ai Search
User's Manual Figure 6-128 Vehicle comparison ● Point to the information panel, and then click to add license plate information to plate database. For details, see "6.8.3.2.3 Adding from Detection Results". ● Point to the information panel, and then click or double-click the picture to play back the video image (10 s before and after the snapshot). - Page 178 User's Manual Figure 6-129 Search by property Step 3 Select Plate Comparison as the Event Type. Step 4 Set vehicle properties and time period. Step 5 Click to set the color. means more than one color. Step 6 Click Query. The search result is displayed.
-
Page 179: Searching By Database
User's Manual Figure 6-131 Icons Table 6-25 Operations Icon Operation ● Select one by one: Point to the panel, and then click at the upper right side to select the panel. means the panel is selected. ● Select in batches: Select All to select all the panels on the page. Point to the panel, and then click or double-click the panel to play back the video record (10 s before and after the snapshot). -
Page 180: Crowd Distribution Map
User's Manual Figure 6-132 Search by vehicle database Step 3 Select the database to be searched. Step 4 Click Query. Step 5 The search result is displayed. If license plate is detected, both the scenario and the license plate will be displayed. Click one displayed panel, and the icons are displayed. -
Page 181: Enabling Ai Plan
User's Manual This function is only available with AI by camera. 6.9.1 Enabling AI Plan Enable the corresponding AI plan before using AI by camera functions. For details, see "6.2.1 Enabling AI Plan". 6.9.2 Configuring Crowd Distribution Map Set crowd distribution alarm rules. 6.9.2.1 Global Configuration Draw lines on the image to determine the geographical scale of the image. -
Page 182: Live View Of Crowd Distribution
User's Manual Step 3 Select AI Application > Crowd Distribution Map > Rule Config. Step 4 Click next to Enabled to enable rule configuration. Step 5 Set detection rules. ● Set regional detection rules. 1) Click Add Rule. Figure 6-134 Add Rules 2) Drag to adjust the size. -
Page 183: Call Alarm
User's Manual Figure 6-135 Live view of crowd distribution ● Right-click on the live video, and then select Crowd Distribution Map > PIP. A blue section is displayed, and it shows the crowd distribution status inside the current view. ● Right-click on the live video, and then select Crowd Distribution Map > Global to switch to the distribution view. -
Page 184: Live View Of Call Alarm
User's Manual Figure 6-136 Configure call alarm Step 5 Click and drag to adjust the size of the detection area (yellow area). Step 6 Set Sensitivity and Min Duration. ● Sensitivity: The higher the Sensitivity is, the easier the call action is detected. ●... -
Page 185: Call Alarm Search
User's Manual call action is highlighted in red when the alarm is triggered. Figure 6-137 Live view of call alarm 6.10.4 Call Alarm Search Search for videos or images of call alarm. Step 1 On the LIVE page, click , and then click Search. -
Page 186: Smoking Alarm
User's Manual Figure 6-138 Search Step 2 Select one or more devices. Step 3 Set search parameters. ● Record 1) Select Thermal as record type. 2) Select Call Detection as detection type. 3) Select a stream type. 4) Set time period. ●... -
Page 187: Enabling Ai Plan
User's Manual smoking detection rules for the visible light channel of a thermal camera. Smoking alarm is only available with AI by Camera. 6.11.1 Enabling AI Plan Enable the corresponding AI plan before using AI by camera functions. For details, see "6.2.1 Enabling AI Plan". -
Page 188: Live View Of Smoking Alarm
User's Manual You can select an existing schedule from the Deployment Time drop-down list. You can also add a new schedule. For details, see "8.8.4 Schedule". Step 7 Click Action to set alarm action. See "8.4.1 Alarm Actions" for detailed information. Step 8 Click Save. -
Page 189: General Operations
User's Manual 7 General Operations This chapter introduces general operations such as live view, playback, alarm, AI functions, and IVS. 7.1 Live and Monitor After you have logged in, the LIVE page is displayed. - Page 190 User's Manual Point to the middle of video window and the left column. is displayed. Click the icon if you need to hide the left column. Figure 7-1 Live (1) Figure 7-2 Live (2) Table 7-1 Live page description Description View zone.
-
Page 191: View Management
User's Manual Description Smart preview icons. View face statistics, person statistics, IVS statistics and AI display. Video play window. See "7.1.1.2 View" window for detailed information. ● Click to take snapshot. ● Click for full-screen view. ● Click to go to the VIDEO RECORDING page for recording configuration. -
Page 192: Creating View Group
User's Manual ● Device supports maximum 100 view groups. ● The views hierarchy shall not be more than 2. For example, after you create View Group 1 under View, you can create a sub-level View Group 2 under View Group 1. However, you cannot create sub-level group under View Group 2. -
Page 193: View
User's Manual Figure 7-5 Rename Table 7-2 View group Name Operation ● Select a view group and then click . Set view group name and click any spare panel. Rename view group ● Right-click view group and select Rename. Set view group name and click any spare panel. - Page 194 User's Manual Creating View Step 1 Follow the steps listed below to create view. ● Select a view group and then click , select Add view. ● Right-click a view group, select Add view. Figure 7-6 Edit view (1) Step 2 Double-click a remote device in resource pool, or drag the remote device to the right panel.
- Page 195 User's Manual ● Device automatically creates the view grids amount according to the selected remote device amount. Device supports maximum 36 view windows. ● The view window fills in the whole layout grid by default. Right-click to select Original Scale > ON, and turn on the Original Scale. The device automatically adjusts view window size according to resolution of remote device.
-
Page 196: Editing View
User's Manual Table 7-3 View Name Operation Edit remote device in the view, window layout and view name. See Edit View "7.1.1.2.2 Editing View" for detailed information. After enabling view, view real-time image of remote device in the view. Enable view See "7.1.1.2.3 Enabling view"... -
Page 197: Enabling View
User's Manual Figure 7-9 Edit view Step 2 Edit view as you require. ● Add remote device: Double-click remote device in the resource pool, or drag the remote device to the free layout grid on the right panel. ● Delete remote device: Point to window on the right, and click at the top right corner. - Page 198 User's Manual Figure 7-10 View window When enabling the view, you can change video position, zoom video window. ● When adjusting view window position, drag the view window to the layout grid of the green background color. You cannot drag the view window to the grid of red background color. ●...
-
Page 199: View Window
User's Manual Name Description In the resource pool, double-click the remote device or drag the remote device to the right panel, you can add remote device to current view. Drag the remote device to the view window to replace the original remote device. - Page 200 User's Manual Figure 7-12 View window Table 7-5 Window task column Name Description Click to start recording manually. Now the icon becomes Click to stop recording. System stops recording according to the instant record length settings if you do not click again to stop.
-
Page 201: Shortcut Menu
User's Manual Name Description Click to snapshot. At different interfaces, snapshot storage path varies. ● Local ◇ When USB storage device is connected, snapshots are saved in USB storage device. ◇ Snapshot Otherwise, the snapshots are saved in the device. Query or export the snapshots by playback control. -
Page 202: Digital Zoom
User's Manual Parameters Description Set video window scale. ● ON: System automatically adjusts video window scale according to the resolution. Original Scale ● OFF: System automatically adjusts video window scale according to the remote device amount and the free space on the playback panel. -
Page 203: Searching By Image
User's Manual original effect. Figure 7-15 Digital zoom: 7.1.1.3.4 Searching by Image Draw a frame on the video to select an image than contains targets, and then use the images to search for similar faces or human bodies. Step 1 Click at the upper-right corner of the video. - Page 204 User's Manual Figure 7-16 Fisheye dewarp Step 1 Right-click on the live video, and then select Fisheye Dewarp. Step 2 Select an installation method. ● Click to select ceiling mount. ● Click to select wall mount. ● Click to select ground mount. Step 3 Select a display mode.
-
Page 205: Smart Tracking
User's Manual 7.1.1.3.6 Smart Tracking Track targets manually or automatically. This function is only available on the multi-sensor panoramic camera + PTZ camera. Make sure that the linked tracking function has been enabled. Step 1 Right-click on the live video, and then select Smart Tracking > ON. Figure 7-17 Smart tracking Step 2 Select the tracking method. -
Page 206: Talk
User's Manual Figure 7-18 Thermal 7.1.1.3.8 Talk The Talk function enables voice interaction between the Device and remote devices, improving the efficiency in handling emergency events. Step 1 Log in to PCAPP. Step 2 Open a view on the Live page. Figure 7-19 Talk Step 3 Click... -
Page 207: Resources Pool
User's Manual 7.1.2 Resources Pool The resource pool displays the added remote device list. The system automatically divides into groups according to device type. Figure 7-20 Resources pool Table 7-8 Resources pool description Operation Description Input key words at , device displays the corresponding remote devices. -
Page 208: Ptz
User's Manual Operation Description ● Point to the remote device name, you can view remote device IP address and port number. ● On the device list, click one remote device and then press Ctrl, click other remote device, you can select several remote devices at the same time. - Page 209 User's Manual The following figure for reference only. The grey button means current function is null. Figure 7-21 PTZ Table 7-9 PTZ Icons Icons Description Press and hold on , and drag it up and down. It is to set PTZ speed.
-
Page 210: Ptz Menu Settings
User's Manual Icons Description Click to enable 3D positioning function. Click to enable auto focus, and then the camera image becomes focused automatically. Click to enter the PTZ menu mode. For details, see "7.1.3.1 PTZ Menu Settings". Zoom. Click to adjust lens zoom rate of the remote device. Focus. -
Page 211: Configuring Ptz Functions
User's Manual Figure 7-22 PTZ menu Table 7-10 PTZ menu description Parameters Description Set remote device image parameters involving picture, exposure, Camera backlight, WB, day and night, focus and zoom, defog, and default. Set remote device PTZ functions such as preset, cruise, scan, pattern, rotation, and PTZ restart. - Page 212 User's Manual You can set a preset so that you can quickly adjust the PTZ to the desired position in the future. Step 1 Log in to PCAPP. Step 2 Select a PTZ camera from the views. Step 3 On the PTZ panel, click Figure 7-23 Call a preset Step 4 Click the direction icons to rotate the camera to a specific position.
-
Page 213: Setting A Cruise
User's Manual 7.1.3.2.2 Setting a Cruise A cruise is a sequential set of presets. After you call a cruise, the PTZ camera automatically rotates to the presets one by one at the pre-defined interval. Step 1 Log in to PCAPP. Step 2 Select a PTZ camera from the views. -
Page 214: Setting Linear Scanning
User's Manual series of PTZ actions as desired, and then click Stop Record. The maximum number of patterns depends on the camera capability. If not limited on the camera, you can config up to 5 patterns by default. Figure 7-26 Call a pattern Step 5 To call the pattern, hover over the pattern name, and then click . -
Page 215: Enabling Auxiliary Functions
User's Manual The maximum number of linear scannings depends on the camera capability. If not limited on the camera, you can config up to 5 scannings by default. Figure 7-27 Set a linear scanning Step 5 To call the linear scanning, hover over the name, and then click . -
Page 216: Playing Back Recorded Video
User's Manual 7.2.1 Playing Back Recorded Video Search and playback record file according to remote device, record type, and record time. Step 1 On the LIVE page, click and then select SEARCH. Figure 7-29 Search Step 2 Select a remote device, and then click Record tab. Click to display only channels. - Page 217 User's Manual Figure 7-30 Schedule Step 5 Click Search. The record thumbnail is at the top of the remote device, and the time bar displays the record period (green color means there is a record). ● The selected remote device is on the left panel. Click a remote device, and the record file thumbnail is on the right panel.
- Page 218 User's Manual ● The playback window amount depends on the thumbnail amount you can drag or select. System supports maximum 16 windows. System automatically adjusts each window size according to the original scale of playback file. ● The thumbnail with means system is playing record file of current thumbnail.
- Page 219 User's Manual Signal Words Description Click to start playback. Now the icon becomes . Click to pause playback video. Click to switch to frame by frame playback. It is only valid in pause mode. Click to play back at fast speed. The fast speed includes1,2,4,8, and16.
-
Page 220: Clipping Recorded Video
User's Manual Signal Words Description Shortcut menu: Right-click on the playback window, you can view the shortcut menu. ● Zoom: It is to zoom in a specified zone and view the details. ● Original scale: It is to set view window scale. ◇... -
Page 221: Playing Back Snapshots
User's Manual Figure 7-34 Video clipping frame Step 4 Click the record edit column (the blue column) and drag to the left or right, to select start time and end time of clipping. Step 5 Click Save Immediately. Figure 7-35 Save Step 6 Click Browser to select saving path. - Page 222 User's Manual System supports maximum 1 remote device. Figure 7-36 Image playback (1) Step 3 Select image type, including Manual Snap, Video Detect, IO Alarm and Thermal. Step 4 Set search time. ● Method 1: Click the date or time on the time column, change time or date value. ●...
- Page 223 User's Manual Figure 7-38 Image thumbnail ● The selected remote device is on the left panel. Click a remote device, and the image thumbnail is on the right panel. ● Click to move thumbnail list, and display the hidden thumbnail. ●...
-
Page 224: Exporting File
User's Manual 7.2.4 Exporting File Export record file or image to the designated storage path. ● The default record file mode is .dav and the image file mode is .jpg. ● Connect USB device to the system if you are on the local menu to operate. Step 1 On the LIVE page, click and then select SEARCH. - Page 225 User's Manual Figure 7-42 Save 3) Click Browser to select saving path. For local operation, after you set storage path, the Save page displays the Format button. Click the Format button to clear all data on the USB storage device. The formatting operation will clear all data.
-
Page 226: Video Tag
User's Manual Figure 7-43 Download ● Click Pause all to pause all download tasks. Click Start all to resume download tasks. ● Click Clear completed columns to delete all downloaded tasks. ● Click of the corresponding task to pause download task. Click to resume download. -
Page 227: Locking Files
User's Manual Figure 7-44 Tag Step 4 Enter tag name, and then click OK. 7.2.6 Locking Files Lock specific videos or pictures so they cannot be viewed. An locked file can only be viewed after being unlocked. On the LIVE page, click , and then select SEARCH. -
Page 228: Vehicle Management
User's Manual 7.3.2 Vehicle Management See "6.8.3 Configuring Vehicle Database". 7.3.3 Tag Management Step 1 On the LIVE page, click , and then select FILE > Tag Management > Tag Management. Figure 7-45 Tag management Step 2 Select a channel, set start time and end time, and then click Search. The tags during the set time period are displayed. -
Page 229: Voice Management
User's Manual Figure 7-46 File lock Step 2 Select a channel, set start time and end time, and then click Search. The locked files are displayed. ● Click to view the video of the locked file. ● Click Refresh to view the latest locked files. ●... -
Page 230: Watermark Verification
User's Manual Figure 7-47 Audio management Step 2 Click Import to select the audio files that you want to import. Step 3 Click OK. The uploaded audio file is displayed. After the audio file is uploaded, it can be renamed or deleted. Table 7-13 Audio file operation Name Operation... -
Page 231: Task Management
User's Manual Figure 7-48 Watermark Step 2 Click Browse to select a video file. Step 3 Click Verify. ● Normal: If the verification result is normal, the correct watermark is displayed. ● Exception: If the verification result is abnormal, the abnormal watermark and its type are displayed. -
Page 232: Configuration Procedure
User's Manual 7.4.1.1 Configuration Procedure Figure 7-49 Analyze files imported from USB storage device Figure 7-50 Analyze local files 7.4.1.2 Importing Task Resources Import task resources from PC or USB storage device for AI analysis. Step 1 On the LIVE page, click , and then select TASK >... - Page 233 User's Manual In the device tree, indicates that the camera has been configured with intelligent analysis task. Figure 7-52 Create AI analysis task Step 4 Select a task type from Analysis Target. 1) Click the analysis target cell. Figure 7-53 Analysis target 2) Select a task type.
-
Page 234: Viewing Analysis Results
User's Manual Rule Name Operations ● Click next to Enabled to enable non-motor vehicle detection as well as face detection. ● Click next to Face to disable face detection. Non-Motor Vehicle You can only enable face detection after non-motor vehicle detection has been enabled. -
Page 235: Extracting Eigenvector Again
User's Manual analysis results. ● If the analysis target is Human, see "6.5.4.1 Human Search". ● If the analysis target is Vehicle, see "6.5.4.2 Vehicle Search". ● If the analysis target is Non-motor Vehicle, see "6.5.4.3 Non-motor Vehicle Search". ● If the analysis target is Face, see "6.3.2.6 Face Search". 7.4.2 Extracting Eigenvector Again Re-extract Eigenvector of images with unmatched versions, to improve AI analysis accuracy. - Page 236 User's Manual Figure 7-56 Backup Step 2 Select a channel from the resource tree on the left. Step 3 Select a file type. ● Record 1) Select a record type from All Record, Instant Record, Video Detect and IO Alarm. 2) Select a stream type from Main Stream and Sub Stream.
- Page 237 User's Manual Figure 7-57 Save 2) Select a file type. 3) Click Browse to set saving path. You can download files to PC or USB storage device. When downloading to USB storage device, making sure that the USB device has already been connected to the Device.
-
Page 238: Alarm List
User's Manual Figure 7-58 Remote device 2) Click Query to search for connected third-party storage devices. 3) Select a storage device, and then in the Type box, select a target format for the file. 4) Click Format to format the selected storage device. The formatting operation will clear all data of the storage device. -
Page 239: Display Management
User's Manual automatically hides. ● Click to confirm alarm event. The confirmed event will be removed from the alarm list. ● Click the alarm event on the alarm list. The device displays the 20 seconds video before and after the alarm event occurred. ◇... - Page 240 User's Manual main screen cannot be disabled. Figure 7-61 Display Table 7-16 Difference between main screen and sub screen Name Main screen Sub screen User operation (Login, log out, change password, lock) Preview and Monitor Search Confirm alarm File Management Intelligent Analytics Function Operations Multiple-screen...
-
Page 241: Locking Screen
User's Manual Name Main screen Sub screen Device, network, event, storage, account, security System Configuration strategy, and system management, and cluster. 7.7.2 Locking Screen Click and then select Lock to lock the screen. The screen stops at current page and cannot operate other functions. -
Page 242: Background Task
User's Manual tab and then click Clear button to clear all system error information. 7.9 Background Task View background task running status. Click , device displays background task list. Click All, Running, or Waiting to view the corresponding background task list. Figure 7-64 Background task 7.10 Buzzer View buzzer alarm messages. -
Page 243: System Configuration
User's Manual 8 System Configuration This chapter introduces system configuration functions such as managing remote device, setting network, setting alarm event, setting HDD storage, managing user information, setting device security strategy, and setting system parameters. 8.1 Configuration Window Click to open the configuration window. Figure 8-1 Configuration window On this window, you can: ●... -
Page 244: Viewing Device Information
User's Manual plan. Figure 8-2 Device management Click or click Add to add remote device to the system. 8.2.1 Viewing Device Information View information of the Device. Step 1 Click , and then select DEVICE. Step 2 Select the root node in the resource tree, and then click the Device Info tab. - Page 245 User's Manual Figure 8-3 Device information Table 8-1 Device info Parameters Description Name Set device name. Description Device description. Displays device info, including type, SN, MAC, number of video, audio and alarm in/out channels, video input Device info bandwidth, system version, security baseline version, web version, and algorithm version.
-
Page 246: Remote Device
User's Manual 8.2.2 Remote Device The Device supports to add remote device, modify its IP address and configurations, and export its information. 8.2.2.1 Viewing Remote Devices View connected remote devices. For details about adding devices, see "8.2.2.3 Configuring Remote Devices". Step 1 Click , or click... -
Page 247: Modifying Ip Of Unconnected Devices
User's Manual 8.2.2.2.1 Modifying IP of Unconnected Devices ● You can only modify the IP address of initialized devices. ● You can only modify the IP address of remote devices connected with private protocol. Step 1 Click , or click on the configuration page, and then select DEVICE. - Page 248 User's Manual Figure 8-6 Modify IP (1) Step 5 Enter the static IP address, subnet mask, gateway, and incremental value. ● Enter incremental value only when multiple remote devices are modified. If you want to change IP addresses of several devices at the same time, system allocates IP address one by one according to your setting at the fourth bit of the IP address.
-
Page 249: Modifying Ip Of Connected Devices
User's Manual 8.2.2.2.2 Modifying IP of Connected Devices ● You can only modify the IP address of initialized devices. For remote device initialization, see "5.4.1 Initializing Remote Device" for detailed information. ● You can only modify the IP address of remote devices connected through Private, Onvif or Onvifs protocol. -
Page 250: Configuring Remote Devices
User's Manual The result of IP modification is displayed. Step 6 Click OK. 8.2.2.3 Configuring Remote Devices Set remote device property, connection information, and video parameters. The page displayed might vary with remote devices. See the actual page for detailed information. 8.2.2.3.1 Configuring Device Property Set remote device name, and view device information. - Page 251 User's Manual Step 3 Change IP address. 1) Click of the corresponding address. 2) Enter IP address, subnet mask and gateway. 3) Click Test to test whether the IP address is valid. Figure 8-9 Modify IP 4) Click OK to save setting. Step 4 Change port number.
-
Page 252: Configuring Video Parameters
User's Manual Parameters Description Set cache strategy of remote device video stream. ● Self-adaptive: System automatically adjusts video stream cache status according to the network bandwidth. Cache strategy ● Realtime: Guarantee video real-timeness. When the network bandwidth is not sufficient, the video might not be fluent. ●... - Page 253 User's Manual Parameters Description Select the checkbox to enable SVC function. Select 1 or 2 from the drop- down list on the right. The default setup is 1, there is no scaled encoding. SVC refers to the scaled video coding. It can split the video stream to basic stream and enhanced scale.
-
Page 254: Configuring Osd
User's Manual 8.2.2.3.4 Configuring OSD Set time and channel information overlay on the video. Step 1 Click , or click on the configuration page, and then select DEVICE. Step 2 Select a remote device on the left panel and then click OSD tab. Figure 8-12 OSD Step 3 Enable OSD information according to actual requirements. -
Page 255: Configuring Audio Parameters
User's Manual ◇ Click to adjust the alignment of text boxes. ◇ Click to create a text box. ◇ Click to delete a text box. Figure 8-15 Geographical position 4. Drag the text box to the proper position. 5. Click to save the OSD information. -
Page 256: Exporting Remote Devices In Batches
User's Manual parameters. Table 8-5 Audio parameters Parameter Description The audio encoding mode set here applies to both audio streams Compression and voice talks. We recommend leaving it as default. The number of samples of a sound that are taken per second. The Sampling Frequency higher the value, the more accurate the digital representation of the sound can be. -
Page 257: Importing Remote Devices In Batches
User's Manual 8.2.2.5 Importing Remote Devices in Batches Import devices in batches by using the template. On the Device List page, click Batch Import to go to the Add Device page. On the Add Device page, click the Import CSV File tab. 8.2.2.6 Connecting Remote Devices On the Device page, view connection status of remote device in the device list. -
Page 258: Changing Device Password
User's Manual is to select all remote devices between these two, and then click to delete them. ◇ On the Device List page, select multiple remote devices, and then click Delete. 8.2.2.8 Changing Device Password Change passwords of connected devices. You can only modify devices successfully connected to IVSS via private protocol. -
Page 259: Basic Network
User's Manual Figure 8-20 Network management 8.3.1 Basic Network Set basic network parameters of the device, such as IP address, port aggregation and port number, to connect with other devices in the network. 8.3.1.1 Configuring IP Address Set device IP address, DNS server information and other information according to network planning. Device has 4 Ethernet ports by default. - Page 260 User's Manual Click to view the NIC parameter information. Figure 8-21 TCP/IP Step 2 Click of the corresponding NIC to edit network parameters. Figure 8-22 Edit Ethernet network Step 3 Set parameters. Table 8-6 TCP/IP parameters description Parameters Description Speed Current NIC max network transmission speed.
-
Page 261: Port Aggregation
User's Manual Parameters Description Set NIC MTU value. The default setup is 1500 Byte. We recommend you to check the MTU value of the gateway first and then set the device MTU value equal to or smaller than the gateway value. It is to reduce the packets slightly and enhance network transmission efficiency. -
Page 262: Binding Nic
User's Manual Aggregation mode Description In this mode, device has bonded several NICs and set one NIC as the main card and the rest NICs are the alternative NICs. Usually, only the main NIC card is working. System can automatically enable other Fault-tolerance alternate cards to work when the main card breaks down. - Page 263 User's Manual The setting page varies depending on the aggregation mode you have selected. The following figure is the load balance setting page. Figure 8-23 Edit load balance 5) Set parameters. Table 8-8 TCP/IP parameters description Parameters Description Speed Maximum network transmission speed of current NIC. IP Type Select IPv4 or IPv6.
-
Page 264: Cancelling Binding Nic
User's Manual System pops up a confirmation box. Step 4 Click OK. The binding card information becomes activated after reboot operation. 8.3.1.2.2 Cancelling Binding NIC Cancel port aggregation and allow the bonded NICs to work as independent card. Step 1 Click or click on the configuration page, and then select NETWORK >... -
Page 265: Network Apps
User's Manual Parameters Description Set according to the actual requirements. The default value is 37777. TCP Port The value ranges from 1025 to 65535. Set according to the actual requirements. The default value is 554. The RTSP Port value ranges from 1 to 65535. Set according to the actual requirements. -
Page 266: Ddns
User's Manual Figure 8-25 P2P Step 2 Click to enable P2P function. Step 3 Click Save. After the configuration, you can register a device to the APP to view remote video, playback record file, and so on. See corresponding cellphone APP for detailed information. After successfully connected to the P2P, the status displayed as Success. -
Page 267: Procedure
User's Manual After you have registered and logged in the DDNS website successfully, you can view the information of all the connected devices under this username. 8.3.2.2.2 Procedure Step 1 Click , or click on the configuration page, and then selectNETWORK > Basic Network >... -
Page 268: Email
User's Manual Parameters Description The domain name for registering on the website of DDNS service Domain provider. User Name Enter the username and password obtained from DDNS service provider. You need to register (including username and password) on the website Password of DDNS service provider. -
Page 269: Snmp
User's Manual Parameters Description Server Address Enter email server address. Set the encryption type of email server, such as NONE, SSL, and TLS. Encryption You are recommended to select TLS. Other encryption methods might not be safe. Port Enter the port number of email server. Username and Enter the configured username and password of Email server. - Page 270 User's Manual Figure 8-28 SNMP (1) Step 2 Click to enable the function. Step 3 Select SNMP version. ● If you have selected SNMP V1/V2, see the previous figure. ● If you have selected SNMP V3, see the following figure. Figure 8-29 SNMP(2) Step 4 Set parameters.
-
Page 271: Register
User's Manual Table 8-12 SNMP parameters Parameters Description Port Listening port of agent programs on the device. Read or Write Community supported by the agent programs. Read Community, Write Community The name can only contain numbers, letters, underscores, and middle lines. The destination address of Trap information sent by the agent Trap Server program. -
Page 272: Upnp
User's Manual Figure 8-30 Register Step 2 Click to enable the function. Step 3 Set parameters. Table 8-13 Register Parameters Description IP Type Select IP address of server for registration. Server In the Server box, enter the IP address of server for registration. Port Enter the port number of the server for registration. - Page 273 User's Manual Figure 8-31 UPnP Step 2 Set parameters. Table 8-14 Table 6-13 UPnP parameters Parameters Description Port Mapping Click to enable UPnP. State The status of port mapping. The LAN IP address of the router. LAN IP The IP address is automatically obtained after the mapping succeeds. The WAN IP address of router.
-
Page 274: Multicast
User's Manual corresponding port number in the router network. 8.3.2.7 Multicast When multiple users are viewing live video of the same device at the same time, it might cause failure due to limited bandwidth. To solve this problem, you can set a multicast IP address (224.0.0.0– 239.255.255.255) for the Device. -
Page 275: Alarm Center
User's Manual Figure 8-33 Log in through multicast 8.3.2.8 Alarm Center You can configure the alarm center server to receive the uploaded alarm information. Make sure that alarm center server is deployed. Step 1 Click , or click on the configuration page, and then select NETWORK > Network Apps >... -
Page 276: Route Table
User's Manual 8.3.2.9 Route Table Configure the route table so that the system can automatically calculates the best path for data transmission. Step 1 Click , or click on the configuration page, and then select NETWORK > Network Apps > Route Table. Step 2 Click Add. -
Page 277: Alarm Actions
User's Manual Device. ● Select remote device in the device tree on the left, to set alarm event of this remote device. ● The alarm event might be different depending on the model you purchased. ● means that the corresponding alarm event has been enabled. ●... -
Page 278: Record
User's Manual Actions Description Preparation The system sends alarm email Email configuration has been to all added receivers when Email completed. See "8.3.2.3 Email" there is corresponding an for detailed information. alarm event. The system takes snapshots of Snapshot the linked channel when –... -
Page 279: Buzzer
User's Manual Make sure that the remote device, such as IPC, has been added. See "5.4.2 Adding Remote Device" for detailed information. Step 1 Click Actions, and then select Record. Figure 8-37 Record Step 2 Set the time length of recording after the event moment. Step 3 (Optional) Repeat Step 1–Step 2 to link multiple remote devices to record. -
Page 280: Preset
User's Manual Figure 8-40 Email 8.4.1.5 Preset Set preset function. The system links the selected remote device to rotate to the designated preset point when there is corresponding alarm event. Make sure that the PTZ device has been added, and preset has been added. See "5.4.2 Adding Remote Device"... -
Page 281: Remote Device Alarm Output
User's Manual Figure 8-43 Local alarm out Step 2 Select alarm output port. You can select multiple alarm output ports. Step 3 Set delay time. Set a delay time. After alarm event is ended, alarm will end after the delay time. You can configure from 0 seconds through 300 seconds, and the default value is 10 seconds. -
Page 282: Voice Prompt
User's Manual Not all models support this function. Step 3 (Optional) Repeat Step 1–Step 2, and link multiple access control devices. 8.4.1.10 Voice Prompt Set voice prompt function. When there is an alarm, system can play the selected audio file. Make sure that the voice function has been configured. -
Page 283: Local Device
User's Manual Audio and light alarm is available when AI by camera is used for IVS detection and the camera supports this function. Step 1 Click Actions and select Camera Audio and Remote Warning Light. Figure 8-47 Camera audio Figure 8-48 Remote warning light Step 2 Configure the parameters. -
Page 284: Abnormal Event
User's Manual Figure 8-49 Disarming Step 4 Click to enable disarming. Step 5 Cancel selecting alarm linkage actions as needed. The actions are selected by default. Step 6 (Optional) Configure disarming by period. 1) Click to enable disarming by period. 2) Click Add Schedule to specify disarming schedule. - Page 285 User's Manual Name Description System triggers an alarm when the used storage space reaches the pre-defined threshold. It is disabled by default. Storage full The alarm is valid only when the storage mode is set as Stop on the STORAGE > VIDEO RECORDING > Basic page. System triggers an alarm in case of RAID degrade, RAID broken or RAID exception other RAID exceptions.
-
Page 286: Offline Alarm
User's Manual Figure 8-50 AI module temp Step 4 Click to enable AI module temperature alarm function. Step 5 Drag to set alarm temperature threshold. The above step is for AI module temperature alarm only. Step 6 Click Actions to set alarm actions. See "8.4.1 Alarm Actions" for detailed information. Step 7 Click Save. -
Page 287: Configuring Ai Application
User's Manual Figure 8-51 Offline alarm Step 4 Click to enable device offline alarm. Step 5 Click Deployment Time to select schedule from the drop-down list. After setting deployment period, system triggers corresponding operations when there is a motion detection alarm in the specified period. ●... -
Page 288: Setting Ai Display
User's Manual indicates that AI by camera is enabled; indicates that AI by device is enabled. Figure 8-52 AI plan 8.4.2.4.2 Setting AI Display Set the property to be displayed in rule box and feature property panel. View AI detection result through smart preview, and support to display face, human and vehicle. - Page 289 User's Manual Figure 8-53 Face Step 4 Configure display filter information. After setting filter criteria, only the qualified detection result will be displayed. For example, enable Age, and then select youth from the drop-down list. The tracking box and the features panel only display the human face of the youth age. 1) Click to enable corresponding filter type.
-
Page 290: Setting Entries Frequency
User's Manual ● Drag to adjust features panel transparency. The higher the value, the more transparent the features panel. ● System supports maximum 4 features. System has checked four features by default. To select other features, cancel the selected features, and then select the ones you need. ●... - Page 291 User's Manual Figure 8-56 Entries frequency Step 4 Click Associate Face Database, and then select the database to be linked. Step 5 Configure the parameters. Table 8-20 Entries frequency parameters Parameter Description Entries Counter Click to enable entries counter. Entries will be counted. ●...
-
Page 292: Video Diagnosis
User's Manual Figure 8-57 High frequency tag 8.4.2.4.4 Video Diagnosis The Device can analyze and trigger alarm against blurry image, tampering, color cast and more, and then generate statistics reports. Configuring Video Diagnosis After enabling video diagnosis, the Device triggers an alarm when the video quality is affected by blurry image, tampering, color cast and more. -
Page 293: Configuring Device Alarm
User's Manual 3) On the device list, select one or more devices. 4) Set the interval. Step 7 Click the Deployment Time drop-down list to select a schedule. After setting the deployment time, only an alarm occurring within the schedule triggers linkage actions. -
Page 294: Remote Device
User's Manual ● Make sure that the Device is connected with alarm input device. ● The Device supports 16-channel alarm input. Configure according to actual port of alarm input device. Take ALARM1 port connection for example. Step 1 Click , or click on the configuration page, and then select EVENT. -
Page 295: Video Detection
User's Manual The parameters might be different depending on the model you purchased. 8.4.3.1 Video Detection Video detection function adopts the PC visual, image and graphical processing technology to analyze the video image and check there is considerable changes on the video. Once there are considerable video changes (such as there is any moving object, or the video is blurred), system triggers corresponding alarm event. -
Page 296: Tampering
User's Manual 1) Click motion detection zone icon 2) On the surveillance video, press and hold on the left button of mouse to select detection zone. ● Select the motion detect zone you have drawn. Click to delete the zone. ●... -
Page 297: Offline Alarm
User's Manual Figure 8-62 Tampering Step 4 Click to enable tampering alarm. Step 5 Click Deployment Time to select schedule from the drop-down list. After setting deployment period, system triggers corresponding operations when there is a motion detection alarm in the specified period. ●... -
Page 298: Ipc External Alarm
User's Manual a device offline alarm in the specified period. ● Click View Schedule to view detailed schedule settings. ● If the schedule is not added or the added schedule does not meet actual needs, click Add Schedule. See "8.8.4 Schedule" for detailed information. Step 6 Click Actions to set alarm actions. -
Page 299: Thermal Alarm
User's Manual Add Schedule. See "8.8.4 Schedule" for detailed information. Step 7 Click Actions to set alarm actions. See "8.4.1 Alarm Actions" for detailed information. Step 8 Click Save. 8.4.3.4 Thermal Alarm ● Alarm types vary depending on the models of thermal cameras. ●... -
Page 300: Storage Resource
User's Manual utilization ratio of storage space. The system supports pre-check and routine inspection, and displays health status, so you can obtain real-time status of device and avoid data loss. ● Pre-check: During device operation, the system automatically detects disk status in case of change (reboot, insert and pull the disk). -
Page 301: Format
User's Manual compares with the specified safety value. Once the monitor status is higher than the specified value, system displays alarm information to guarantee HDD data security. Check one HDD to view S.M.A.R.T information at one time. On the Local Hard Disk page, select a HDD, and then click S.M.A.R.T. The S.M.A.R.T page is displayed. -
Page 302: Raid
User's Manual 8.5.1.2 RAID RAID (Redundant Array of Independent Disks) is a data storage virtualization technology that combines multiple physical HDD components into a single logical unit for the purposes of data redundancy, performance improvement, or both. ● The Device supports RAID0, RAID1, RAID5, RAID6, RAID10, RAID50 and RAID60. See "Appendix 2 RAID"... - Page 303 User's Manual Figure 8-68 Create RAID (1) Step 3 Set RAID parameters. Select RAID creation type according to actual situation. It includes Manual RAID and Auto RAID. ● Manual RAID: System creates a specified RAID type according to the selected HDD amount.
- Page 304 User's Manual Parameters Description Set RAID resources allocation mode. The default setup is self-adaptive. ● Self-adaptive means the system can automatically adjust RAID synchronization speed according to current business load. When there is no external business, the synchronization speed is at high speed.
- Page 305 User's Manual Parameters Description Set RAID resources allocation mode. The default setup is self- adaptive. ● Self-adaptive means the system can automatically adjust RAID synchronization speed according to current business load. When there is no external business, the synchronization speed Working Mode is at high speed.
-
Page 306: Creating Hot Spare Hdd
User's Manual If the input information is wrong, click Back to set RAID parameters again. Step 6 Click Create. System begins to create RAID. It displays RAID information after creation. Figure 8-72 RAID (2) Related Operations After creating RAID, view RAID disk status and details, clear up RAID, and repair file system. Table 8-28 RAID operation Name Operation... - Page 307 User's Manual Figure 8-73 Hot spare (1) Step 2 Click Add. Figure 8-74 Global hot spare Figure 8-75 Private hot spare Step 3 Select hot spare creation type. ● Global hot spare: Create hot spare for all RAID. It is not a hot spare HDD for a specified RAID group.
-
Page 308: Network Hard Disk
User's Manual Figure 8-76 Confirm info Step 5 Confirm information. Click Back to select hot spare HDD(s) again if you want to change settings. Step 6 Click Create to save settings. System displays the added hot spare HDD information. Figure 8-77 Hot spare (2) Select a hot spare HDD and then click Delete, it is to delete hot spare HDD. -
Page 309: Iscsi Management
User's Manual Figure 8-78 ISCSI application ● Select a network hard disk, and then click Format to format the disk. Formatting your hard disk will erase all data from your hard disk, so do it carefully. ● Click the HDD Operation column, and then you can select an HDD operation permission type. ◇... - Page 310 User's Manual Figure 8-79 Network hard disk Step 2 Click Figure 8-80 Add iSCSI Step 3 Set parameters. Table 8-29 Network hard disk parameters Parameters Description Server IP Enter iSCSI server IP address. Port Enter iSCSI server port number. It is 3260 by default.
-
Page 311: Video Recording
User's Manual Parameters Description If iSCSI server has no permission limitation, you can select anonymous login. ● indicates that anonymous login is enabled and there is no need Anonymous to set username and password. ● indicates that anonymous login is disabled. User Name If access permission has been limited when creating the shared file directory on the iSCSI server, you need to enter username and password. -
Page 312: Setting Video/Image Storage
User's Manual Figure 8-81 Disk group Step 3 Select HDD or RAID group from Disks, and then drag the HDD or the RAID group to another disk group. Disk grouping takes effect immediately. Select All to select all the HDDs and RAID groups of the disk group. After configuring disk groups, you can also view which disk group the selected disk, video or picture belongs to. - Page 313 User's Manual Figure 8-82 Video Step 2 Select filtering way from the Batch Process drop-down list. ● By Channel Name: Select channel according to the channel name. ● By Logical Channel No.: Select channel that is connected to the Device. In this case, Start Channel No.
-
Page 314: Recording Schedule
User's Manual ● Only disk group with available HDD or RAID group or linked channel is displayed. ● The value (such as ) next to the group name refers to the number of HDD and RAID group in the disk group. If instead, is displayed, it means no available HDD or RAID group in the disk group, but there is video or image stored in the disk group. -
Page 315: Recording Schedule
User's Manual ● means that the type is selected. ● Substream1 and Substream2 cannot be enabled at the same time. ● Auto: Records automatically according to the schedule. ● Manual: Records around the clock and does not respond to the recording schedule. ●... - Page 316 User's Manual 4. Click , name the schedule, select a type and then click OK. 5. Specify recording hours by dragging the sliders on the day bars. ● Always Effective: Records according to the schedule. ● Customize: Select this option, click to define the validity periods of the schedule.
-
Page 317: Basic
User's Manual ● Manual Snap: The number of images for each manual capture action. Enter a value to specify the number of seconds between each image. ● Event Snap: The number of images captured for each event. ● Copy to: Copy the current settings to other channels. 8.5.2.3 Basic Configure the storage mode when the disk space is used up and the automatic deletion of expired files. -
Page 318: Record Transfer
User's Manual The deleted files cannot be recovered. Figure 8-88 Delete expired files Step 4 Click Save. 8.5.2.4 Record Transfer When the device and an IPC are disconnected, the IPC continues to record and stores the recording in the SD card. After the network is recovered, the device will download the recording during the disconnection from the IPC. -
Page 319: Https
User's Manual access rights, enable network security protection. 8.6.1 HTTPS HTTPS can use the reliable and stable technological means to guarantee user information and device security and communication data security. After installing the certificate, you can use the HTTPS on the PC to access the device. -
Page 320: Installing Signature Certificate
User's Manual 2) Click Open. 3) Click Install Certificate. 4) Follow the prompts to import the certificate. System goes back to Certificate page. Step 5 Click OK to complete certificate installation. Figure 8-90 Installed certificate 8.6.1.1.2 Installing Signature Certificate Upload signature certificate to install. Prerequisites Before installation, make sure that you have obtained safe and valid signature certificate. -
Page 321: Enabling Https
User's Manual Step 4 Click Install. System begins to install certificate, and then displays certificate information after the installation. Step 5 Install the root certificate on the PC. See "8.6.1.1.1 Installing the Created Certificate" for detailed information. This root certificate is the one obtained with signed certificate. 8.6.1.2 Enabling HTTPS After you install the certificate and enable HTTPS function, you can use the HTTPS on the PC to access the device. -
Page 322: Configuring Access Permission
User's Manual ● You cannot use the HTTPS function after you uninstall the certificate. ● The certificate cannot be restored after being uninstalled. Be cautious. Step 1 Click , or click on the configuration page, and then select SECURITY > Credential. Figure 8-93 Uninstall Step 2 Click Uninstall. - Page 323 User's Manual Figure 8-94 IP Filter Step 2 Select IP access rights. ● Allow all access: It is to allow all IP addresses in the same IP segment to access the device. ● Reject access list: It means the IP address in the list cannot access the device. ●...
-
Page 324: Safety Protection
User's Manual 8.6.3 Safety Protection Set the login password lock strategy once the login password error has exceeded the specified threshold within the defined time period. System can lock current IP host for a period of time. Step 1 Click , or click on the configuration page, and then select SECURITY >... - Page 325 User's Manual Service. Figure 8-96 System service Step 2 Enable or disable system service according to your actual situation. Table 8-31 System service System service Description After enabling this function, you can access the Device through SSH protocol to carry out system debugging and IP configuration. This function is disabled by default.
-
Page 326: Configuring Firewall
User's Manual System service Description Password Configure the password expiration interval. The Device prompts you to Expires in change the password when the password expires. When this function is enabled, stream transmission will be encrypted. Audio/Video Transmission We recommend you enable this function. Otherwise you might risk data Encryption leakage. -
Page 327: Account Management
User's Manual ● Hosts in the allowlist have the permission to synchronize time of the Device. ● Hosts in the blocklist cannot synchronize time of the Device. Step 4 On the Allowlist page or the Blocklist page, add hosts. 1) Click Add. Figure 8-98 Add a host 2) Select an IP version, and then enter an IP address. -
Page 328: Adding User Group
User's Manual ● System supports maximum 64 user groups. User group name supports maximum 64 characters. ● System has two default user groups (read-only): admin and ONVIF. ● Create new user group under the root. 8.7.1.1 Adding User Group Step 1 Click , or click on the configuration page, and then select ACCOUNT. -
Page 329: Deleting User Group
User's Manual Figure 8-100 Authority 2) Set user group authorities according to actual situation. ● : means it has the corresponding authority. ● Check the box at the top of the authority list (such as (0) Authority Control) to select all authorities of current category. - Page 330 User's Manual left corner. Step 3 Enter current user’s login password, and then click OK. Figure 8-101 Property Step 4 Set parameters. Table 8-34 User management Parameters Description Set username. Name The name ranges from 1 to 31 characters. It can contain English letters, number and special character ("_", "@", ".").
-
Page 331: Operation
User's Manual Figure 8-102 Authority Step 6 Click Save. 8.7.2.2 Operation After adding a user, you can modify user information or delete the user. The user with account management authority can change its own and other users’ information. Table 8-35 User operation Name Operation Select a user from user list. -
Page 332: Changing Password Of The Current User
User's Manual 8.7.3.1.1 Changing Password of the Current User Step 1 Click at the top right corner, and then select Modify Password. Step 2 Enter the old password, the new password and then confirm. Step 3 Click OK. 8.7.3.1.2 Changing Password of Other User Only Admin account supports this function. -
Page 333: Resetting Password
User's Manual Figure 8-104 Change password Step 5 In the New Password box, enter the new password and enter it again in the Confirm Password box. Step 6 Click OK. 8.7.3.2 Resetting Password You can use email address or answer the security questions to reset password once you forgot it. You can only reset password on the local interface of the Device. - Page 334 User's Manual Figure 8-105 Login Step 2 Click Forgot Password?. Step 3 Click OK. ● If you have set the email address information, the QR code is displayed. ● If you have not set the email address information, the email address interface is displayed.
- Page 335 User's Manual Figure 8-106 Enter email address Figure 8-107 Scan QR code Step 4 Reset the password.
- Page 336 User's Manual Figure 8-108 Security questions Step 5 Click Next. Figure 8-109 New password setting Step 6 Set parameters. Table 8-36 Description of password parameters Parameters Description User The default username is admin. Password In the New Password box, enter the new password and enter it...
-
Page 337: Resetting Password On The Web
User's Manual Parameters Description again in the Confirm Password box. The password must consist of 8–32 non-blank characters and Confirm Password contain at least two types of the following characters: Uppercase, lowercase, numbers, and special characters (excluding ' " ; : &). Enter a strong password according to the password strength indication. - Page 338 User's Manual Figure 8-111 Security questions Step 5 Click Next. Step 6 Set a new password. Figure 8-112 New password setting Table 8-37 Description of password parameters Parameters Description User The default username is admin. Password In the New Password box, enter the new password and enter it again in the Confirm Password box.
-
Page 339: Onvif
User's Manual Parameters Description After setting the prompt, when you point to on the login page, the system pops up a prompt to help you remember the Prompt question password. The prompt question function is for local login only. See the actual page for detailed information. -
Page 340: Deleting Onvif User
User's Manual Step 4 Enter the login password of current user, and then click OK. Figure 8-114 ONVIF property Step 5 Set parameters. Table 8-38 ONVIF parameters description Parameters Description Set ONVIF username. username The name ranges from 1 to 31 characters. It can contain English letters, number and special character (_ @ .). -
Page 341: System Configuration
User's Manual Step 4 Click OK. 8.8 System Configuration Click or click on the configuration page, select SYSTEM. The SYSTEM page is displayed. Set system basic settings, such as general parameters, time, display parameter, schedule, and voice. Figure 8-115 System management 8.8.1 Setting System Parameters Set system language, standard, user logout time, virtual keyboard, and mouse moving speed. -
Page 342: System Time
User's Manual Parameters Description Select video standard. ● PAL is mainly used in China, Middle East and Europe. ● NTSC is mainly used in Japan, United States of America, Canada and Mexico. Standard As a technical standard of processing video and audio signals, PAL and NTSC mainly differ in encoding, decoding mode and field scanning frequency. - Page 343 User's Manual Figure 8-117 Time Step 2 Set parameters. Table 8-40 System parameters description Parameters Description Set system date and time. You can set manually or set device to synchronize time with the NTP server. ● Manual Setting: Select Manual Setting and then set the actual date and time in the following two ways.
-
Page 344: Display
User's Manual DST is a system to stipulate local time, in order to save energy. If the country or region where the device is located follows DST, you can enable DST to ensure that system time is correct. 1) Click to enable DST. -
Page 345: Schedule
User's Manual Step 4 Set parameters. Table 8-41 Display parameters description Parameters Description Set display resolution. Different displays support different Resolution resolutions. See your actual interface for detailed information. Refresh rate Set refresh rate of the display. Step 5 Click Save. 8.8.4 Schedule Set schedule. -
Page 346: Cluster Service
User's Manual ● The step is for customized mode only. ● Each calendar supports maximum 50 validity periods. ● The blue area on the time bar means the validity period. On the time bar, you can: ● Click the blue area, and is displayed. - Page 347 User's Manual Figure 8-120 Procedure of creating a cluster Step 1 Click , or click on the configuration page, and then select CLUSTER SERVICE > CLUSTER. Step 2 Add a main device or sub device. 1) Click Add. Figure 8-121 Add cluster 2) Set parameters.
-
Page 348: Viewing Details
User's Manual Parameters Description Enter the IP address of the main device or sub device. IP Address When adding the first sub device, you need not enter the IP address, because the first sub device is the current device by default. -
Page 349: Configuring Arbitration Ip
User's Manual Figure 8-123 Event log 8.9.1.3 Configuring Arbitration IP When there are only 2 devices in the cluster, a third-party device is required to determine whether the main device is faulty, so arbitration IP must be set for the cluster to perform a normal replacement operation. -
Page 350: Viewing Cluster Log
User's Manual Figure 8-125 Add Step 3 Set parameters. Table 8-43 Parameters Parameters Description Main Device Main device IP. Sub Device Sub device IP. Select the channel of which the video is to be transferred. Channel No. Click to set the channel range. Start Time The start and end time of the video. -
Page 351: System Maintenance
User's Manual 9 System Maintenance Click on the LIVE page, and select MAINTAIN. You can operate and maintain the device working environment to guarantee proper operation. Figure 9-1 Maintain 9.1 Overview Click on the LIVE page, and select MAINTAIN > Overview. Figure 9-2 Overview Table 9-1 Overview Function... -
Page 352: System Information
User's Manual Function Description View the connection and idle status of remote devices ● Click Jump To to go to the DEVICE page for detailed Remote Device information. ● Click Refresh to refresh the data. View RAID status. ● Click Jump To to go to the STORAGE page for detailed RAID Status information. -
Page 353: Viewing Legal Information
User's Manual Figure 9-3 Device info 9.2.2 Viewing Legal Information View device software license, privacy policy, and open-source software note. Click on the LIVE page, and select MAINTAIN > System Info > Legal Info. 9.2.3 Viewing Algorithm Version View device algorithm license status and AI version information. Click on the LIVE page, and select MAINTAIN >... -
Page 354: System Resources
User's Manual Figure 9-4 Algorithm version 9.3 System Resources View device and AI module information. 9.3.1 Viewing Device Resource Click on the LIVE page, and select MAINTAIN > System Resources > DEIVCE INFO. The System Resources page is displayed. You can view resource status including CPU and memory usage, panel temperature and fan speed. -
Page 355: Logs
User's Manual Figure 9-6 AI module information 9.4 Logs The logs record all kinds of system running information. Check the log periodically and fix the problems in time to guarantee system proper operation. 9.4.1 Log Classification Search system log, user log, event log, and link log. Table 9-2 Log description Type Search system log. -
Page 356: Intelligent Diagnosis
User's Manual Figure 9-7 System log Related Operations Export and clear log. Table 9-3 Log operation Name Operation Click and then the Export window appears. You can select whether to encrypt the exported log information. ● You need to set a password for export encryption. The password is required to unzip the exported file. -
Page 357: One-Click Export
User's Manual Figure 9-8 Logs ● Click to export a log. ● After selecting multiple logs, click Export to export them in batches. 9.5.2 One-click Export Export the diagnosis data for troubleshooting when the device is in exception. Step 1 On the LIVE page, click , and select MAINTAIN >... -
Page 358: Packet Capture
User's Manual Figure 9-9 Block Step 3 Set block period. The default period is 30 minutes. Step 4 Click OK to save the configuration. 9.6.2 Packet Capture Packet capture is the practice of intercepting a data packet that is crossing or moving over a specific computer network. -
Page 359: Device Maintenance
User's Manual ● You cannot capture packets of several NICs at the same time. ● During packet capturing, you can go to other pages for operation and go back to the Packet Capture page later to stop packet capturing. Step 5 (Optional) When operating on the web or PCAPP, click to download the captured packet. -
Page 360: Updating Cameras
User's Manual connect the USB storage device to the IVSS. ● When operating on the web or PCAPP interface, save the update file on the PC in which the Web or PCAPP is located. Step 1 On the LIVE page, click , and select MAINTAIN >... -
Page 361: Automatic Maintenance
User's Manual All configurations are lost after factory default operation. Step 1 On the LIVE page, click , and then select MAINTAIN > Device Maintain > Default. Figure 9-12 Default Step 2 Select a method between Quick Restoration and Custom Restoration. Step 3 Click OK. -
Page 362: Disk Maintenance
User's Manual page is displayed. Figure 9-15 IMP/EXP Exporting Configuration File Click Export to export configuration file to local PC or USB storage device. File path might vary depending on your operations. ● On PCAPP, click , select Download to view file saving path. ●... -
Page 363: Ssd Health Detection
User's Manual Step 3 Click OK. 9.8.2 SSD Health Detection On the LIVE page, click , and select MAINTAIN > Disk Maintain > S.M.A.R.T Detection, and then you can view the storage allocation and remaining P/E cycle of SSD. Figure 9-17 SSD health detection 9.8.3 Firmware Update Import update file to update HDD information. -
Page 364: Pcapp Introduction
User's Manual 10 PCAPP Introduction After installing PCAPP, system supports to access the Device remotely to carry out system configuration, function operations and system maintenance. For details about installing PCAPP, see "5.3.1 Logging in to PCAPP Client". 10.1 Page Description Double-click on the PC desktop. -
Page 365: Configuring Pcapp
User's Manual ● Double-click file name to open it. ● Click Displayed in Folder to open the folder where the file is located. ● Click Clear Downloads to clear history download records. 10.4 Configuring PCAPP When PC theme is not Areo, video of PCAPP might not be displayed normally. It is suggested that PC theme should be switched to Areo, or compatibility mode of PCAPP should be enabled. -
Page 366: Viewing Version Details
User's Manual Figure 10-3 Setting Enabling Hardware Acceleration Click , and select Settings. Select Enable hardware acceleration (it will take effect after video is opened again). The live view becomes much more fluent when this function is enabled. 10.5 Viewing Version Details Click and then select About to view PCAPP version information. -
Page 367: Log Out, Reboot, Shut Down, Lock
User's Manual 11 Log Out, Reboot, Shut Down, Lock Log out, reboot, shut down and lock out the Device. Figure 11-1 User operation Logging Out Click , and then select Log Out. Rebooting Click , and then select Reboot. System pops up confirm dialogue box. Click OK to reboot. Shutting Down To unplug the power cable might result in data (record and image) loss. - Page 368 User's Manual Figure 11-2 Unlock the client...
-
Page 369: Faq
User's Manual 12 FAQ Problem Possibilities and Solutions ● The AI module is offline. Click on the LIVE page, and select MAINTAIN > System Resources > AI Module Info. You can view status of the AI modules. ● There are too many filter criteria on the AI display page. After enabling AI by ●... -
Page 370: Appendix 1 Mouse And Keyboard Operations
User's Manual Appendix 1 Mouse and Keyboard Operations This section introduces mouse and keyboard operations. Appendix 1.1 Mouse Operations Connect mouse to the USB port, you can use the mouse to control the local menu. For details, see the following table. Operation Description Click to select a function menu, to enter the corresponding menu page. - Page 371 User's Manual If the device has connected to the peripheral keyboard, click the text column. Virtual keyboard will disappear. Appendix Figure 1-1 Virtual keyboard (global keyboard) Appendix Figure 1-2 Virtual keyboard (digital keyboard) Appendix Figure 1-3 Virtual keyboard (input letter) Appendix Table 1-1 Virtual keyboard icon Signal Words Description...
- Page 372 User's Manual Signal Words Description Click to control cursor position. Click to switch to the next line. Select text and click the icon to cut the selected contents. Select text and click the icon to copy the selected contents. Cut or copy the contents, click the text box and click the icon to paste the contents.
-
Page 373: Appendix 2 Raid
User's Manual Appendix 2 RAID RAID is an abbreviation for Redundant Array of Independent Disks. It is to combine several independent HDDs (physical HDD) to form a HDD group (logic HDD). Comparing with one HDD, RAID provides more storage capacity and data redundancy. The different redundant arrays have different RAID level. - Page 374 User's Manual RAID Level Description Min. HDD Needed RAID 10 is a combination of the RAID 1 and RAID 0. It uses the extra high speed efficient of the RAID 0 and high data protection and restores RAID10 capability of the RAID 1. It has high read/write performance and security.
-
Page 375: Appendix 3 Hdd Capacity Calculation
User's Manual Appendix 3 HDD Capacity Calculation HDD capacity calculation formula: Total capacity (M) = Channel number× Demand time length (hour) × HDD capacity occupied per hour (M/hour) According to the above formula, get recording time calculation formula. Recording time (hour) = For example, for single-channel recording, HDD capacity occupied per hour is 200 M/hour. -
Page 376: Appendix 4 Glossary
User's Manual Appendix 4 Glossary Name Description Common Gateway Interface (CGI) is an important Internet technology. With CGI, client can ask data from program running on network server. CGI describes data transmission standard between server and asking processing program. Dynamic Domain Name System (DDNS) is to map the user dynamic IP address to a specified domain analysis service. - Page 377 User's Manual Name Description Open Network Video Interface Forum (ONVIF) is the defined general protocol for information exchange among the network video devices. It ONVIF includes search device, real-time audio/video, metadata, information control, and so on. Phase Alteration Line, this is a television standard that television scanning beam is 625 beams, 25 frames per second, phase alteration, odd field first and then it is followed by even field.
-
Page 378: Appendix 5 Cybersecurity Recommendations
User's Manual Appendix 5 Cybersecurity Recommendations Cybersecurity is more than just a buzzword: it’s something that pertains to every device that is connected to the internet. IP video surveillance is not immune to cyber risks, but taking basic steps toward protecting and strengthening networks and networked appliances will make them less susceptible to attacks. - Page 379 User's Manual We suggest you to change default HTTP and other service ports into any set of numbers between 1024–65535, reducing the risk of outsiders being able to guess which ports you are using. 6. Enable HTTPS We suggest you to enable HTTPS, so that you visit Web service through a secure communication channel.
- Page 380 User's Manual private networks. ● Enable IP/MAC address filtering function to limit the range of hosts allowed to access the device. More information Please visit Dahua official website security emergency response center for security announcements and the latest security recommendations.
- Page 381 User's Manual...
Need help?
Do you have a question about the DHI-IVSS7008 and is the answer not in the manual?
Questions and answers