Advertisement
Quick Links
Advertisement

Related Manuals for NANO RX2000+


Summary of Contents for NANO RX2000+
- Page 1 USER MANUAL R X2 0 0 0+ p l us...
-
Page 3: Table Of Contents
Welcome Troubleshooting The how to’s Hearing Journey What’s included? Hearing Journey Knowing your device Contest Charging your device Tech specs Wearing your device How to clean your device Volume & turning on/off Table of Changing the modes Choose a dome size contents Changing the tubes... -
Page 4: Welcome
Welcome! - Page 5 On behalf of Nano, we’d like to congratulate you for your purchase. Our products have helped thousands of satisfied customers and we are passionate about helping you find an affordable solution to your hearing loss chal- lenges. Your new device is the perfect mix of price and quality, and we are confident it will help you hear more clearly.
-
Page 6: The How To's
How-to’s... - Page 7 Please visit the tutorial section on Nano’s website - you’ll be able to find the manuals and many video tutorials on how to use your new device. Check the quick-start guide if you wish to check a quick setup to start using your hearing aids right away. Read the manual in its entirety to get familiar with your device.
- Page 8 Thank you for your purchase at Nano!, We at Nano, care about our customer’s hearing journey and their experiences. Once you receive your package, please call our helpful Welcome team to assist you with setting up and powering on your devices.
-
Page 10: What's Included
What’s Included... - Page 11 Domes Cleaning brush User manual Charging Case Hearing Aids...
- Page 12 Getting to know your rx2000+...
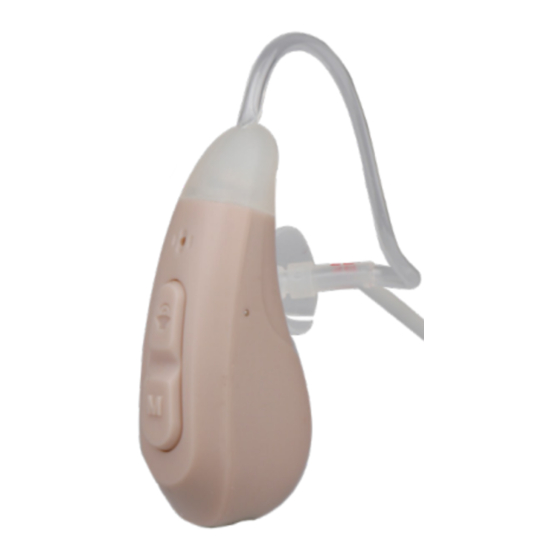
- Page 13 Thin tubes (TTs) TT’s base Microphone Stabilizer bar Vol. Up + ON/OFF Ear-domes Vol. Down Charging end Left /Right Ear Charging Port Left / Right Charge level Indicator Charge level indicator...
-
Page 14: Charging Your Device
Charging your device... - Page 15 Insert the hearing aids inside of the charging case. Connect the mini-USB end (small end) of the cable to the charging case, and connect the USB (big end) to the wall charger. Check the amount of charge on the front side of the charging case: when charging, each bar will glow flashing blue or solid blue to display the power capacity.
- Page 16 It takes about 3 hours to fully charge the charging case. Charging case will charge RX2000+ up to 3 times. When the power is less than 25%, the light #1 will flash blue. Do not charge for more than 4 hours.
- Page 17 Need extra accessories?: We have extra accessories available. Call (480) 336-9292 or visit www.nanohearingaids.com...
-
Page 18: Wearing Your Device
Wearing Your Device PLEASE CHECK NEXT PAGES FOR REFERENCE... - Page 19 Choose a dome size. Place the device behind your ear. Hold the bend of the thin tube close by the dome and gently insert the dome into your ear canal. The dome should fit in snug, but not too tight. Using your index finger, press the stabilizer until its inside of your ear.
- Page 20 *Tip: If you find your hearing device is not comfortable, try shuffling and adjusting it until it fits nicely. Your ears are not yet adjusted to feeling the hearing aids inside of them, but they will quickly get used to the sensation.
- Page 21 If you find the stabilization bar too long, you can simply cut it. It won’t affect the functionality of the thin tubes. If you feel like its not working or it simply doesn’t feel comfortable, feel free to cut it completely.
-
Page 22: How To Clean Your Device
How to clean your device... - Page 23 After removing your device from your ear, take the ear dome out of the device. Clean the ear dome verifying there is no wax buildup or debris covering its hole, you can clean it with warm water and soft soap and gently massage the dome until it’s free of wax, If necessary, also clean the thin tubes using soap and water.
- Page 24 TURNING ON/OFF Adjusting The volume...
- Page 25 Turn on /off (press 3 seconds) Increase the Volume (press quickly) decrease the Volume...
- Page 26 Adjusting modes...
- Page 27 Modes can change the way your device adapts to the environment. If you’re having issues with the clarity of the sound, change between modes. To do so, press and hold the Down switch for 3 seconds. A beep will confirm that you changed modes.
- Page 28 Checking the dome size...
- Page 29 Check to see if you’re wearing the correct dome size by gently shaking your head up and down and then side to side while chewing. If the domes slide out, it’s too small. A bigger than needed one will feel uncomfortable in- side the ear canal.
- Page 30 Changing hin tubes...
- Page 31 Remove ear tube: Hold the tubing base with your fin- gers, and then gently push the tubing base downward and slide it off. You may feel some resistance when re- moving the ear tube at first time.
- Page 32 Note: Left Ear Tube and Right Ear Tube are marked either Blue or Red to be identified.
- Page 33 Attach ear tube: Insert the tubing base into the tube socket, and firmly push it in with your thumb & forefin- ger until it slicks into place.
- Page 34 Troubleshooting FIXING COMMON ISSUES OF YOUR DEVICE...
- Page 35 Feedback / Chirping: If you hear a high-pitched sound when you put the device in the ear canal, you’re having feedback. Change between different dome sizes to one that fits better, and insert the device as swiftly as possible to avoid feedback. Battery doesn’t last: Make sure you’re turning off your device when you’re not using it, and remember to NEVER charge it for more than 4 hours,...
- Page 36 Failure Possible Reason Solution Check if the plug is plugged well The plug in is not Check if the 110V AC plug has plugged in/well power in Check if the plug works The indicate light is not turning on The USB cable Check if both ends of the USB is not connected cable are loose, replug them.
- Page 37 Follow the next steps if battery issue persists: Charge your device for 10 minutes. Turn it on until the battery drains itself out - until the device is “completely dead”, so to speak. When this happens, charge it for 4 hours. If the problem persists, give us a call.
- Page 38 Hearing J ou r n ey...
- Page 39 Week 1 Some sounds may seem too loud, and sometimes you’ll feel like the sounds you’re hearing are “on the inside of a cave or a tunnel” - maybe you hear them far away. This is completely normal and a sign that the aids are working. The more you wear your new hearing aids, the better your brain will adjust itself to them.
- Page 40 Week 3 Experiment with the different volumes and ambiance modes your HA have. Keep wearing them for as long as you can, everyday, and also make sure you’re cleaning them properly. The “tunnel” effect should subside slowly. Some people may stop experiencing the effect by now. Week 4 After 4 weeks, hearing will be much easier and you’ll feel more present in conversations.
- Page 41 Connect with your loved ones, again.
- Page 42 60-day hearing journey contest...
- Page 43 You can win a free $200 coupon! Just wear your hearing aids for 60 days, and send a picture to: challenge@nanohearingaids.com with a picture of you wearing your device and your order number, and our team will reply with a coupon valid for future hearing aids purchases just for you!
- Page 44 Tech Specs...
- Page 45 Frequency F1 ≤350 Hz F2 ≥5000 Hz Range: Max Output ≤119dB±3dB THD at ≤5% 500Hz: Eq. Input ≤26dBSPL THD at ≤5% noise Lvl: 800Hz: HFA Full-on 35dB±5dB THD at ≤5% gain 1600Hz:...
- Page 46 Nano Hearing Aids 1761 S Mojave Rd Suite B Las Vegas, NV 89104 www.NanoHearingAids.com hello@nanohearingaids.com Call for customer support (480) 637-7541...
Need help?
Do you have a question about the RX2000+ and is the answer not in the manual?
Questions and answers