Table of Contents
Advertisement
Quick Links
SOIL
MOISTURE METER
Model : DSMM500
OPERATION MANUAL
Your purchase of this
SOIL MOISTURE METER
marks a step forward for
you into the field of
precision measurement.
Although this METER is
a complex and delicate
instrument, its durable
structure
will
many years of use if
p r o p e r
o p e r a t i n g
t e c h n i q u e s
developed. Please read
t h e
f o l l o w i n g
instructions
and always keep this
manual
within
reach.
allow
a r e
carefully
easy
Advertisement
Table of Contents

Subscribe to Our Youtube Channel
Related Manuals for General DSMM500


Summary of Contents for General DSMM500
- Page 1 SOIL MOISTURE METER Model : DSMM500 Your purchase of this SOIL MOISTURE METER marks a step forward for you into the field of precision measurement. Although this METER is a complex and delicate instrument, its durable structure will allow many years of use if...
-
Page 2: Table Of Contents
TABLE OF CONTENTS 1. FEATURES..............1 2. SPECIFICATIONS............1 3. FRONT PANEL DESCRIPTION........3 3-1 Soil moisture Probe..........3 3-2 Moisture Sensing Head.........3 3-3 Power Button............3 3-4 Hold Button............3 3-5 REC Button............3 3-6 LCD Display............3 3-7 Battery Compartment/Cover.........3 4. MEASURING PROCEDURE..........4 4-1 Measurement by selecting the different material............4 4-2 Data Hold............5 4-3 Data Record............ -
Page 3: Features
1. FEATURES * Designed to check the moisture level of soil or other similar material. * Measurement range : 0 % to 50 % moisture content of soil sample with 0.1 % resolution. * All in one digital soil meter, easy to make operation. * Data hold function to freeze the desired value on display. - Page 4 Measurement 0 % to 50 % moisture content on soil. Range Resolution 0.1 %. Accuracy ± ( 5 % + 5 d ) F.S. @ 23 ± 5 , F.S. : full scale. ℃ ℃ Circuit Custom one-chip of microprocessor LSI circuit.
-
Page 5: Front Panel Description
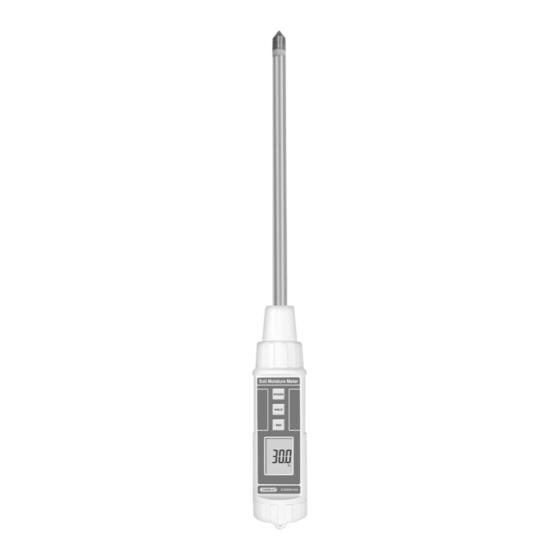
3. FRONT PANEL DESCRIPTION Fig. 1 3-1 Soil moisture Probe 3-2 Moisture Sensing Head 3-3 Power Button 3-4 Hold Button 3-5 REC Button 3-6 LCD Display 3-7 Battery Compartment/Cover... -
Page 6: Measuring Procedure
4. MEASURING PROCEDURE 4-1 Soil measurement 1)Turn on the meter by pressing the " Power Button " ( 3-3, Fig. 1 ) momentarily. * Press the " Power Button " ( 3-3, Fig. 1 ) momentarily again will turn off the meter. 2)Insert the "... -
Page 7: Data Hold
4-2 Data Hold * During the measurement, press the " Hold Button " ( 3-4, Fig. 1 ) momentarily to hold the measured value. The LCD will show a " HOLD " symbol. * Press the" Hold Button " once again to release the data hold function. -
Page 8: Battery Replacement
1.5 V ( UM4, AAA ) batteries. * To change the batteries, open ( rotate clockwise direction ) the " Battery Cover " ( 3-7, Fig. 1 ). * Make sure the " Battery cover " (3-7, Fig 1) is secured after changing the batteries. 0904-PMS714-GENERAL-DSMM500...
Need help?
Do you have a question about the DSMM500 and is the answer not in the manual?
Questions and answers