Convaid CARROT 3 Instruction Manual
For children with special needs
Hide thumbs
Also See for CARROT 3:
- Instruction manual (28 pages) ,
- Assembly manual (8 pages) ,
- Replace instructions (2 pages)

Related Manuals for Convaid CARROT 3


Summary of Contents for Convaid CARROT 3
- Page 1 CARROT 3 - CHILD RESTRAINT SYSTEM For Children with Special Needs Instruction Manual...
-
Page 2: Table Of Contents
CARROT 3 CHILD RESTRAINT SYSTEM The Carrot 3 is designed to provide additional support for children who have difficulty sitting correctly in conventional car seats. Always consult your doctor to make sure that this restraint system is suitable for your child. - Page 3 Table of Contents Harness Buckle - Fastening / Releasing ..............22 LATERAL SUPPORT ....................23 Lateral Support Adjustment ..................23 BACKREST ........................24 Backrest Height Adjustment ..................24 Backrest Extensions ....................24 ...........................25 SEAT Seat Depth Adjustment ....................25 Seat Extensions ......................25 Rodded Seat Extension - Long .................26 Rodded Seat Extension - Short ................26 Pommel ........................27 Pommel Attachment ....................27...
-
Page 4: Warnings
Administration recommends the vehicle’s rear seat is the safest location for a properly installed child restraint system. • Do not use the Carrot 3 in the front seat of the vehicle unless the passenger air bag is turned off. Serious injury or death can occur. Refer to your vehicle owner’s manual for instruction, warnings, and precautions. - Page 5 • The Carrot 3 must not be used in homes, boats or any other non-certified applications. • Always keep the Carrot 3 secured in the vehicle, even when not in use. In an accident, an unsecured Carrot 3 may injure other occupants.
-
Page 6: Safety Information
• Never leave children alone in a vehicle, even for a short time. • Do not attempt to disassemble any part of the Carrot 3 or modify it in any way that is not described in this manual. - Page 7 DO NOT secure a child only with the harness straps (5-point) of the Carrot 3; ALWAYS use the vehicle’s lap shoulder (3-point) safety belt at the same time to secure the Carrot 3 and the child. Not using vehicle’s lap shoulder (3-point) safety belt could cause your child restraint to not perform as intended, and increase the potential of serious injury or death.
- Page 8 Once reclined, re-tighten the harness straps. Reclining the back without loosening the harness straps may cause choking. The Carrot 3 was tested at a 30º recline from vertical, and should not be transported in a moving vehicle past this point.
-
Page 9: Features
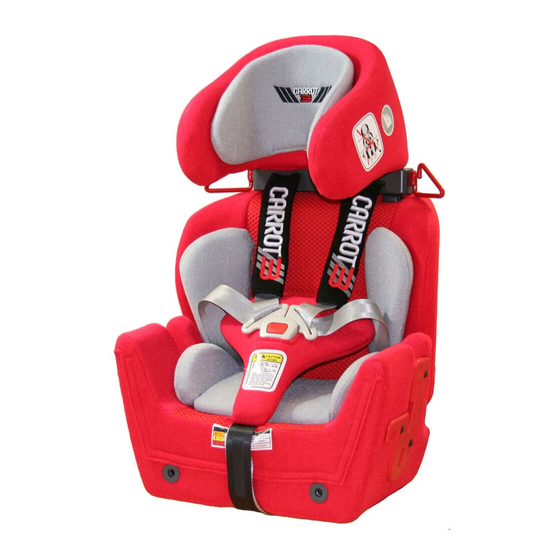
Features: Carrot 3 Carrot 3 Standard Model Splitter Plate Carrot 3 with Shoulder Protector Wings... -
Page 10: Installation
Lower Anchor and Tethers for Children LATCH Installation Carrot 3 system is recommended for use in a vehicle with LATCH anchors. Verify that your vehicle is equipped with LATCH anchors. If your vehicle is not equipped with LATCH anchors refer to page 13 regarding installation and use of lower securement strap. -
Page 11: Using Latch Top Tether Strap
Vehicle Installation Carrot 3 Top Tether Strap Installation Guide Installing top tether strap (if not factory installed): 1. Make a 2.5” horizontal cut approximately 3” below the top center at the rear of the head rest to reveal the mounting area. (Figs. A and B) Fig. - Page 12 The Carrot 3 is secure when it cannot be moved front-to-back or side-to-side more than 1 inch (2.5 cm) at the belt path. If the Carrot 3 is not secure, repeat the installation process or use an alternate seating location.
-
Page 13: Securement Strap Installation
4. Reassemble the seat by reversing steps above. Seat Installation in Vehicle: 1. Place the Carrot 3 in the vehicle on the appropriate seat. (Fig. F) 2. Unbuckle lower securement strap and secure it around the lower part of vehicle seat. (Fig. G) 3. -
Page 14: Aircraft Installation
This Carrot 3 is Certified for Use in • The Carrot 3 may not fit in all aircraft. Contact your Motor Vehicles and airline prior to travel to verify fit. The width of the Aircraft. - Page 15 Strap. This strap is long enough to tether the Carrot 3 around the Aircraft seat. With this system you can fasten/unfasten and tighten/loosen the strap from either side of the seat so that the Carrot 3 can be put at any seat in the aircraft. Install Carrot Fixing Strap prior to boarding aircraft.
- Page 16 IMPORTANT: Before installing the Carrot 3, make sure the aircraft seat is in a fully upright position. Adjust the Carrot 3 to its upright position, then place it on the aircraft seat forward-facing, as shown in Fig. A. Make sure that the back of the Carrot 3 is firmly against the aircraft seatback.
-
Page 17: Pads And Seat Cushions
Pads and Seat Cushions Pads and Cushions (STANDARD ACCESSORIES) The following Pads and Cushions are provided as standard accessories, and easily attach / adjust with Velcro ® Head Pillow Provides comfort and lateral head support. Body Balance Pads Used to balance / position the user. Hip Pads Provides proper positioning for balance, comfort and support. -
Page 18: Head Support
Head Support Head Support Depth Adjustment The Head Support can be adjusted forward or backward by 0.6” (1.5 cm) increments to provide a better fit and added protection for the occupant (Fig. A). To Adjust: Remove screws on each side of the head support with a Phillips screwdriver. -
Page 19: Shoulder Support
Shoulder Support Harness Strap Adjustment The Harness Strap comfortably positions the child in place. To tighten the shoulder harness strap, pull on the harness adjustment strap (Fig. A). To loosen the harness strap, press and hold the harness release lever (Red), while pulling the shoulder harness strap (Fig. -
Page 20: Shoulder Strap Comfort Pad
Shoulder Support Shoulder Strap Comfort Pad The shoulder strap comfort pad can be moved by readjusting the Velcro attached to the back of the ® Head Support. Shoulder Protector Wing (OPTIONAL ACCESSORY) The Shoulder Protector Wing provides additional positioning support and trunk alignment and can also be used to extend the height of the backrest by 6”. -
Page 21: Shoulder Protector Wing Installation
Shoulder Support Shoulder Protector Wing Installation 1. Detach shoulder harness straps from splitter plate. (Fig. A). 2. Pull the harness straps and padded cover Velcro straps through the back of the seat. ® (Fig. B). 3. Press and hold height adjustment buttons, and remove head support (Fig. -
Page 22: Chest Support
Chest Support WARNING! The top of the Chest Support Pad must be at armpit level or lower. Positioning the support pad too high may cause choking Chest Support Pad Adjustment To raise the height of the Chest Support Pad, press & hold the Height Adjustment Lever (Yellow) on the front of the child seat, and pull on the pad (Fig. -
Page 23: Lateral Support
Lateral Support Lateral Support Adjustment (OPTIONAL ACCESSORY) Lateral supports are used to maintain midline positioning of the trunk. To adjust: 1. Unfasten the Velcro and the zipper on ® the back upholstery. 2. Pull back the upholstery. (Fig. A) 3. Loosen 2 screws with a 7/64” Allen Wrench. -
Page 24: Backrest
Backrest IMPORTANT: • Height of the shoulder harness strap moves with the height of the backrest. • The Shoulder Harness Strap must be at or above the child’s shoulders, and parallel to the ground. (Fig A) • The Shoulder Harness Strap is for positioning only, and not designed to support occupant in a crash. -
Page 25: Seat
Seat Determining Proper Seat Depth: When the child is sitting with knees bent, the total seat depth should be slightly shorter than the length from the pelvis to the rear of the knee. (Fig. A) Seat Depth Adjustment Using Depth Fig. -
Page 26: Rodded Seat Extension - Long 7
Release lock by pulling the black “D” shaped ring - Seat Depth Release Lever on the front of the Carrot 3, and while pulling the lever (Fig. A), insert and adjust the position of the rodded seat extension. (Fig. B) Seat Depth Release Lever Fig. -
Page 27: Pommel
Accessories Pommel (OPTIONAL ACCESSORY) A rodded seat extension is required to attach the pommel to the Carrot 3. The Pommel separates thighs to improve hip alignment and stabilize sitting posture Pommel Attachment Fig. A To attach the pommel, insert the seat extension rods through the holes on the pommel’s attachment bracket... -
Page 28: Support Tray
Anti Adduction / Knee Separator Pad (OPTIONAL ACCESSORY) This Anti-Adduction Pad can be used facing forwards as a knee separator or facing the back of the Carrot 3 as an anti-adduction pad. Reverse facing shown 1. Unbuckle the harness strap. -
Page 29: Removable Incontinence Receiver
Accessories Removable Incontinence Cover The removable and washable incontinence cover is made of a fluid-resistant material and helps protect the Carrot 3 upholstery. 1. Release harness strap to set aside. 2. Pull the chest support down in front of the seat. -
Page 30: Anti-Escape Vest
(Fig A) 10. Attach the harness straps to the splitter plate. Hinge Lock Belt - for easy carrying This Hinge Lock makes carrying the Carrot 3 easier. Fig. B 1. Slip the loop of the Hinge Lock Belt onto the red metal belt path at the shoulder. -
Page 31: Securing Your Child
Fig. A 1. Loosen the harness by pressing the harness strap release lever (Red) on the front of the Carrot 3, and pull the shoulder straps forward (Fig. A). 2. Unfasten the harness buckle by pressing the release button and sliding the clasp out (Fig. - Page 32 DO NOT secure a child only with the harness straps (5-point) of the Carrot 3; ALWAYS use the vehicle’s lap shoulder (3-point) safety belt at the same time to secure the Carrot 3 and the child. Not using vehicle’s lap shoulder (3-point) safety belt could cause your child restraint to not perform as intended, and increase the potential of serious injury or death.
-
Page 33: Care And Maintenance
Do not take apart or attempt to take apart the harness and the straps from the Carrot 3. If reassembled incorrectly, the Carrot 3 may not perform as intended. Never remove the buckles and/or the buckle clasps from the harness or the... -
Page 34: Warranty
Warranty For your convenience, record all the information about your Carrot 3 below. Refer to the Serial Number & Manufactured Date Label for all information: LIMITED FIVE-YEAR WARRANTY Product Model: CARROT 3 CHILD RESTRAINT SYSTEM Name: _________________________________________________________ Street Address: __________________________________________________... -
Page 35: Warranty
This warranty does not include damages which arise from negligence, minor use not in accordance with the product instruction. The use of non-CARROT 3 covers, inserts, toys, accessories, or tightening devices is not approved. Their use could cause this child seat to fail Safety Standard FMVSS 213, or not to perform as intended in a crash. - Page 36 2830 California Street, Torrance, CA 90503, USA Toll free in the US: 1-844-US-Mobility (844-876-6245) • Phone: (310) 618-0111 • Fax: (310) 618-8811 Email: convaidsales.us@etac.com • International Email: international.convaid.us@etac.com www.etac.us.com UG0200-ENG-Rev.05 2021-12-21...
Need help?
Do you have a question about the CARROT 3 and is the answer not in the manual?
Questions and answers