
Related Manuals for VALCO MELTON ISOMELT

Summary of Contents for VALCO MELTON ISOMELT
- Page 1 ISOMELT User Manual Polígono Industrial Agustinos, calle G, nave D-34 Tel: +34.948.321.580 Fax: +34.948.326.584 31160 ORCOYEN (Navarra) ESPAÑA e-mail:melton@melton.es http://www.valcomelton.com...
- Page 3 Declaration of conformity The product: Model no.: Serial no.: Year of manufacture: Described in the enclosed documentation is in conformity with: Directive 2006/42/CE of 29 December 2009 replacing the Directive 98/37/EC of 22 June 1998 relating to the approximation of the laws of the Member States relating to machinery, combining in a single text Directives 89/392/EEC of 14 June 1989, 91/368/EEC of 20 June 1991, 93/44/EEC of June 14, 1993 and 93/68/EEC of 22 July 1993.
- Page 5 CONTROL REGISTRATION CONTROL #: ..............DATE: ................ ELECTRIC CHECK: CONTROL BOARD CHECK: TEMPERATURE CONTROL CHECK 150/180C: HYDRAULIC CHECK (100 bar): PNEUMATIC CHECK: APPLICATOR SERIAL NUMBER: GUARANTEE CARD DISTRIBUTOR:......................CONTACT:........................ADRESS:................TELEPHON....... OEM:..........................ADDRESS:........................TYPE:..........BRAND:..........MODEL:......USER:..........................CONTACT:........................
- Page 7 IMPORTANT! THIS INSTRUCTION MANUAL SHOULD BE KEPT IN AN ACCESSIBLE PLACE KNOWN TO ALL OPERATORS AND MAINTENANCE PERSONNEL. READ THE INSTRUCTIONS CAREFULLY BEFORE OPERATING THE MACHINE AND FOLLOW THEM WHILE THE MACHINE IS IN OPERATION. FOLLOW THE SAFETY INSTRUCTIONS PROVIDED IN THIS MANUAL WHEN USING AND HANDLING THE MACHINE.
-
Page 8: Table Of Contents
4.5 PUMP SETTINGS: ....................44 4.6. SETBACK: ......................44 4.8. DRY AIR SYSTEM: .................... 46 4.9. LEVEL SENSOR ADJUSTMENT ..............47 4.10. ISOMELT PLUS LID PRESSURE ADJUSTMENT ........48 4.11. ISOMELT BUFFER ..................49 MUS0920201 07/10/2014 MELTON, S.L.U. - POLIGONO INDUSTRIAL AGUSTINOS CALLE G-34,31160 ORCOYEN, NAVARRA TEL: 00 34 948 321580 Fax: 00 34 948 326584 e-mail: melton@melton.es... - Page 9 CHAPTER 5 OPERATION ________________________________ 50 5.1. INTRODUCTION:....................51 5.2. COMMISSIONING: .................... 51 5.3. STOPS: ......................... 54 CHAPTER 6 MAINTENANCE ______________________________ 55 6.1. INTRODUCTION:....................56 6.2. MAINTENANCE RECOMMENDATIONS: ............57 6.3. MAINTENANCE PROCESSES: ................. 58 CHAPTER 7 TROUBLESHOOTING _________________________ 65 7.1. INTRODUCTION:....................66 7.2.
- Page 10 MUS0920201 07/10/2014 MELTON, S.L.U. - POLIGONO INDUSTRIAL AGUSTINOS CALLE G-34,31160 ORCOYEN, NAVARRA TEL: 00 34 948 321580 Fax: 00 34 948 326584 e-mail: melton@melton.es http://www.valcomelton.com...
-
Page 11: Chapter 1 Safety Instructions
CHAPTER 1 SAFETY INSTRUCTIONS MUS0920201 07/10/2014 MELTON, S.L.U. - POLIGONO INDUSTRIAL AGUSTINOS CALLE G-34,31160 ORCOYEN, NAVARRA TEL: 00 34 948 321580 Fax: 00 34 948 326584 e-mail: melton@melton.es http://www.valcomelton.com... -
Page 12: Symbols And Terms
1.1. SYMBOLS AND TERMS: Miscellaneous European Community prohibitions markings Note of special interest Danger: hot surface Use of goggles required Miscellaneous precautions Use of safety gloves Precaution: electric required current Precaution: flammable liquid Precaution: risk of fluid leakage under high pressure Precaution: risk of entrapment between mobile parts... - Page 13 Burns Burns can be caused by the uncovered parts of the applicator, such as the guns or by splashes of hot melt. The hot adhesive under pressure in the nozzles can cause serious injuries to the skin. Qualified personnel: This is personnel (technical staff) who have acquired sufficient know-how in a specific field, either through training or from experience.
-
Page 14: Purpose
1.2. PURPOSE: This unit has been manufactured according to current safety standards. This unit has been designed for the purpose described in chapter 2 of this manual, Description. To use the machine correctly, follow the instructions provided in the Operating Manual, particularly: ... -
Page 15: First Aid
1.3. FIRST AID: In case of burns: Immerse affected part in cold clean water as quickly as possible until the adhesive has cooled. Do not attempt to remove the adhesive from the skin even when it has cooled as this may cause more serious injury. Seek qualified medical attention immediately. -
Page 16: Chapter 2 Description
CHAPTER 2 DESCRIPTION MUS0920201 07/10/2014 MELTON, S.L.U. - POLIGONO INDUSTRIAL AGUSTINOS CALLE G-34,31160 ORCOYEN, NAVARRA TEL: 00 34 948 321580 Fax: 00 34 948 326584 e-mail: melton@melton.es http://www.valcomelton.com... -
Page 17: Introduction
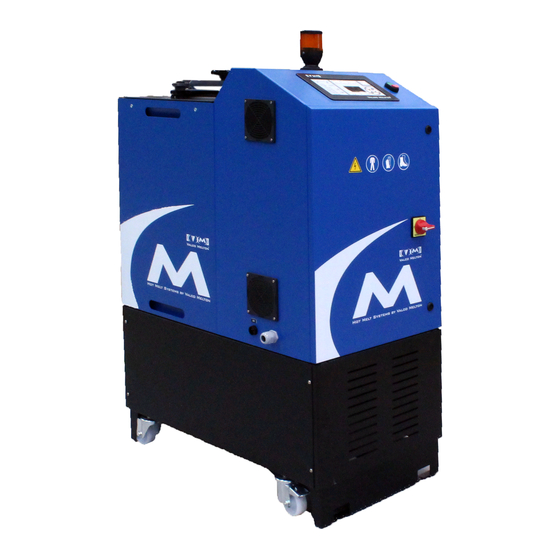
2.2. MAIN PARTS: The main parts of the ISOMELT equipment are shown on the following figure: MUS0920201 07/10/2014 MELTON, S.L.U. - POLIGONO INDUSTRIAL AGUSTINOS CALLE G-34,31160 ORCOYEN, NAVARRA TEL: 00 34 948 321580 Fax: 00 34 948 326584 e-mail: melton@melton.es... - Page 18 2.2.1. Baseframe: The base that supports the entire machine and where the manifold, the pump and the motor are stored. 2.2.2. Tank: This is where the hot-melt or other materials are melted; these materials may be in bulk form or in chunks. The tank is made of cast aluminium and is coated with Teflon to prevent soot and crystallisations.
- Page 19 2.2.7. Pumping and Distribution System: It features the following components: Manifold: This manifold distributes the Hot Melt to the hoses and guns. Made of aluminium, it is assembled inside the bench. It heats up through internal resistors. The manifold features outlets to connect the hoses, a purging valve, a filter to remove impurities and a regulator.
-
Page 20: Technical Specifications
2.3. TECHNICAL SPECIFICATIONS: COMPONENT DATA GENERAL Maximum Power supply 16080 W Power supply voltage III 220V+T (50/60 Hz) / III 380V+N+T (50-60Hz Hz) Power supply voltage range ± ±10% Amperage 40A for 230V / 24A for 400V Hoses (max.) 2.8 – 80 bar (40 – 1138 psi) Hydraulic pressure Noise level 63 dB... -
Page 21: General Dimensions
2.4. GENERAL DIMENSIONS: ISOMELT / ISOMELT BUFFER ISOMELT PLUS MUS0920201 07/10/2014 MELTON, S.L.U. - POLIGONO INDUSTRIAL AGUSTINOS CALLE G-34,31160 ORCOYEN, NAVARRA TEL: 00 34 948 321580 Fax: 00 34 948 326584 e-mail: melton@melton.es http://www.valcomelton.com... -
Page 22: Chapter 3 Machine Installation
CHAPTER 3 MACHINE INSTALLATION MUS0920201 07/10/2014 MELTON, S.L.U. - POLIGONO INDUSTRIAL AGUSTINOS CALLE G-34,31160 ORCOYEN, NAVARRA TEL: 00 34 948 321580 Fax: 00 34 948 326584 e-mail: melton@melton.es http://www.valcomelton.com... -
Page 23: Introduction
Unpack carefully to prevent damage to the machine. Inspect the machine for damages caused during transport. 3.3 INSTALLATION REQUIREMENTS: Install the ISOMELT machine leaving enough space for it to be accessed during operations. Avoid extreme temperatures (below -10ºC and above +50ºC). -
Page 24: Mechanical Installation
3.4. MECHANICAL INSTALLATION: The mechanical installation involves the following: Positioning the machine: Remove the machine from the pallet using a forklift and position according to the installation requirements (chapter 3.3). The machine features anchor holes on the legs. Connecting the hoses: Proceed as follows to connect the hoses: Make sure the machine has been depressurised before connecting the hose. - Page 25 3.4.1. HOSE POSITION: Never bend the hoses to angles with a radius of less than 150 mm. Hoses should not be secured to very broad, cold surfaces. MUS0920201 07/10/2014 MELTON, S.L.U. - POLIGONO INDUSTRIAL AGUSTINOS CALLE G-34,31160 ORCOYEN, NAVARRA TEL: 00 34 948 321580 Fax: 00 34 948 326584 e-mail: melton@melton.es http://www.valcomelton.com...
- Page 26 Do not bunch hoses together. Leave at least a 25 mm gap between them so the heat dissipates adequately. Do not cover hoses. If the hoses need to be covered, make sure there are vents to allow the heat to dissipate. Do not install hoses with clamps that place pressure on the diameter.
-
Page 27: Electrical Wiring
3.5. ELECTRICAL WIRING: The electrical wiring depends on the model. See electric diagrams. Make sure the power source is duly protected and you are using the right cable for the machine’s electrical power needs. Secure the power cord to the machine bench in order to prevent an accident. Connect the pump permissions to the safety line on the main machine. -
Page 28: Chapter 4 Machine Adjustments
CHAPTER 4 MACHINE ADJUSTMENTS MUS0920201 07/10/2014 MELTON, S.L.U. - POLIGONO INDUSTRIAL AGUSTINOS CALLE G-34,31160 ORCOYEN, NAVARRA TEL: 00 34 948 321580 Fax: 00 34 948 326584 e-mail: melton@melton.es http://www.valcomelton.com... -
Page 29: Control Panel
4.1. CONTROL PANEL: The following adjustments should be made before the machine is switched on or while it is working. They will ensure that the machine works properly and safely. The control panel is fitted with a timer for automatic switch-on and switch-off. With menus to access the parameter programming as well as the main machine operating permissions, alarms and various operating functions that will be described below, the machine regulates the temperature of the resistors connected to the various... - Page 30 NAME DESCRIPTION Green when the system reaches the programmed System Ready LED temperature. Alarm LED Red when an alarm goes off. On/Off Cooling/Regression Places the unit in or out of Cooling/Regression mode. Button Yellow when the unit is in Cooling/Regression mode. Settings Screen Displays the menu screens Turns the timer function on or off.
-
Page 31: Display Contrast Settings
4.2. DISPLAY CONTRAST SETTINGS: The screen contrast may be adjusted for better viewing. If you cannot see the screen well, adjust the contrast. Do the following to adjust the contrast: 1. Keep the “SETUP” key pressed down on the front panel keypad while simultaneously pressing the “+”... -
Page 32: Settings
4.3 SETTINGS: Press the key to access the main settings menu. The following menus are available: Press the right and left keys to go to the chosen menu and press the OK key to enter the menu. Press the +/- keys to modify a parameter. One easy option is to press OK to access the parameter selection screen and use the +/- and left/right keys to choose the desired combination. - Page 33 4.3.1. PASSWORD LEVELS: The ISOMELT machine features several levels of security to protect important information from being accessed by unauthorised personnel. The levels are activated with different PIN codes upon entering the “Configuration Menu”. The following list includes the PIN codes for the different levels and describes the differences between them.
- Page 34 4.3.2 SYSTEM SETTINGS. You can access this feature via the settings / system menu. 4.3.2.1 Language: It is found under the settings / system / language menu. Use the +/- keys to choose a language. 4.3.2.2. Temperature Units: This is found under the settings / system / temperature units menu. You may choose Celsius (ºC) or Fahrenheit (ºF): 4.3.2.3.
- Page 35 4.3.2.4. Ready delay Time It is found under the settings / system / time before start menu. When using the Ready Delay Time option, the system ready LED will turn on at a pre-set time after all of the zones reach the respective programmed temperatures except for the system ready compensation temperature.
- Page 36 4.3.2.6. Under Temperature Alarm This is found under the settings / system / low temperature menu. The Under Temperature Alarm refers to the temperatures set for each machine zone. The tolerance for the under temperature alarm is the number of degrees that each zone has cooled below the set temperature before the alarm goes off.
- Page 37 4.3.2.8. Beacon / Alarm Setup It is found under the settings / system / alarm mode menu. The card features two alarm slots for a 24VDC marker light. Select the type of alarm for the slot with the +/- keys. MUS0920201 07/10/2014 MELTON, S.L.U.
- Page 38 4.3.2.9. Automatic Pump Mode: It is found under the settings / system / auto pump mode menu. Use the automatic pump option so the pump works automatically or manually. 4.3.2.10. Pot Fill Mode It is found under the settings / system / pot fill mode menu. When the equipment is used to fill another tank and its level sensor emits a signal to activate the pump, because it needs adhesive, we can set here a delay time for the activation of our pump.
- Page 39 4.3.3. CLOCK AND 7-DAY TIMER: This is found under the settings / clock menu. The Clock submenu is used to choose the day and time and to establish on/off shifts and times and cooling/regression/rest temperatures so the system runs them automatically.
- Page 40 4.3.4. DIAGNOSIS: This is found under the settings / diagnosis menu. The diagnostics screen displays the current software version as well as the current temperature and status of each zone. 4.3.5. SETBACK TEMPERATURE / TIME: This is found under the settings / setback menu. The setback time option is used to reduce the temperature of all of the zones with a temperature difference where the hot-melt is soft but does not melt.
- Page 41 4.3.6. GUN/ HOSE SEQUENTIAL HEATING: This is found under the settings / startup menu. The hose on option allows the hose to begin heating after the tank reaches a specific temperature below the set temperature. This feature is used to reduce wear on the adhesive caused when the adhesive heats up in the hose because the adhesive remains in the hose for too long when waiting for the tank to reach the operating temperature.
- Page 42 4.3.8. INPUT: This is found under the settings / input menu. The inputs are electrical inputs that can be activated by remote signal. The different types of configurable inputs are shown below. Use the left/right keys to select the input number (from 1 to 4) and the +/- keys to configure the input type.
- Page 43 4.3.9 OUTPUTS: This is found under the settings / outputs menu. The outputs are electrical outputs that can enable a remote unit. The different types of configurable outputs are shown below. Use the left/right keys to select the output number (from 1 to 4) and the +/- keys to configure the output type.
- Page 44 4.3.10. PUMP: This is found under the settings / pump menu. Use the left/right keys to select the parameter to modify. Speed Gain: This configures the nominal speed percentage at which the pump can rotate. Creep Speed: The minimum speed at which the pump can rotate. Minimum Speed: The signal below which the pump is maintained at a minimum speed.
- Page 45 4.3.11. ENCODER: Use the left/right keys to configure the encoder settings: Use the +/- keys to configure the measurement units: 4.3.12. TEMP: This is found under the settings / temp. menu. The parameters P I D S R can be configured for each zone in order to optimise the heating in each zone.
- Page 46 4.3.13. CONFIGURATION This is found under the settings / conf. menu. Use the right/left keys to access the options: No. hoses: Enable the I/O card with the +/- keys: No. pumps: Weight Control: Use the right/left keys to select the pump. Use the +/- keys to enable/disable. Probe Type: Use the +/- keys to choose Ni 120 or Pt 100.
-
Page 47: Temperature Settings
4.4. TEMPERATURE SETTINGS: 4.4.1 PROGRAMMING TEMPERATURES: Press the temperature button (if the temperature LED is not green) to display the first temperature screen. Temperature button 4.4.2 TEMPERATURE SCREENS: The tank temperature screen displays the current and programmed temperature. Output 1 and output 2 temperatures alternate on the screen to the right. Current tank Current hose temperature... - Page 48 4.4.3 TANK TEMPERATURE: Press the key to access the temperature menu. Press OK to program the desired temperature with the navigation keys. 4.4.4 HOSE/GUN TEMPERATURE: Press the key or the right /left navigation keys again to configure the temperature of the hoses and guns. After entering the value, remember to enable the switch to activate each heating zone.
-
Page 49: Pump Settings
4.5 PUMP SETTINGS: Press the key to access the pump settings menu. Choose manual or auto mode with the +/- keys. In manual mode, you must enter the nominal speed percentage at which the pump must rotate. Press the right/left keys to access the weight configuration parameters for auto mode. - Page 50 4.7. OUTPUT PRESSURE ADJUSTMENT: The adhesive output pressure is controlled by the regulator on the manifold. Turn the regulator stud with an Allen wrench until the pressure is suitable for the application. MUS0920201 07/10/2014 MELTON, S.L.U. - POLIGONO INDUSTRIAL AGUSTINOS CALLE G-34,31160 ORCOYEN, NAVARRA TEL: 00 34 948 321580 Fax: 00 34 948 326584 e-mail: melton@melton.es http://www.valcomelton.com...
-
Page 51: Dry Air System
4.8. DRY AIR SYSTEM: The equipment has a pneumatic system to maintain the tank pressurized at 0,3 bar with dry air or N When the lid is closed the equipment eliminates the warm air of the tank and introduces dry air or N When using nitrogen remove the dryer and the filters to prevent nitrogen loss. -
Page 52: Level Sensor Adjustment
4.9.1. LEVEL SENSOR ADJUSTMENT 1º When the adhesive level is below the probe, press the red button. The red light flashes, then press again the red button and the minimum level is set. 2º Fill the tank covering completely the level sensor, press the green button. The green light flashes, then press again the green button and the level sensor is calibrated. -
Page 53: Isomelt Plus Lid Pressure Adjustment
4.10. ISOMELT PLUS LID PRESSURE ADJUSTMENT The equipment has a pressure regulator to adjust the pressure when the cylinder moves downward. It’s recommended 4 bars. When the cylinder moves upwards it operates at the inlet pressure of the system. It’s recommended 6 bars... -
Page 54: Isomelt Buffer
4.11. ISOMELT BUFFER This version is used to connect to a Drum that fills the tank automatically. The tank has two level sensors and a buffer valve that is optional. Level sensor When the level decreases below the sensor, it emits the signal that activates the Drum pump. -
Page 55: Chapter 5 Operation
CHAPTER 5 OPERATION MUS0920201 07/10/2014 MELTON, S.L.U. - POLIGONO INDUSTRIAL AGUSTINOS CALLE G-34,31160 ORCOYEN, NAVARRA TEL: 00 34 948 321580 Fax: 00 34 948 326584 e-mail: melton@melton.es http://www.valcomelton.com... -
Page 56: Introduction
WARNING: This machine should only be used by qualified personnel who understand all the procedures and are familiar with the necessary safety measures. 5.1. INTRODUCTION: This chapter explains how to use the machine. First of all, make sure that the person operating the machine is duly protected and that all safety measures are being followed. - Page 57 This may lead to unnecessary downtimes later on. Filling the tank Isomelt buffer: In this case the installation fills the tank automatically (see chapter 4.11 ISOMELT BUFFER on page 49) MUS0920201 07/10/2014 MELTON, S.L.U.
- Page 58 Filling the tank Isomelt Plus: It’s used with PUR adhesive 1. Open the lid and introduce the PUR block. 2. Close the lid and turn the selector to ↓ position 3. When the equipment activates the pump, the cylinder begins to press the adhesive block.
-
Page 59: Stops
5.3. STOPS: There are two cases: Pump shut-down: If you wish to stop pumping, you must turn the pump OFF on the pump screen. The temperature control will maintain the machine temperature. If the stop is to last for an extended period, activating the Low Maintenance function is recommended. -
Page 60: Chapter 6 Maintenance
CHAPTER 6 MAINTENANCE MUS0920201 07/10/2014 MELTON, S.L.U. - POLIGONO INDUSTRIAL AGUSTINOS CALLE G-34,31160 ORCOYEN, NAVARRA TEL: 00 34 948 321580 Fax: 00 34 948 326584 e-mail: melton@melton.es http://www.valcomelton.com... -
Page 61: Introduction
Annex B. 6.1. INTRODUCTION: This chapter outlines the procedures for proper maintenance of the ISOMELT machine. Following these procedures will ensure safe operation and a long useful life of the machine. Carefully read Chapter 1: Safety before starting any maintenance process. -
Page 62: Maintenance Recommendations
6.2. MAINTENANCE RECOMMENDATIONS: The following table shows how often maintenance operations must be done. Frequency Maintenance As necessary Change manifold joints and filter cartridge. Clean the outside surface of the machine. Use a liquid cleaner recommended by the adhesive manufacturer. Weekly Inspect all hydraulic, electrical and pneumatic (40 hours) -
Page 63: Maintenance Processes
6.3. MAINTENANCE PROCESSES: 6.3.1. PUMP REPLACEMENT Follow these steps to replace the pump: 1. Make sure the machine is off. 2. Remove the bench cover by releasing the screws with an Allen wrench. 3. Release the pump coupling. Remove the two set screws with an Allen wrench in order to do so. - Page 64 6.3.2. MOTOR REPLACEMENT: Follow these steps to replace the motor: 1. Make sure the machine is off. 2. Remove the bench cover by releasing the screws with an Allen wrench. 3. Release the motor coupling. Remove the two set screws with an Allen wrench in order to do so.
- Page 65 6.3.3. BLEEDING: The bleed process is done to sweep away small crystallisations that may be produced in the filter and if you wish to depressurise the system. Before purging the filter, put on goggles, gloves and a long- sleeve shirt to prevent possible burns caused by hot adhesive splashing.
- Page 66 6.3.4. REPLACING THE ADHESIVE FILTER: Before changing the filter, put on a face shield, gloves and a long-sleeve shirt to prevent possible burns caused by hot adhesive splashing. Keeping a filter or mesh in stock to replace when necessary is recommended. This replacement is quick and improves the machine performance.
- Page 67 6.3.5. REPLACING THE PROBE AND CARTRIDGE HEATERS The steps for replacing the cartridge heaters and temperature probe are described below. Before repairing the element, clean the outside to prevent adhesive from getting into the electric box. 1. Release the screws on the electric box cover. 2.
- Page 68 6.3.6. CLEANING THE GRID / MELTER Before cleaning the grid and the melter, put on a face shield, gloves and a long-sleeve shirt to prevent possible burns caused by hot adhesive splashing. Before removing the components, ensure that the level sensor, the grid and the melter have been disconnected of the electric cabinet.
- Page 69 4. Remove the grid 5. Clean the elements If using a cleaning agent, make sure it is compatible with the adhesive being used. Check with the adhesive manufacturer if there are any doubts. 6. Assemble the elements. Ensure that the electric elements are connected correctly.
-
Page 70: Chapter 7 Troubleshooting
CHAPTER 7 TROUBLESHOOTING MUS0920201 07/10/2014 MELTON, S.L.U. - POLIGONO INDUSTRIAL AGUSTINOS CALLE G-34,31160 ORCOYEN, NAVARRA TEL: 00 34 948 321580 Fax: 00 34 948 326584 e-mail: melton@melton.es http://www.valcomelton.com... -
Page 71: Introduction
WARNING: The maintenance operations described in this chapter should only be performed by qualified personnel understanding the processes and familiar with the safety measures involved. 7.1. INTRODUCTION: This chapter refers to the most common faults in your equipment. Breakdowns occur when the flow of glue is reduced or stops, or the alert system informs of a fault. - Page 72 MUS0920201 07/10/2014 MELTON, S.L.U. - POLIGONO INDUSTRIAL AGUSTINOS CALLE G-34,31160 ORCOYEN, NAVARRA TEL: 00 34 948 321580 Fax: 00 34 948 326584 e-mail: melton@melton.es http://www.valcomelton.com...
-
Page 73: Electrical Faults
7.3. ELECTRICAL FAULTS: MUS0920201 07/10/2014 MELTON, S.L.U. - POLIGONO INDUSTRIAL AGUSTINOS CALLE G-34,31160 ORCOYEN, NAVARRA TEL: 00 34 948 321580 Fax: 00 34 948 326584 e-mail: melton@melton.es http://www.valcomelton.com... - Page 74 MUS0920201 07/10/2014 MELTON, S.L.U. - POLIGONO INDUSTRIAL AGUSTINOS CALLE G-34,31160 ORCOYEN, NAVARRA TEL: 00 34 948 321580 Fax: 00 34 948 326584 e-mail: melton@melton.es http://www.valcomelton.com...
- Page 75 MUS0920201 07/10/2014 MELTON, S.L.U. - POLIGONO INDUSTRIAL AGUSTINOS CALLE G-34,31160 ORCOYEN, NAVARRA TEL: 00 34 948 321580 Fax: 00 34 948 326584 e-mail: melton@melton.es http://www.valcomelton.com...
- Page 76 MUS0920201 07/10/2014 MELTON, S.L.U. - POLIGONO INDUSTRIAL AGUSTINOS CALLE G-34,31160 ORCOYEN, NAVARRA TEL: 00 34 948 321580 Fax: 00 34 948 326584 e-mail: melton@melton.es http://www.valcomelton.com...
-
Page 77: Adhesive Application Problems
7.4. ADHESIVE APPLICATION PROBLEMS: MUS0920201 07/10/2014 MELTON, S.L.U. - POLIGONO INDUSTRIAL AGUSTINOS CALLE G-34,31160 ORCOYEN, NAVARRA TEL: 00 34 948 321580 Fax: 00 34 948 326584 e-mail: melton@melton.es http://www.valcomelton.com... - Page 78 MUS0920201 07/10/2014 MELTON, S.L.U. - POLIGONO INDUSTRIAL AGUSTINOS CALLE G-34,31160 ORCOYEN, NAVARRA TEL: 00 34 948 321580 Fax: 00 34 948 326584 e-mail: melton@melton.es http://www.valcomelton.com...
- Page 79 MUS0920201 07/10/2014 MELTON, S.L.U. - POLIGONO INDUSTRIAL AGUSTINOS CALLE G-34,31160 ORCOYEN, NAVARRA TEL: 00 34 948 321580 Fax: 00 34 948 326584 e-mail: melton@melton.es http://www.valcomelton.com...
- Page 80 MUS0920201 07/10/2014 MELTON, S.L.U. - POLIGONO INDUSTRIAL AGUSTINOS CALLE G-34,31160 ORCOYEN, NAVARRA TEL: 00 34 948 321580 Fax: 00 34 948 326584 e-mail: melton@melton.es http://www.valcomelton.com...
- Page 81 MUS0920201 07/10/2014 MELTON, S.L.U. - POLIGONO INDUSTRIAL AGUSTINOS CALLE G-34,31160 ORCOYEN, NAVARRA TEL: 00 34 948 321580 Fax: 00 34 948 326584 e-mail: melton@melton.es http://www.valcomelton.com...
- Page 82 MUS0920201 07/10/2014 MELTON, S.L.U. - POLIGONO INDUSTRIAL AGUSTINOS CALLE G-34,31160 ORCOYEN, NAVARRA TEL: 00 34 948 321580 Fax: 00 34 948 326584 e-mail: melton@melton.es http://www.valcomelton.com...
- Page 83 MUS0920201 07/10/2014 MELTON, S.L.U. - POLIGONO INDUSTRIAL AGUSTINOS CALLE G-34,31160 ORCOYEN, NAVARRA TEL: 00 34 948 321580 Fax: 00 34 948 326584 e-mail: melton@melton.es http://www.valcomelton.com...
-
Page 84: Annex Apneumatic Pressure Regulator Assembly
ANNEX A PNEUMATIC PRESSURE REGULATOR ASSEMBLY MUS0920201 07/10/2014 MELTON, S.L.U. - POLIGONO INDUSTRIAL AGUSTINOS CALLE G-34,31160 ORCOYEN, NAVARRA TEL: 00 34 948 321580 Fax: 00 34 948 326584 e-mail: melton@melton.es http://www.valcomelton.com... -
Page 85: Description
A.1. DESCRIPTION A.1.1. INTRODUCTION Pneumatic pressure regulator. Controls the adhesive pressure to the manifold outlet. Prevents overpressure in the guns when starts the application. A.1.2. MAIN PARTS The main parts of the system are shown in the following figure: Pressure relief valve Solenoid valve Regulator with... - Page 86 WARNING: The operations described in this chapter should be performed by qualified personnel, following safety instructions. A.2.2 INSTALLATION REQUIREMENTS In order for the machine to work properly, there needs to be a 0-24VDC signal to activate the solenoid valve and a compressed air circuit. Avoid extreme room temperatures (below -10ºC and above +50ºC).
- Page 87 1. Remove the side frame. 2. Remove the pre-cut side where you wish to install the regulator with the pressure gauge. 3. Position the regulator with the pressure gauge. 4. Position the depressurisation valve on the manifold. 5. Connect the tube by placing it through the rectangular hole on the bottom. MUS0920201 07/10/2014 MELTON, S.L.U.
-
Page 88: Machine Adjustments
A.2.4. ELECTRICAL WIRING The solenoid valve must be connected to a 0-24 VDC activation signal on the main machine. A.2.5. PNEUMATIC CONNECTION The regulator features a pneumatic connection for a Ø8 tube. It is situated on the regulator with the pressure gauge. At least 6 bars of pressure are necessary. - Page 89 MUS0920201 07/10/2014 MELTON, S.L.U. - POLIGONO INDUSTRIAL AGUSTINOS CALLE G-34,31160 ORCOYEN, NAVARRA TEL: 00 34 948 321580 Fax: 00 34 948 326584 e-mail: melton@melton.es http://www.valcomelton.com...
-
Page 90: Annex Blog Sheets
ANNEX B LOG SHEETS MUS0920201 07/10/2014 MELTON, S.L.U. - POLIGONO INDUSTRIAL AGUSTINOS CALLE G-34,31160 ORCOYEN, NAVARRA TEL: 00 34 948 321580 Fax: 00 34 948 326584 e-mail: melton@melton.es http://www.valcomelton.com... - Page 91 DATE INCIDENCE MUS0920201 07/10/2014 MELTON, S.L.U. - POLIGONO INDUSTRIAL AGUSTINOS CALLE G-34,31160 ORCOYEN, NAVARRA TEL: 00 34 948 321580 Fax: 00 34 948 326584 e-mail: melton@melton.es http://www.valcomelton.com...
Need help?
Do you have a question about the ISOMELT and is the answer not in the manual?
Questions and answers
Mere application बार-बार chauk ho rahi hai machine stop hone ke bad bhi RPM show karta hai Mera tank auto mein chalna chahie per running line mein glue aana band ho jata hai Qotak gan ko is angle mein use Kiya jata hai
The issue could be that the external permission from the main machine has not been given. According to the manual, when connected to a main machine, the ISOMELT unit will not run or supply glue in auto mode until external permission is received. This could cause the machine to show RPM (indicating motor activity) but not dispense glue.
This answer is automatically generated