Table of Contents
Advertisement
Quick Links
KICD - Container Drive
KEITH Manufacturing Co.
www.KeithWalkingFloor.com
World Headquarters
Toll-Free: 800-547-6161
Phone: +1-541-475-3802
Europe Headquarters
Phone: +31-342-422007
10777601
INSTALLATION MANUAL
Original Instructions
©2020 KEITH Manufacturing Co. All Rights Reserved. KEITH, KEITH logo and WALKING FLOOR are registered trademarks of KEITH
Manufacturing Co. Equipment manufactured by KEITH Manufacturing Co. is protected by numerous patents both domestic and foreign.
Released: 2017-08-30
DOC06452 Rev. A
Advertisement
Table of Contents

Related Manuals for Keith KICD


Summary of Contents for Keith KICD
- Page 1 INSTALLATION MANUAL Original Instructions ©2020 KEITH Manufacturing Co. All Rights Reserved. KEITH, KEITH logo and WALKING FLOOR are registered trademarks of KEITH Manufacturing Co. Equipment manufactured by KEITH Manufacturing Co. is protected by numerous patents both domestic and foreign. Released: 2017-08-30...
-
Page 2: Table Of Contents
INSTALLATION MANUAL KICD - Container Drive Table of Contents Contact Information - KEITH Manufacturing Co. Introduction Container Preparations 2.1 Container Alignment 2.2 Bracing 2.3 Hydraulic Tubing Locations 2.4 Cross-Members 2.5 Shimming 2.6 Baffle Plate Sub-Deck 3.1 Square Tubing Drive Unit 4.1 Side Seal Support 4.2 Painting... -
Page 3: Contact Information - Keith Manufacturing Co
INSTALLATION MANUAL KICD - Container Drive Contact Information - KEITH Manufacturing Co. World Headquarters - USA 401 NW Adler St. P.O. Box 1 Madras, OR 97741 Toll-Free: 800-547-6161 Phone: +1-541-475-3802 Email: Sales@KeithWalkingFloor.com Europe Headquarters Barneveld, The Netherlands Phone: +31-342-422007 Email: EuroSales@KeithWalkingFloor.com... -
Page 4: Introduction
One person with welding skills can complete the entire installation. An efficient installation requires appropriate tools and accessible materials. A list of tools is found in Appendix 1. Appendix 2 lists materials. The KEITH ® KICD - Container Drive owner’s manual contains more detailed information about the system and operation procedures. -
Page 5: Container Preparations
INSTALLATION MANUAL KICD - Container Drive Container Preparations The container requires preparation before the system is installed. Planning ahead for the WALKING installation requirements saves significant preparation time, ® FLOOR 2.1 Container Alignment Check the compatibility of the drive unit with the container before making any alterations to the container. -
Page 6: Hydraulic Tubing Locations
INSTALLATION MANUAL KICD - Container Drive 2.3 Hydraulic Tubing Locations Hydraulic pressure, generated by the tractor’s wet kit, powers the drive unit. Tubing must connect the drive unit to the tractor. The location of the hydraulic tubing cut holes are shown so that the tubing will line up with the drive plumbing. -
Page 7: Shimming
INSTALLATION MANUAL KICD - Container Drive Remove cross-members to create an adequate opening for the drive unit (Figure 4). See Chapter 4 for more information about drive unit location. Opening between channel at rear of tunnel to cross member. Side view in container (Figure 4) - Page 8 INSTALLATION MANUAL KICD - Container Drive Shim 35 mm [1-3/8 in] Shim level to tunnel above cross-members at tunnel only. Shimming the Cross-Members & Rear Baffle Plate Top of Shim to top of tunnel at tunnel only. Tunnel 32 mm [1-1/4 in] Different examples of Shimming SECTION B-B on top of Cross-Members...
-
Page 9: Baffle Plate
INSTALLATION MANUAL KICD - Container Drive Tunnel Shim to go wall to wall 5 mm [3/16 in] Shim 3 mm [1/8 in] Shim 6 mm [1/4 in] Shim 8 mm [5/16 in] 35 mm [1-3/8 in] Shim (x5) Shim Figure 6 SECTION D-D 2.6 Baffle Plate... -
Page 10: Sub-Deck
INSTALLATION MANUAL KICD - Container Drive Sub-Deck The sub-deck is the structure directly above the cross-members and underneath the floor slats. The sub-deck consists of square steel tubing or U-shaped aluminum profiles. The square tubing mounts on top of the cross-members. Plastic floor bearings connect to the tubing. 3.1 Square Tubing The proper installation of the square tubing is critical for maintaining drive alignment, floor straightness and for optimal performance of the seal located between the floor slats. Raise the drive unit into position. Do not weld at this time. The drive unit is in place for locating the end of 25 mm x 25 mm [1 in x 1 in] tubing. - Page 11 INSTALLATION MANUAL KICD - Container Drive 25 mm x 25 mm [1 in x 1 in] Tubing 25 mm x 25 mm [1 in x 1 in] Tubing SECTION E-E Do not cover baffle plate with 25 mm x 25 mm 50 mm [2 in]...
- Page 12 INSTALLATION MANUAL KICD - Container Drive Lay out the remaining tubes across the width of the container, spacing them with jigs. Keeping the jigs above the cross-members, clamp the jig and tubes to every other cross-member. Be sure all tubes attain the minimum overhang of 50 mm [2 in]. Remember to plan for the formed cross sill attached to the drive unit.
-
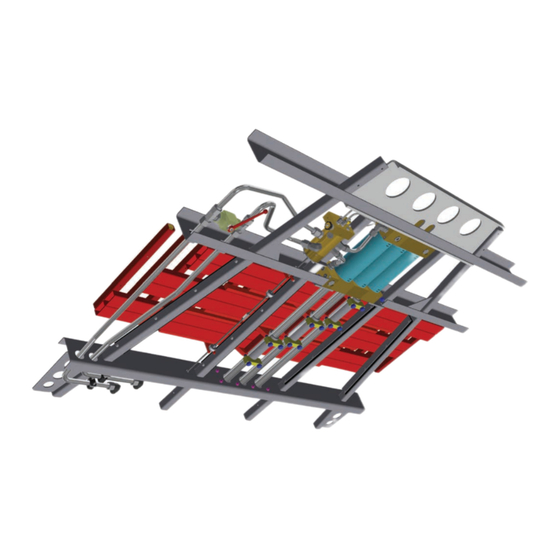
Page 13: Drive Unit
INSTALLATION MANUAL KICD - Container Drive Drive Unit NOTE: A minimum drive opening of 1980 mm [78 in] is necessary to maneuver the drive unit. (See Page 4, Figure 4) IMPORTANT: Do not damage piston rods. Do not lift drive unit by any of the hydraulic components. -
Page 14: Side Seal Support
INSTALLATION MANUAL KICD - Container Drive Height Raise drive frame cross-member to the same height of shimmed cross-member. This method gives the proper drive height as bearings are 6 mm [1/4 in] above the 25 mm x 25 mm [1 in x 1 in] tube and the drive shoes connect directly to the floor slats. See Detail F. -
Page 15: Painting
INSTALLATION MANUAL KICD - Container Drive 4.2 Painting The factory paints drive units with red oxide primer. 1. Confirm that the drive unit is coated well with primer. 2. Treat the drive unit and sub-deck with a finishing paint. IMPORTANT: Make sure that the following parts are protected when painting: cylinder chrome rods, switching valve chrome rod, serial plate and any decals. -
Page 16: Hydraulic Tubing
INSTALLATION MANUAL KICD - Container Drive 4.4 Hydraulic Tubing Section 2.3 discusses the location of hydraulic tubing. IMPORTANT: All components and tubing must be kept absolutely clean to prevent dirt from entering the system. 1. Determine tube locations and lengths. -
Page 17: Flooring
INSTALLATION MANUAL KICD - Container Drive Flooring After paint dries, the flooring can be installed. The slats slide on plastic bearings. The aluminum floor slats are bolted to shoes on the cross drives. 5.1 Slide Bearings 1. Compare bearing dimensions with shim on the cross-member flange width. The gap in the bearing should exceed the flange width of the shim of the cross-member. The standard bearing gap is 62 mm [2-7/16 in]. Milling can enlarge the gap to 100 mm [4 in]. 2. Snap 6 bearings (3003 Long) 100 mm [4 in] opening on the sub-deck over the load end of cylinders. - Page 18 INSTALLATION MANUAL KICD - Container Drive Install one row of 3003 Bearings, cut off ears on bottom to fit. Install one row of 915 mm [36 in] splash Drive Unit bearings. Cut (12) 1830 mm [72 in] in half to make (24) 915 mm [36 in] splash bearings.
-
Page 19: Floor Slats
INSTALLATION MANUAL KICD - Container Drive 5.2 Floor Slats 1. Determine length of floor slats. The slats have to reach from 50 mm [2 in] from the doors to a minimum of 300 mm [12 in] from the closest point on the front wall at floor level. This implies that the maximum length of the slats is 350 mm [13-3/4 in] shorter than the inner length of the container. For example, maximum slat length for a 150 mm [6 in] stroke unit in a 12.04 M [39 ft 6 in] container is 11.69 M [38 ft 4 in]. - Page 20 INSTALLATION MANUAL KICD - Container Drive Door Floor Slat End of slat to first 50 mm [2 in] hole in drive shoe. Door End of slat to first hole in drive shoe. 50 mm [2 in] SECTION I-I Drive Shoe Figure 16 DOC06452 Rev. A...
- Page 21 INSTALLATION MANUAL KICD - Container Drive End of slat to first hole in drive shoe. 12 mm [1/2 in] Drill thru 6 places Figure 17 Clamp jig to slat when drilling Flooring drill jig #6121701 for 3.65 inch flooring Seal Figure 18 Aluminum floor slat #2188 Place dowel pins on jig tight against floor slat.
- Page 22 INSTALLATION MANUAL KICD - Container Drive Aluminum Floor Slat 90° Countersink depth so floor bolt is flush Floor Bolt with top of flooring. M12 x 30 mm Figure 20 Drive Shoe Drive Shoe Nut Bar Drive Shoe use Sikaflex fastcure glue on threads and around countersunk surface of bolt holes before torquing the floor bolts per Appendix 4. Red Loctite may be used instead of Sikaflex on Aluminum flooring. (Do not use Red Loctite on UHMW Flooring) Button Head Bolt...
-
Page 23: Side Seal Options
INSTALLATION MANUAL KICD - Container Drive 3. Placement of floor slat drill jig. Check that you have the right flooring drill jig before continuing. Place flooring drill jig on top of the floor slat with the location dowel pins tight against the side opposite the seal. Center the rear hole over the mark from the end of slat to first hole in drive shoe measurement and clamp the jig. Drill 12 mm holes through the flooring. (Figures 17, 18 & 19) 4. Counter sink holes in aluminum slats only. Do not countersink holes in UHMW floor slats. Using a 90° countersink to a depth so the floor bolts are flush with top of floor slat. It is critical to get a good countersink depth for a tight fit. If possible, it is suggested to use a preset drill press for uniform hole depth. (Figure 20) 5. Install floor slats. Slide floor slats over T-Blocks and onto bearings into position and insert bolt into drive shoe nut bar to hold floor slat in position while installing the next slat. 6. Bolt and torque flooring to drive shoes. Sikaflex the floor bolts and the countersunk hole surface before inserting bolt. (Figures 20 & 21) Torque bolts per Appendix 4. 5.3 Side Seal Options The side seal is a non-moving floor slat that fills the gap between the moving floor slats and the side walls. Several options are available. A seal is needed between the moving floor slats and the side seal, so some options require the use of one double seal slat. - Page 24 INSTALLATION MANUAL KICD - Container Drive 2229 mm Double seal floor slat 92.7 mm [3.65 in] To Calculate Side Seal Width: O.C. Floor Slat B = (C-2229)/2 Figure 22 Option #1 Side Seal Placement Side Seal #1802 Option #1: Side Seal #1802 requires 32 mm [1-1/4 in] shim and one double seal slat.
-
Page 25: Front Shield
The width is a minimum of 6 mm [1/4 in] narrower than the inner container width. The front shield is angled about 45 degrees. When the floor slats are in the rear position, the slide strip must still lie fully on top of the floor slats. 2. Fabricate front shield. (KEITH Manufacturing Co. supplies this in most cases.) Form the plate and attach angled steel for support. Rivet the plastic slide strip to the shield. 3. Mount front shield. -
Page 26: Appendix 1 - Tools
INSTALLATION MANUAL KICD - Container Drive Appendix 1 - Tools Tools provided by KEITH Manufacturing Co. • Spacer jigs (for alignment of the sub-deck) Basic tools not supplied with kit • End wrench set up to 16 mm • Allen wrenches •... -
Page 27: Appendix 2 - Materials
INSTALLATION MANUAL KICD - Container Drive Appendix 2 - Materials Standard Kit • Drive unit • Floor slats • Slide bearings • Floor bolts • Slide strip (for self-fabrication of front shield) • Safety decals NOT Provided with Standard Kit Sub-decking (25 mm x 25 mm [1 in x 1 in] steel tubing / aluminum profile) -
Page 28: Appendix 3 - Check List
INSTALLATION MANUAL KICD - Container Drive Appendix 3 - Check List Carefully check the items on this list. They are essential for optimal floor performance. Before installation 1. The container should be straight. 2. The container should have cross bracing. 3. Cross-members should be level with other cross-members and kingpin plate. 4. Cross-members need to be shimmed up to the specified height. -
Page 29: Appendix 4 - Bolt Torque Requirements
INSTALLATION MANUAL KICD - Container Drive Appendix 4 - Bolt Torque Requirements Description Size Quantity Torque Values Tube Clamp Bolts M6 CL8.8 HCS Varies Snug * Cylinder Pack Bolts 150 ft.-lbs M16 CL10.9 HCS (Requires blue Loctite) [205 N·m] 61 N·m Switching Valve Bolts M10 CL10.9 HCS...
Need help?
Do you have a question about the KICD and is the answer not in the manual?
Questions and answers