Table of Contents
Advertisement
Quick Links
Advertisement
Table of Contents

Related Manuals for LINOVISION 4GPTZ-PortableKit


Summary of Contents for LINOVISION 4GPTZ-PortableKit
- Page 1 PORTABLE MOBILE EMERGENCY SUITCASE User Manual...
- Page 2 Thanks to purchase the products, if you have any question or requirement, please feel free to contact As the reference of usageinstruction, the description of some details may be not so accurate in this manual.The contents of this document will be updated irregularly for product version upgrading or other reasons, and the update will be added in the new version of the manual, we will not notify separately.
-
Page 3: Table Of Contents
Contents Product introduction.......................... 3 Appearance and interface description....................3 Parameter specification........................6 Configuration and usage........................7 4.1 login built-in webpage.........................7 4.2 Platform address setting......................7 4.3 Access ways..........................8 4.3.1 Cable access........................8 4.3.2 WiFi access........................8 4.3.3 4G/3G access........................9 Scheduling screen operation instructions..................10 5.1 Login status.......................... -
Page 4: Product Introduction
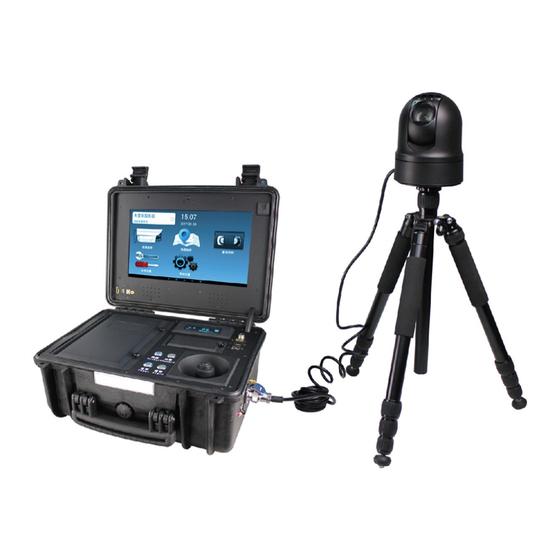
Product introduction 4G HD portable emergency command device is a full-featured integrative product with functions of high-definition, smooth, and stable video effect, real-time location, emergency, PTZ operation, two-waytalkback, etc. It is a complete set of emergency command devices that specially designed for unexpected emergencies, and provides technical support for realizing “smooth communication, real-time scene, complete data, and command in place”. - Page 5 Upper panel Lower panel The functions of the relevant interfaces on the device are shown in the table below:...
- Page 6 Interfaces Functions HDMI Synchronously output the screen image Standard USB Connect with USB, keyboard, mouse and otherperipherals Upper panel Develop and debug the installation system, also can be connect with Square USB peripherals 3.5mm headphone Android system sound output jack YC9 aviation plug Connect with talkback handheld microphone HDMI...
-
Page 7: Parameter Specification
Storage status indication Indicators on the right side Green twinkling: recording Red bright: stop recording Red twinkling: low battery warning Charging interface on the right side Side interfaces HD PTZ camera video input interface on the right side GPS antenna interface on the right side Parameter specification Items Details... -
Page 8: Configuration And Usage
Protection IP67 Dimension 410*340*205mm Others Weight 9.2KG Working humidity Temperature -20℃~60℃, humidity 5%~95% Configuration and usage It is necessary to set up some parameters before install the device, such as the access platform address, etc. The specific configuration process is as shown below, please contact the customer service personnel if you have any question. -
Page 9: Access Ways
4.3 Access ways Different network connection way can be selected to make the device access the platform according to the requirements. Three ways are supported by the device to connect the network: cable/ WiFi /4G. Fast switching can be realized via the ‘network” button on the lower panel, and according to the display status on the indicator panel to judge the connection way and connection status. -
Page 10: 3G Access
4.3.3 4G/3G access Click after login the built-in webpage, find the “network configuration” in the system, and select “use 4G/3G” in the “preferred network”, submit. Click 4G/3G option, check the dial-up status in the status parameters, the device has access to the network when it shows “dial-up success”. -
Page 11: Scheduling Screen Operation Instructions
Scheduling screen operation instructions As shown in the figure below, the LCD of the upper panel is the android system touch screen. Main function modules: login status, video command, map command, query playback, application settings, system settings. The follows will introduce the function of each module. Screen function sketch 5.1 Login status Device connection / login server status are shown on the left upper corn of the screen.If it displays “Device... -
Page 12: Application Settings
Login process sketch 5.2 Application settings It needs to input the platform address, user name and password in the “application settings” before login the server. Please login again after save. The network port IP of the device can be set in the network settings, as shown in the figure below: 5.3 Video command Enter the page “video command”, real-time scene image can be seen. -
Page 13: Map Command
5.4 Map command People can master the location information of their own and other portable terminals in the “map command” page and view the video of other terminals, as shown in the figure below: 5.5 Query playback The video files and images saved in the built-in memory card can be queried and processed playback in the “query playback”... -
Page 14: System Settings
5.6 System settings Each functional parameter can be changed in the Android system after enter the page, the same with other Android system settings, no longer describe details here. Command and schedule platform Login the emergency command and schedule platform after logged into the server tocreate cluster group.Group communication, retrieval image, video conference and other functions can be realized. -
Page 15: Query Playback
Query playback Login “network video surveillance system”, click query playback. : query the videos saved in the platform, : query the videos saved in the device storage medium. Select device and date, click to query, double click the video file in the query results to playback, or right click to download the video, as shown in the figure below: Restore factory settings 9.1 Use “Device configuration assistant”... -
Page 16: Use "Network Video Surveillance System/Built-In Webpage
9.2 Use “Network video surveillance system/built-in webpage” Login the network video surveillance system, click “device management”, double click the device in the device list, select system/device information/restore factory settings. Operations of the built-in webpage are the same, as shown in the figure below:...
Need help?
Do you have a question about the 4GPTZ-PortableKit and is the answer not in the manual?
Questions and answers