Table of Contents
Advertisement
Quick Links
Advertisement
Table of Contents

Related Manuals for Pioneer MVH-S129UB


Summary of Contents for Pioneer MVH-S129UB
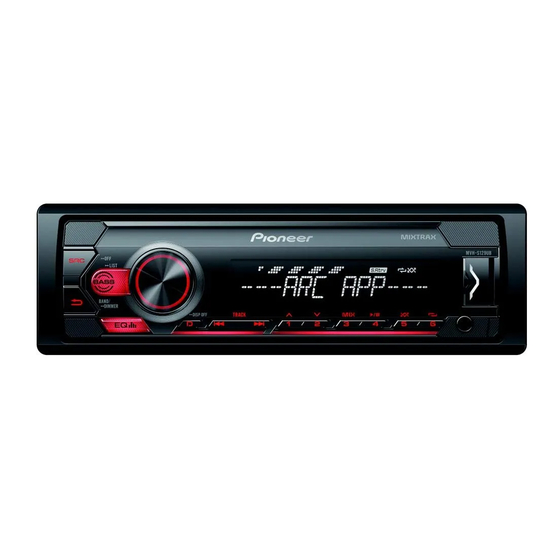
- Page 1 DIGITAL MEDIA RECEIVER MVH-S129UB Owner’s Manual...
-
Page 2: Table Of Contents
Table of Contents Before You Start Before You Start ................. 2 Thank you for purchasing this PIONEER product To ensure proper use, please read through this manual before using this product. It is Getting Started ................3 especially important that you read and observe WARNINGs and CAUTIONs in this manual. -
Page 3: Getting Started
Remote Control Turn on the power* Press SRC/OFF to turn Press SRC to turn on the on the power. power. MVH-S129UB Press and hold SRC/OFF Press and hold SRC to to turn off the power. turn off the power. BASS... - Page 4 Display indication How to replace the battery Indication Description Appears when a lower tier of the menu or folder exists. Appears when the BASS button is pressed and held. Appears when the local seek tuning function is set (page 9). Appears when a traffic program is received.
- Page 5 Setup menu Turn the M.C. dial to select [SYSTEM], then press to confirm. Turn the M.C. dial to select [DEMO OFF], then press to confirm. When you turn the ignition switch to ON after installation, [SET UP :YES] appears in the display. Turn the M.C.
-
Page 6: Radio
Menu Item Description To seek a station manually S/W UPDATE Select to confirm the latest system information on the After selecting the band, press to select a station. unit. [SYSTEM INFO] Press and hold then release to seek an available station. [SYSTEM Select to update the unit to the latest software and Scanning stops when the unit receives a station. -
Page 7: Usb/Aux
NOTE USB/AUX If [AUX] is set to [OFF] in the SYSTEM settings, [AUX] cannot be selected as a source (page 11). Playing back Operations Disconnect headphones from the device before connecting it to the unit. You can make various adjustments in the FUNCTION settings (page 9). Note that the following operations do not work for an AUX device. -
Page 8: Using Pioneer Arc App
NOTE Using Pioneer ARC APP If Pioneer ARC APP has not been installed on your Android device yet, a message that prompts you to install the application will appear on your Android device. Select [OFF] in [P.APP AUTO ON] to clear the message (page 11). -
Page 9: Settings
Menu Item Description Settings You can adjust various settings in the main menu. [ON], [OFF] Receive current traffic information if available. (Available only when FM band is Press the M.C. dial to display the main menu. selected.) Turn the M.C. dial to select one of the categories below, then press to confirm. -
Page 10: Audio Settings
Menu Item Description AUDIO settings HPF SETTING Menu Item Description Cut-off frequency: [OFF], Only frequencies higher than the high-pass [50HZ], [63HZ], [80HZ], filter (HPF) cutoff are output from the FADER*1 [100HZ], [125HZ], [160HZ], speakers. Adjust the front and rear speaker balance. [200HZ] BALANCE Slope level: [–12], [–24]... -
Page 11: Illumination Settings
PIONEER Service Station. DISPLAY FX *2 Please use a commercially available wiring harness for each car model when [PRESET] mode is engaged, and use a commercially available adapter when in [PIONEER]. [ON], [OFF] Set the MIXTRAX special effects on/off. -
Page 12: Connections/Installation
tape around wiring that comes into the power terminal of the auto Connections/Installation contact with metal parts to protect antenna. Doing so may result in the wiring. battery drain or a malfunction. – Place all cables away from moving • The graphical symbol placed Ground wire POWER AMP... - Page 13 Rear speaker • Optimum performance Power amp (sold separately) White is obtained when the Perform these connections when using White/black unit is installed at an the optional amplifier. Gray angle of less than 60°. Gray/black • When installing, to ensure proper Green heat dispersal when using this unit, Green/black...
- Page 14 installation may cause skipping or other malfunctions. When not using the supplied mounting sleeve Line up the holes on the mounting bracket with the holes on the sides of the unit to attach the bracket. Screw Screw in one screw on each side to Bracket hold the unit in place.
-
Page 15: Additional Information
Handling guidelines remains, contact your dealer or an range, the selected range may – Disconnect your device and authorized Pioneer Service Station change when another folder or replace it with a compatible USB for assistance. track is being selected or during fast device. - Page 16 (ID3 tag Version 2.x Sequence of audio files is given priority over CAUTION Version 1.x.) Copyright and • Pioneer cannot guarantee M3u playlist Not compatible The user cannot assign folder numbers compatibility with all USB mass trademark and specify playback sequences with...
- Page 17 Equalization range: ±12 dB (2 dB Signal-to-noise ratio: 62 dB (IEC-A Specifications step) network) Subwoofer (mono): NOTE General Frequency: 50 Hz/63 Hz/80 Hz/ Specifications and the design are Rated power source: 14.4 V DC 100 Hz/125 Hz/160 Hz/200 Hz subject to modifications without Slope: –12 dB/oct, –24 dB/oct (allowable voltage range: 12.0 V notice.
- Page 20 © 2019 PIONEER CORPORATION. All rights reserved. <QRB3928-A> ID...
Need help?
Do you have a question about the MVH-S129UB and is the answer not in the manual?
Questions and answers