Table of Contents
Advertisement
Quick Links
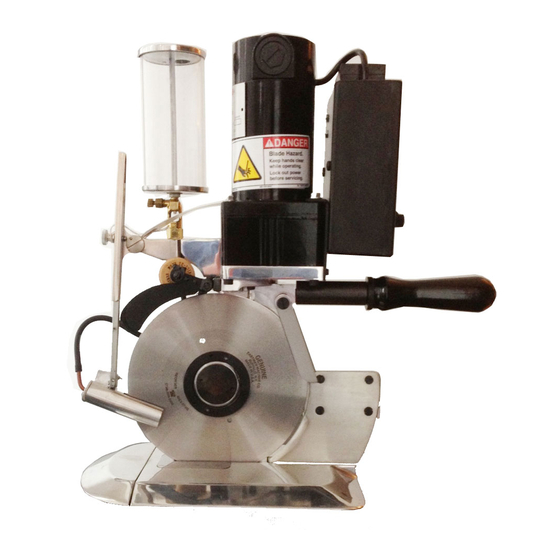
RUBBER
SLITTER
MODEL RS2
Please read completely before attempting
to operate your new RS2 Cutting Machine.
WARNING
This machine is equipped with a very sharp
knife. Keep hands, arms, and hair away from
the knife area at all times.
Misuse of this machine or failure to follow all
safety instructions on this machine and in the
instruction manual may result in serious per-
sonal injuries.
779 Washington St., Buffalo, N.Y. 14203-1396 U.S.A. • (716)856-2200 • Fax (716)856-1140 or (716)856-2068
Form C-1519
Manufacturers of Eastman Cutting and Spreading Machines
www.EastmanCuts.com
WARNING
Safety glasses must be worn at all times when
operating or servicing this equipment.
Instruction Book
and Parts List
Technical Support:
1-800-872-5595
CustomerService@EastmanCuts.com
Advertisement
Table of Contents

Subscribe to Our Youtube Channel
Related Manuals for EASTMAN RS2


Summary of Contents for EASTMAN RS2
- Page 1 Safety glasses must be worn at all times when operating or servicing this equipment. SLITTER MODEL RS2 Please read completely before attempting to operate your new RS2 Cutting Machine. Instruction Book and Parts List WARNING This machine is equipped with a very sharp Technical Support: knife.
- Page 2 Eastman’s sole obligation under this warranty shall be, at Eastman’s sole option, to repair or replace the defective goods or parts or to provide the buyer a credit equal to the portion of the purchase price allocable to the defective goods or parts. This warranty shall not apply if defects are caused by product misuse or neglect, if the machine has been altered or modified by the buyer, or if other than genuine Eastman parts are used in the machine.
-
Page 3: Maintenance Procedures
OPTIONAL KNIFE SHARPENING The RS2 Rubber Slitter has been designed for quick and Take the machine out of material to be cut. Switch machine easy conversion between the standard Baseplate and the to ON position, note setting of variable speed and increase speed to full capacity. - Page 4 Place sponge holder in working position one gallon of water. Shake or stir thoroughly. to continue operation. NOTICE The Eastman Machine Company does not warrant this Plastic Cutting Fluid and disclaims all liability for any damage that may occur through its use. Form C-1519...
-
Page 5: Motor Brush Replacement
TO ADJUST EMERY WHEELS TO REPLACE EMERY WHEELS As the Emery Wheels wear away and become farther With front of machine facing serviceman, guard rod in apart, they must be adjusted. Emery Wheels must be down safe position, remove right hand grinding wheel and adjusted from arm by loosening setscrew “D”... -
Page 6: Illustrated Parts List
Your Eastman RS2 Rubber Slitter Round Knife has been Illustrated carefully designed to provide many hours of trouble free operation. The comprehensive exploded parts illustra- tions have been carefully prepared to enable you to Parts List easily order replacement parts, as required. Replace-... - Page 7 Form C-1519...
- Page 8 Motor Assembly & Control Box Illustrated Parts List ITEM PART NO. DESCRIPTION QTY. 517C1-1215 Gear Motor, 110V 517C1-1280 Gear Motor, 220V 79C2-61 Label, Caution Sharp Blade 79C2-62 Label, Caution 300C7-1 Screw, Round Hd. Cap 4-36 x 1/8 254C1-2 Tie Mount 145C2-8 Cord #18-3 Wire 254C1...
- Page 9 Terminal Block must be grounded. Attach WARNING: ground wire to ground terminal "E" on ter- minal Block. Form C-1519...
- Page 10 Electrical Upgrade Kit 820C4-5 Illustrated Parts List (After 1/20/2002) ITEM PART NO. DESCRIPTION QTY. 104C1-6 Dial Indicator 580C1-124 Switch Dpst, Rocker 16A-250VAC 332-M3-16 Screw, Socket Flat Head M3 x 0.5 x 16 182C14-14 Control Box 11-1316 Fuse, 2 Amp 4C2-82 Nut, Hex #6-32 11-1348 Fuse Holder, 2 Position...
- Page 11 Terminal Block must be grounded. Attach WARNING: ground wire to ground terminal "E" on ter- minal Block. Terminal Block (Refer to back cover for detailed parts list) Form C-1519...
-
Page 12: Standard Assembly
Standard Assembly Illustrated Parts List ITEM PART NO. DESCRIPTION QTY. 308C15-2 Screw, Socket Hd. Cap 10-32 x 1/2 308C15-3 Screw, Socket Hd. Cap 10-32 x 3/8 79C12-247 Bracket, Ref. Only 4C2-133 Insert Nut 10-32 72C4-20 Cup, Grease 88C1-184 Standard 29C6-173 Adaptor, Operating Handle 4C1-111 Locknut, Handle... - Page 13 For best results use only GENUINE EASTMAN Knives The guarantee covering your RS2 Round Knife WARNING is not valid if knives other than those manufactured by Eastman are used. When cutting with the standard baseplate the knife must be reversed. The name will face the outside.
-
Page 14: Sharpener Assembly
Sharpener Assembly Illustrated Parts List ITEM PART NO. DESCRIPTION QTY. 57C2-22 Sharpener Lever 20C8-2 Screw 17C15-71 Cotter Pin, 1/16 x 1/2 77C1-34 Link, Sharp Contact 34C1-20 Spring, Tension 309C12-3 Setscrew, 8-32 x 3/16 46C3-13 Block, Sharpener Arm 11C10-19 Shaft, Sharpener 25C4-163 Knife Guard 540C1-51 LH Arm with Wheel L.H. - Page 15 EASTMAN name facing outward. The operator can then see the Eastman name. When using the optional Strip Gauge, the blade is used with the EASTMAN name facing in. The operator will not see the EASTMAN name. 2. Sharpener modifications: When using Standard Base Plate the sharpener assembly is assembled as shown.
- Page 16 Moistening Attachment & Guard Assembly Illustrated Parts List ITEM PART NO. DESCRIPTION QTY. 741C1-10 Water Can Assembly 53C11-69 Cover, Water Can 91C4-11 Rivet 720C1-32 Rod & Disc Top Assembly 12C15-61 Gasket 140C1-1 Body, Water Can 115C1-12 Disc, Bottom 12C15-63 Washer, Flat Rubber 12C15-60 Washer, Flat 4C1-152...
- Page 17 GENUINE EASTMAN Concentrated PLASTIC MASTER FLUID 242C3-0 - 1/2 Pint 242C3-1 - 1 Gallon GENUINE EASTMAN Concentrated PLASTIC MASTER FLUID for Rubber Products 242C3-2 - 1/2 Pint 242C3-3 - 1 Gallon Form C-1519...
-
Page 18: Baseplate Assembly
Baseplate Assembly Illustrated Parts List ITEM PART NO. DESCRIPTION QTY. 79C12-247 Bracket 62C16-226 Bracket for Standard 302C15-4 Screw, Flat Hd. 10-32 x 5/8 505C3-230 Plate Base, Complete 79C5-264 Plate, Throat 300C12-2 Screw, Round Hd. 8-32 x 1/4 300C12-5 Screw, Round Hd. ITEM PART NO. - Page 19 Form C-1519...
- Page 20 Strip Gauge (optional) 505C2-98A - 18" 505C2-98B - 24" Illustrated Parts List ITEM PART NO. DESCRIPTION QTY. ITEM PART NO. DESCRIPTION QTY. 13C2-11 Knob, Hand 17C15-126 Roll Pin 1/8 x 1/2 300C10-4 Screw, Round Hd. 15C13-60 Stud 6-32 x 3/8 171C1-22 Gauge Lock 25C4-178...
- Page 21 WARNING When cutting with the standard baseplate the knife must be reversed. The name will face the outside. When cutting with optional strip gauge the knife must be reversed. The name will be on the inside. See page15 for sharpener modification. Form C-1519...
-
Page 22: Motor Mount
Motor Mount (Optional) Illustrated Parts List ITEM PART NO. DESCRIPTION QTY. 62C12-12 Mounting Bracket, Top 62C12-11 Mounting Bracket, Side 308C18-3 Screw, Socket Hd. Cap 1/4-20 x 3/4 79C2-62 Label, Caution 29C6-174 Adaptor Form C-1519... - Page 23 Service Record Machine Serial No.: Machine Voltage: Date of Purchase: Date Type of Service Performed Form C-1519...
- Page 24 Attachment Plug Complete 523C1-99 523C1-100 523C1-101 523C1-102 523C1-103 779 Washington St., Buffalo, N.Y. 14203-1396 U.S.A. • (716)856-2200 • Fax (716)856-1140 or (716)856-2068 Manufacturers of Eastman Cutting and Spreading Machines www.EastmanCuts.com Form C-1519 ©2015 Eastman Machine Company Printed in U.S.A. 6/2016...
Need help?
Do you have a question about the RS2 and is the answer not in the manual?
Questions and answers