
Subscribe to Our Youtube Channel
Related Manuals for Coaster 182303


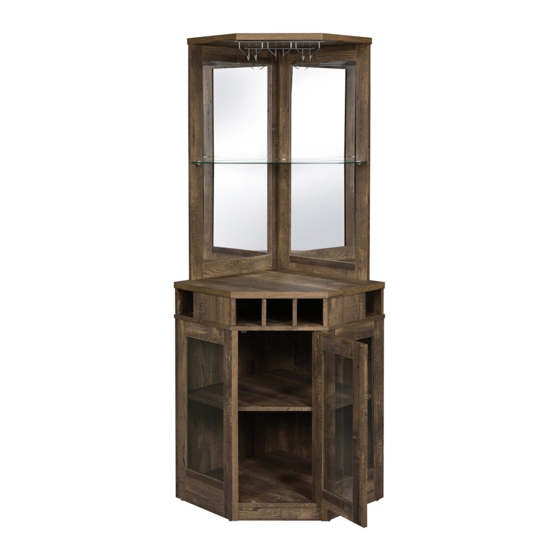
Summary of Contents for Coaster 182303
- Page 1 ASSEMBLY INSTRUCTIONS COASTER FINE FURNITURE Fine Furniture for every stage of life 182303 CORNER BAR CABINET REVISION 0 : 06/01/2020 PAGE 1 OF 17 COASTERFURNITURE.COM...
-
Page 2: Assembly Tips
182303 ITEM: ASSEMBLY INSTRUCTIONS ASSEMBLY TIPS: 1. Remove hardware from box and sort by size. 2. Please check to see that all hardware and parts are present prior to start of assembly. 3. Please follow attached instructions in the same sequence as numbered to assure fast & easy assembly. -
Page 3: Hardware Identification
182303 ITEM: GLASS DOOR 1 PC GLASS 1 PC HARDWARE IDENTIFICATION DESCRIPTION FIGURE Q’TY DESCRIPTION FIGURE Q’TY GLUE 40g 2 PCS MAGNETIC CATCH 1 PC WOODEN DOWEL SCREW FOR DOOR 76 PCS 1 PC Ø8x30mm Ø6.5x10mm RBW FIXED DOOR CAM BOLT... - Page 4 182303 ITEM: STEP 1 x 36 INCORRECT CORRECT 50mm Apply glue on all wooden dowels to ensure integrity of the structure. STEP 2 PAGE 4 OF 17 COASTERFURNITURE.COM...
- Page 5 182303 ITEM: STEP 3 STEP 4 Apply glue on all wooden dowels to ensure integrity of the structure. PAGE 5 OF 17 COASTERFURNITURE.COM...
- Page 6 182303 ITEM: STEP 5 Apply glue on all wooden dowels to ensure integrity of the structure. STEP 6 PAGE 6 OF 17 COASTERFURNITURE.COM...
- Page 7 182303 ITEM: STEP 7 x 12 STEP 8 Apply glue on all wooden dowels to ensure integrity of the structure. PAGE 7 OF 17 COASTERFURNITURE.COM...
- Page 8 182303 ITEM: STEP 9 x 18 STEP 10 Apply glue on all wooden dowels to ensure integrity of the structure. PAGE 8 OF 17 COASTERFURNITURE.COM...
- Page 9 182303 ITEM: STEP 11 STEP 12 PAGE 9 OF 17 COASTERFURNITURE.COM...
- Page 10 182303 ITEM: STEP 13 Apply glue on all wooden dowels to ensure integrity of the structure. STEP 14 PAGE 10 OF 17 COASTERFURNITURE.COM...
- Page 11 182303 ITEM: STEP 15 x 10 Apply glue on all wooden dowels to ensure integrity of the structure. STEP 16 PAGE 11 OF 17 COASTERFURNITURE.COM...
- Page 12 182303 ITEM: STEP 17 x 10 STEP 18 PAGE 12 OF 17 COASTERFURNITURE.COM...
- Page 13 182303 ITEM: STEP 19 STEP 20 Apply glue on all wooden dowels to ensure integrity of the structure. PAGE 13 OF 17 COASTERFURNITURE.COM...
- Page 14 182303 ITEM: STEP 21 Apply glue on all wooden dowels to ensure integrity of the structure. PAGE 14 OF 17 COASTERFURNITURE.COM...
- Page 15 182303 ITEM: STEP 22 COMPLETE PAGE 15 OF 17 COASTERFURNITURE.COM...
- Page 16 182303 ITEM: 500mm(19.69") 500mm(19.69") 457mm(18.00") 461mm(18.15") 551mm(21.19") 93mm(3.66") 605mm(23.82") 551mm(21.19") 93mm(3.66") 95mm(3.74") 100mm(3.94") 291mm(11.46") 532mm(20.95") 532mm(20.95") 575mm(22.64") 335mm(13.19") 603mm(23.74") Note : Dimension tolerance ±5% PAGE 16 OF 17 COASTERFURNITURE.COM...
- Page 17 ANTI-TIPPING INSTALLMENT INSTRUCTIONS FURNITURE TIPPING RESTRAINT WARNING Injury may result from tipping furniture. This restraint may protect against tipping furniture. Do not allow children to climb on furniture. This restraint is not a substitute for proper adult supervision. Failure to detach this restraint before moving the furniture may result in injury and damage.
Need help?
Do you have a question about the 182303 and is the answer not in the manual?
Questions and answers