Advertisement
Quick Links
The QTN8044D is able to accept input from other devices and either pass their
signals back to an NVR, or utilize them to trigger recording or alert actions when it is
being used in a stand-alone role.
1
2
3
4
5
6
7
8
8a
9
Micro SD card - Cards up to 64GB can be used to record still images without the
need for an NVR.
Two way intercom feature - Connect a microphone and speaker to the correct
audio leads- and with similar audio equipment on the user's end, two-way
communication can take place.
Alarm - One alarm can be connected to the alarm block with a single output to an
audible alarm, an external alarm input or to a NVR. When used with an NVR or on a
network, the alarm signal can trigger recording and its signal can be transmitted via
the Cat 5e cable to an NVR.
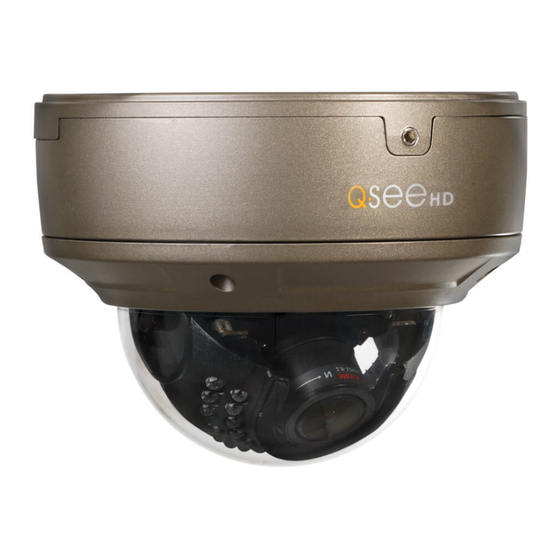
# Item
Function
1 Inside camera:
Storage
Up to 64GB memory
Focus,
Adjust camera's
zoom and focus
Reset camera if user
Reset
is locked out
2 Power
For use without POE
3 RJ45
For network
(Ethernet)
connectivity, video
Port
output and power
input (via POE)
4 PT Controls
Connection point
for analog pan-tilt
platform.
5 Alarm
1 Alarm input
1 Output
6 Video
Standard Definition
video for use in
adjusting camera
7 HP
Audio out - connect
(Headphones)
to speaker
8 Mic
Input for optional
microphone, using
included adapter (8a)
9 Temporary
Connect to circuit
board during zoom/
Power/Video
focus setup.
MOUNTING THE CAMERA
The QTN8044D camera is designed to be mounted on the ceiling. The baseplate is
removable to allow for easy installation.
Use the included hexagonal wrench to unscrew
the retaining bolt half-way. This bolt is located on
the front of the camera, above the Q-See logo.
Use the self-adhesive template to locate the
holes for the mounting screws rather than the
baseplate itself to prevent damage. The large
circle on the template marks the ideal position
to drill a hole for the cables if you will be running
them inside the ceiling. The knock-out on the
back of the base can be removed if you intend to
run the cables along the wall, etc.
Once you have drilled the necessary holes, use the included screws and anchors - or
other mounting hardware as needed - to secure the base to the surface.
Connect the cables and ensure that they will not be pinched when the camera is
attached.
Attach the camera body to the base and tighten the retaining bolt.
ADJUSTING THE LENS
The QTN8044D has a lens that can be manually
adjusted between 2.8mm and 12mm. The
2.8mm setting provides a 109° field of view.
The 12mm setting enlarges subjects by
approximately three times compared to the
2.8mm configuration, with the field of view
narrowing to 22°.
The camera is shipped in the 2.8mm position.
To adjust the lens, you will have to first remove
the camera's dome by loosening the four screws
holding the cover in place. The screws should
not be removed from the cover.
Once the cover has been removed, you can
adjust the Focus (a) and zoom (b) using the two
knobs located on the lens body behind the LED
circuit board. You may need to loosen them
by twisting the knob counter-clockwise before
making the adjustments. Do not apply excessive
force to the knobs as they can snap off, leaving
your camera unable to be adjusted.
Instructions continued on other side
QTN8044D
a
b
Advertisement

Subscribe to Our Youtube Channel
Related Manuals for Q-See QTN8044D


Summary of Contents for Q-See QTN8044D
- Page 1 QTN8044D The QTN8044D is able to accept input from other devices and either pass their MOUNTING THE CAMERA signals back to an NVR, or utilize them to trigger recording or alert actions when it is The QTN8044D camera is designed to be mounted on the ceiling. The baseplate is being used in a stand-alone role.
- Page 2 SD CARD be able to monitor the camera’s view to ensure The QTN8044D also has a slot for a Micro SD card (e)which allows the camera to that the image is properly in focus and includes record still images when it is operating on its own network (ie; not directly connected to the entire area that you wish to monitor.
Need help?
Do you have a question about the QTN8044D and is the answer not in the manual?
Questions and answers