
Subscribe to Our Youtube Channel
Related Manuals for Uniden DECT 1805


Summary of Contents for Uniden DECT 1805
- Page 1 All manuals and user guides at all-guides.com Dect 1805 Qk 2/26/02 10:12 AM Page 1 DECT 1805 OWNER’S MANUAL...
-
Page 2: Installation & Safety
All manuals and user guides at all-guides.com Dect 1805 Qk 2/26/02 10:12 AM Page 2 INSTALLATION & SAFETY Choosing the best location for your phone This symbol When choosing a location for your phone there are a number of appliances the phone indicates should be not be near, and areas you should avoid. - Page 3 All manuals and user guides at all-guides.com Dect 1805 Qk 2/26/02 10:12 AM Page 3 This page is a very condensed version of your owners manual. It is designed to allow you to get your phone installed and operating as quickly as possible - however it does not attempt to explain any of the advanced features of your phone.
- Page 4 All manuals and user guides at all-guides.com Dect 1805 Qk 2/26/02 10:12 AM Page 4 Installing the Handset Batteries To make a call To make a call 1. Press and listen for the dial tone. 1. Press and listen for the dial tone.
-
Page 5: Table Of Contents
All manuals and user guides at all-guides.com Dect 1805 Qk 2/26/02 10:12 AM Page 5 CONTENTS Installation & Safety ..............................i Step 1 - Installation .............................ii Step 2 - Installing the Handset Batteries ....................iii Step 3 - Using the phone ..........................iii Base Station and Handset Display ........................2... -
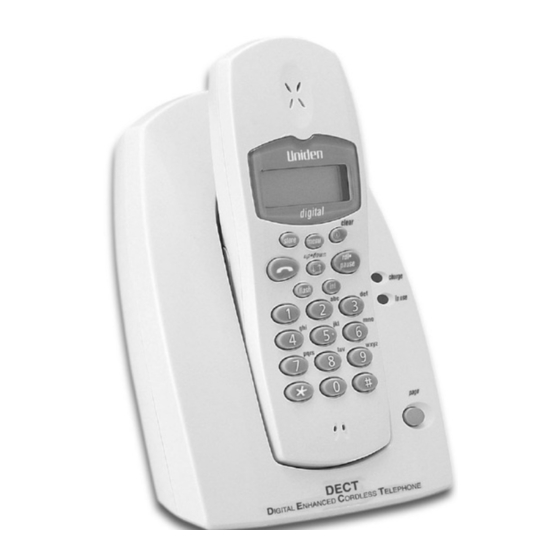
Page 6: Base Station And Handset Display
All manuals and user guides at all-guides.com Dect 1805 Qk 2/26/02 10:12 AM Page 6 BASE STATION 1) Charge LED 2) In Use LED 3) Page key (Registration) 4) Charging contacts charge in use page DECT IGITAL NHANCED ORDLESS ELEPHONE... -
Page 7: Handset
All manuals and user guides at all-guides.com Dect 1805 Qk 2/26/02 10:12 AM Page 7 HANDSET 1) Handset earpiece If anything is 2) LCD display missing, please 3) Memory key contact your 4) Talk key dealer 5) Numeric keypad immediately. -
Page 8: Charging The Handset Batteries
All manuals and user guides at all-guides.com Dect 1805 Qk 2/26/02 10:12 AM Page 8 CHARGING THE HANDSET BATTERIES Charging of the Handset batteries takes place automatically when the Handset is placed on the Base Station. An LED on the side of the Base Station indicates that the Handset is charging. -
Page 9: Description Of Displayed Symbols
All manuals and user guides at all-guides.com Dect 1805 Qk 2/26/02 10:12 AM Page 9 DESCRIPTION OF DISPLAYED SYMBOLS EXTERNAL CALL The External Call icon is visible when is pressed. The icon flashes when: there is an incoming call a call has been dropped... -
Page 10: Using Your Phone
All manuals and user guides at all-guides.com Dect 1805 Qk 2/26/02 10:12 AM Page 10 SWITCHING THE HANDSET ON AND OFF To turn the handset on: Press until the display is visible. The Base Station number is shown on the left and the handset number shown on the right. -
Page 11: Making An External Call
All manuals and user guides at all-guides.com Dect 1805 Qk 2/26/02 10:12 AM Page 11 MAKING AN EXTERNAL CALL Making an external call very easy -there are several styles of call: • On-Line Dialled Calls • Pre-Dial Calls • Memorised Number Call •... - Page 12 All manuals and user guides at all-guides.com Dect 1805 Qk 2/26/02 10:12 AM Page 12 Dialling from memory using the 2 digit directory location Press the and enter the 2 digit directory number that refers to the number 01-20 you wish to dial.
-
Page 13: Making An Internal Call
All manuals and user guides at all-guides.com Dect 1805 Qk 2/26/02 10:12 AM Page 13 Last Number Redial Calls The handset stores the last four numbers called. Press to display the last number called. Press again to display the In New Zealand next number. -
Page 14: Receiving A Call
All manuals and user guides at all-guides.com Dect 1805 Qk 2/26/02 10:12 AM Page 14 RECEIVING A CALL When a Handset receives an incoming call press The appropriate icon will remain illuminated for the duration of the call. If the Handset is resting in the Base Station and the AutoTalk feature is enabled, simply lifting the handset will connect the call. -
Page 15: Personalising Your Phone
All manuals and user guides at all-guides.com Dect 1805 Qk 2/26/02 10:12 AM Page 15 DIAL MEMORIES Each Handset can store up to 20 telephone numbers in Dial Memories. Numbers stored Each number can be up to 24 digits long. -
Page 16: Received Speech Volume
All manuals and user guides at all-guides.com Dect 1805 Qk 2/26/02 10:12 AM Page 16 Delete a Number from Memory Numbers held in a Dial Memory locations can be deleted. Press then Press to step to the number to be deleted. -
Page 17: Handset Ring Volume
All manuals and user guides at all-guides.com Dect 1805 Qk 2/26/02 10:12 AM Page 17 HANDSET RING VOLUME The Handset Ring Volume can be adjusted through five levels (0 through 4). Press then The display shows the current ring volume setting; the current setting is level 2... -
Page 18: Advanced Functions
GAP requirements. Similarly other manufacturer's handsets can be registered with the Basestation. For the registration procedure associated with non-Uniden equipment, the relevant user documentation should be consulted. It should be noted that other Brand equipment might not provide the comprehensive features available with this telephone. -
Page 19: Basestation Registration Key
All manuals and user guides at all-guides.com Dect 1805 Qk 2/26/02 10:12 AM Page 19 BASESTATION REGISTRATION KEY Press and hold the Base Station Registration key for five seconds. The Talk LED on the Base Station will flash to indicate that it is in registration mode. The user then has 90 seconds to complete the handset registration procedure. -
Page 20: Handset De-Registration
All manuals and user guides at all-guides.com Dect 1805 Qk 2/26/02 10:12 AM Page 20 If this is entered correctly, the Handset will start to search for the Base Station. If the PIN is incorrect, a single low tone will be heard and another opportunity to enter the PIN offered. -
Page 21: Pin Code Changes
All manuals and user guides at all-guides.com Dect 1805 Qk 2/26/02 10:12 AM Page 21 The handset numbers already registered are displayed. In the example shown, handsets 1,2 and 6 are registered. 9 9 - - 1 1 2 2 6 6 Press the Handset number to be de-registered. -
Page 22: Trouble Shooting
All manuals and user guides at all-guides.com Dect 1805 Qk 2/26/02 10:12 AM Page 22 TROUBLE SHOOTING If your phones are not performing to your expectations, please try these simple steps first before calling Uniden customer service. PROBLEM SUGGESTION •... -
Page 23: Warranty
Uniden, (C) Improperly installed, (D) Repaired by someone other than an authorised Uniden Repair Agent for a defect or malfunction covered by this warran- ty, (E) Used in conjunction with any equipment or parts or as part of a system not manufac- tured by Uniden, (F) Warranty is only valid in original country of purchase. - Page 24 All manuals and user guides at all-guides.com Dect 1805 Qk 2/26/02 10:12 AM Page 24 © 2002 Uniden Australia Pty Limited Uniden New Zealand Limited Printed in China UDZZ01870ZZ...
Need help?
Do you have a question about the DECT 1805 and is the answer not in the manual?
Questions and answers