Table of Contents
Advertisement
Quick Links
03C451E
For best results, be sure to read the following installation instructions and use the product only as described in the manual.
Important Safeguards
Read the Important Safeguards section thoroughly before installing the product.
●The following symbols indicate safe and proper use
of the product. Failure to observe them may result in
injury or property damage.
The symbols and their meanings are as follows:
Ignoring these symbols may result in
Warning
death or serious injury.
Ignoring this symbol may result in
Caution
injury or property damage.
Do not fit the pipe in opposite the intended
temperature.
Burns may result from confusing hot water for cold.
Do not use hot water that is 85℃ and higher
Do NOT
If you use hot water over 85℃, the life of the faucet will be
reduced, if it is broken, property damage, scalding and other
injuries are likely to occur due to water leakage.
Do not disassemble or modify the item
in any way not described in this manual.
Do Not
If the system is broken, property damage, scalding and other
disassemble
injuries are likely to occur due to water leakage.
Must be installed on a shower wall or area
of equal support strength.
Direct installation on weak mud or plaster walls may result in
detachment of the shower tower of damage to the wall: resulting
in injury.
Sealing agent must be applied around the
installation hole
If sealing agent is not applied, when the wall gets wet, the
shower tower may become detached or the wall may be damaged,
injury may occur.
Read the installation method of the substrate
Mandatory
carefully, confirm the substrate has enough
strength or reinforcement is installed.
Otherwise, the shower tower may become detached and the wall
may be damaged, injury may occur.
After installation, confirm that the shower tower
is stable
If the shower tower is unstable, it will become detached and
the wall will be damaged, injury may occur.
Installation Manual
Thermostat Shower Mixer
(For your safety, please follow the instructions below.)
●The following table demonstrates
the use of safety symbols in this
manual.
Absolutely Do NOT.
Do not disassemble.
Mandatory!
Warning
Less than
Caution
No
Shaking
If you want to clean the filter, shut off the stop
valve first and do not open the cover
abruptly.
Hot water expelled when removing the cap can burn you and
cause injury. Use caution.
Mandatory
To use hot water as shown in the scale, you
must adjust the temperature.
If you do not use hot water as shown in the scale according to
Hot water side
the specifications, you may be burned.
Cold water
side
Do not impact violently
If it is broken, property damage, scalding and other injuries
are likely to occur due to water leakage.
85℃
The shower tower should not be used as a
Do NOT
handrail or be used to hang objects.
If the shower tower or the supporting wall is
damaged, it may cause injury and leakage.
Specifications
Cold and hot
water pressure
Max.use temperature
Suitable water quality
Suitable ambient temperature
Usage
reinforced
1/6
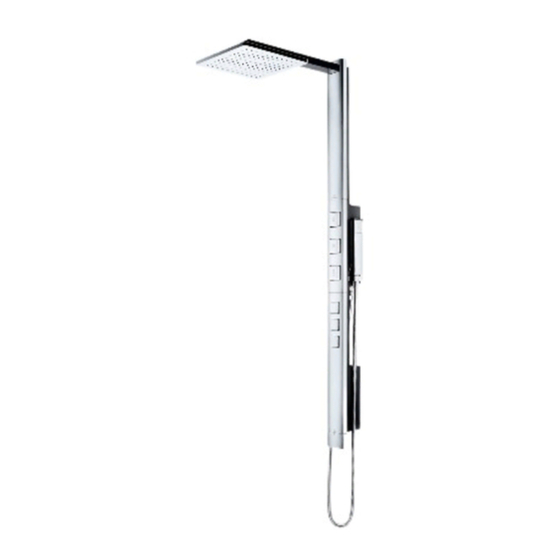
Shower Tower
Model TMC95 V101*
Warning
Caution
Min.necessary
0.15MPa(flowing pressure)
pressure
Max. pressure
0.75MPa(static)
Less than 85℃
Water from river or the well for drinking
1〜40℃
For a general family bathroom
2009.11
shut
stop valve
Filter,
hot side
Cap
filter, cold side
40℃
See next page
Advertisement
Table of Contents

Subscribe to Our Youtube Channel
Related Manuals for Toto NEOREST TMC95 V101 Series


Summary of Contents for Toto NEOREST TMC95 V101 Series
- Page 1 03C451E 2009.11 Installation Manual Shower Tower Thermostat Shower Mixer Model TMC95 V101* For best results, be sure to read the following installation instructions and use the product only as described in the manual. Important Safeguards (For your safety, please follow the instructions below.) Read the Important Safeguards section thoroughly before installing the product. Warning ●The following symbols indicate safe and proper use ●The following table demonstrates shut of the product. Failure to observe them may result in the use of safety symbols in this If you want to clean the filter, shut off the stop stop valve injury or property damage. manual. valve first and do not open the cover Filter, The symbols and their meanings are as follows: hot side abruptly. Absolutely Do NOT. Ignoring these symbols may result in Warning Do not disassemble. Cap death or serious injury. Hot water expelled when removing the cap can burn you and cause injury. Use caution. Mandatory! Ignoring this symbol may result in Caution ...
- Page 2 Before Installing Set-up Drawing ※Some models may have different components as illustrated below. ●If the water supply pressure is higher than 0.75MPa, you should buy a reducing valve to reduce the pressure by 0.2-0.3MPa. To use the shower faucet comfortably, a pressure of about 0.2-0.3MPa is recommended. Dimensions in parentheses are for reference. Please install it to adjust height of users. ●To prevent being scalding due to malfunction, the water supply pressure must be higher than the hot water pressure, or at least equal. Also, when you increase the pressure of the hot water side, it must remain lower than the water supply side. ●The hot water supply temperature should be set 10℃ higher than the intended temperature during use. ●To prevent being scalded due to malfunction, a hot water supply temperature of 60℃ is recommended. ●To reduce resistance, the pipe that is connected to the hot water device should be as short as possible, and the pipe should be wrapped with insulating material. ●You may find residual water in the product. This is due to testing by feeding water through the product before packaging, this is not a problem. ●Confirm that the wall supporting the shower tower is strong enough. ●Please choose the fixation method that is appropriate for the structure of the building. ●In case of install on the wall of concrete substrate, please use the plastic plug in the package. Components Confirm that you have the following parts. Shower Tower Main Component Parts for the Hand Shower Metal Fittings for Installation Parts for the Overhead Shower Others Installation screws ...
- Page 3 Installation Procedure Clean the hot and cold water supply pipes Install the showerhead Critical Before installation: You must remove dirt and sand from Positioning the pipes. Positioning Dim is the pipe pitch 、 Determine the position for installing the shower tower and If is for drilling holes. Standard (8 0) , A=5 If B is min (70) or max (90), Install the installation A = 0 fitting Hole for installation fitting Install the shower hanger Install the shower hose Clean the cold and hot Water pipes Install the cover Hole for installation fitting Fixing main component Hole for water supply leg Install the 80±10 installation legs Hole for hot water ...
- Page 4 Installation Procedure 6 -2 Upper installation Attach the Main Component Install the Installation Fitting Foamed Gasket fitting ①Remove two caps of installation leg. ①Peel off the paper on the foamed gasket and stick Screw it in the paper on upper and lower installation fitting. ②Fit the fitting in the groove at the Washer projection on the top of the main component, Hole for Spring washer ②When you install the installation fitting, upper be sure to orient it correctly. installation Projection on the fitting Peel-off Main component Paper Groove of the Installation Foamed Coach screw Hexagon ...
- Page 5 Adjustments 1.Confirm water comes out 3.Adjust flow rate You can adjust flow rate by the stop valve as follows. After installation, open the primary valve of the pipeline, if (hot) water 1. Turn the temperature-ajusting Showerhead Flow-adjusting lever comes out from the overhead, body, or hand shower, press the button to handle to the end of cold water confirm. Press it again to stop. side and press hand shower Hand shower ON/OFF button. Cold water ※Even after the button is pressed, side 2. Adjust flow rate at 15L/min left-over water will still come out, so it will take some time (It takes 10seconds to fill Press before the water stops. the washbowl) with the stop Body shower Temperature-adjusting valve for cold water side. handle ...
- Page 6 Inspection Confirm the following items after installation. Confirm the shaking Confirm there is no shaking. Is the installation fitting stall? − 4 Refer to Install the Installation Fitting Does the cap nut get loose? Upper Is the installation leg Showerhead Installation stable? fitting Refer to Install the − 3 Check for leakage Installation legs Confirm there is no water leakage. Does showerhead have movement or looseness? Water leaks from A-D Refer to Install the − 5 showerhead Check if the O ring is abnormal, if it is shifted to one side during installation, Lower Check the flow and temp. you should install it again. installation fitting Stop ...
Need help?
Do you have a question about the NEOREST TMC95 V101 Series and is the answer not in the manual?
Questions and answers