Interacoustics Luna Service Manual
Screening audiometer
Hide thumbs
Also See for Luna:
- Instructions for use manual (43 pages) ,
- Instructions for use manual (46 pages)
Table of Contents
Advertisement
Quick Links
Advertisement
Table of Contents

Related Manuals for Interacoustics Luna


Summary of Contents for Interacoustics Luna
- Page 1 Science made smarter Service Manual Luna Screening Audiometer...
-
Page 2: Table Of Contents
About warnings and cautions ........................1 General information ..........................1 Maintenance and Disassembly ........................2 General cleaning and maintenance procedure ..................2 Connecting the USB cable to Luna ......................3 Disassembling Luna ..........................4 Calibration Procedure ............................. 7 Service, adjustment, and repair ....................... 7 Hardware calibration - requirements ................... -
Page 3: Introduction
Introduction About this manual This manual is for the Luna screening audiometer. The manual content covers instrument related data, such as disassembly and calibration. Technical specifications along with the parts & accessories list can be found as appendices in the back of the manual. -
Page 4: Maintenance And Disassembly
General cleaning and maintenance procedure Your Luna may be gently cleaned by means of a soft cloth dampened with luke warm water. The black mesh in each ear cup may also be rinsed gently. For further protection of ear cushion by means of covers and disinfection fluids, please consult your supplier. -
Page 5: 2.2 Connecting The Usb Cable To Luna
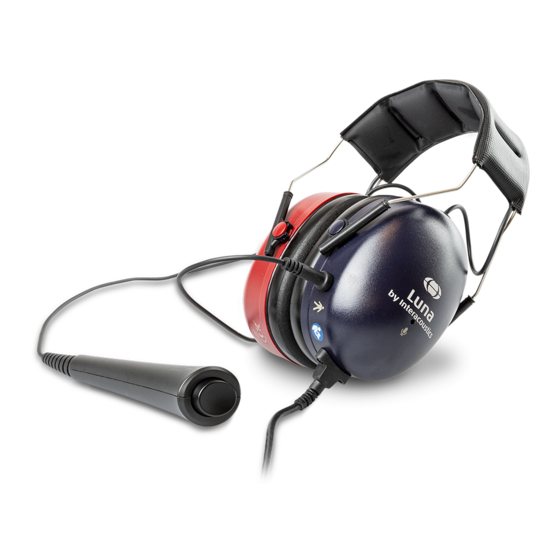
Luna Screening Audiometer 2.2 Connecting the USB cable to Luna Always make sure to connect cables to Luna as described below. Never twist the connector in the socket or breakage will occur. Disassemble/assemble the shell and the USB cable. Note the specifics on the shell and the cable (red circles). -
Page 6: Disassembling Luna
Service Manual Luna Screening Audiometer Disassembling Luna Grab hold of the foam hygiene cushion and release it Once the foam hygiene cushion has been removed, from the (red) shell. remove the black mesh cover and the white foam cushion Fig. 2 Fig. - Page 7 Service Manual Luna Screening Audiometer To disassemble the parts in the blue shell, simply repeat Overview of parts the previous actions Fig. 8 Fig. 9 When re-assembling the device, remember to properly tighten the 2 screws fastening the transducer to the shell.
- Page 8 Service Manual Luna Screening Audiometer NOTICE If PCA board has been disconnected it must be re-calibrated Please refer to Appendix C - Parts & Accessories Appendix B in the back of this manual.
-
Page 9: Calibration Procedure
Interacoustics. Service and calibration must only be performed by authorized personnel. Before any attempt is made to calibrate Luna, it must have been powered on for 3-5 minutes in an ambient temperature that is both stable and comfortable. -
Page 10: Installation Of The Luna Suite Software
Luna Screening Audiometer Installation of the Luna Suite software To download the Luna Suite software, go to www.interacoustics.com/luna where you will find the latest version of the software. Tick the box ‘I agree to the license terms and conditions’ and click ‘install’. - Page 11 Service Manual Luna Screening Audiometer The Luna Suite will open: Click on the key icon You may now enter the product key which you received together with the Luna audiometer. The code consists of 16 randomly chosen letters and figures.
-
Page 12: Using The Calibration Software For Windows ® 10
When opened, the calibration startup screen should look like the below screenshot, with the Connect button low lighted to indicate connection. If the Connect button is highlighted due to missing connection to Luna, reconnect the device, and then click Connect. -
Page 13: Calibration Of Transducer
Service Manual Luna Screening Audiometer Calibration of transducer This chapter contains calibration standards for Luna. Included here is an explanatory guide and a complete set- up of how to calibrate the transducer. Calibration standard Tone standard is selected via AUD and ‘Standard’. The options are IEC or ANSI. -
Page 14: Selecting A Transducer/How-To-Guide
Service Manual Luna Screening Audiometer Selecting a transducer/how-to-guide Equipment required: • Measuring amplifier Acoustical IEC 60318-1 coupler • Frequency counter • Correction values for coupler • From the AUD menu, select Transducer calibration. Place the transducer on the IEC 60318-1... -
Page 15: Attenuator Test
Service Manual Luna Screening Audiometer Attenuator test Via TEST, click Attenuators. Then, follow the on-screen instructions. Fig. 15... -
Page 16: Room Monitor Calibration
Service Manual Luna Screening Audiometer Room monitor calibration Insert the calibration adaptor ½” into the calibrator. Tools needed: Calibration adaptor DD65v2A Fig. 16 Switch on the calibrator. Connect the calibration adaptor to the room monitor microphone opening on the outside of the left transducer. -
Page 17: Troubleshooting
Luna is not recognized on Windows® 7/8. b. Check that 2x “USB Serial Device (COMx)” are shown in device manager when plugging in the headset. c. Make sure that only one instance of the Luna Suite Software is running. -
Page 18: Appendix A - Technical Specifications
Construction: Plastic cabinet. Power: USB-powered Average: 300mA (Max: 500mA) Operation environment: Ambient noise: The Luna audiometer should be used in a quiet place such as a separate room Rel. Humidity: 15 – 90% 10-35° Temperature: 98 kPa – 104 kPa... -
Page 19: Reference Equivalent Threshold Values For Transducers
Service Manual Luna Screening Audiometer Reference equivalent threshold values for transducers Max dB level HL 1000 1500 2000 3000 4000 6000 8000 Survey of reference and max hearing level tone audiometer AAU / PTB (2018) DD65 v2 Coupler: ANSI S3.7-1995 (NBS-9A) /... -
Page 20: Appendix B - Electromagnetic Compatibility (Emc)
Service Manual Luna Screening Audiometer Appendix B – Electromagnetic Compatibility (EMC) This instrument is suitable in hospital environments except for near active HF surgical equipment • and RF shielded rooms of systems for magnetic resonance imaging, where the intensity of... - Page 21 EMC information presented in this chapter. The LUNA has been tested for EMC emissions and immunity as a standalone instrument. Do not use the LUNA adjacent to or stacked with other electronic equipment. If adjacent or stacked use is necessary, the user should verify normal operation in the configuration.
- Page 22 Luna Screening Audiometer Guidance and Manufacturer’s Declaration - Electromagnetic Immunity The LUNA is intended for use in the electromagnetic environment specified below. The customer or the user of the LUNA should assure that it is used in such an environment.
- Page 23 Luna Screening Audiometer Guidance and manufacturer’s declaration — electromagnetic immunity The LUNA is intended for use in the electromagnetic environment specified below. The customer or the user of the LUNA should assure that it is used in such an environment,...
- Page 24 If the measured field strength in the location in which the LUNA is used exceeds the applicable RF compliance level above, the LUNA should be observed to verify normal operation, If abnormal performance is observed, additional measures may be necessary, such as reorienting or relocating the LUNA.
-
Page 25: Appendix C - Parts & Accessories
Cable Micro USB to mini 4P Black 2000mm 8518616 Cable USB AM to mini 4P Black 2000mm 8518617 DD65v2A (Calibration tool) 8519829 Carrying case for Luna 1701 8523086 Transducer DD65v2 8524164 8519276 Patient response switch (3.5 mm) Sanitation Kit DDxx... -
Page 26: Appendix D - Update History
Service Manual Luna Screening Audiometer Appendix D – Update History DATE ACTION REMARKS 2021/06 The transducer table on p. i, - hearing levels have been changed from -10 to 100 to -10 to 105 dB 2021/04 Added remark to 3.2.2 Selecting a transducer...
Need help?
Do you have a question about the Luna and is the answer not in the manual?
Questions and answers