Hytera PD78X Manual
Hide thumbs
Also See for PD78X:
- System planner manual (182 pages) ,
- Upgrade manual (44 pages) ,
- Service manual (44 pages)
Table of Contents
Advertisement
Quick Links
Preface
Thank you for purchasing Hytera DMR Digital Portable Radio. As a product built to the DMR standard, it is
endowed with ergonomic design, all-round digital functions and remarkable quality to refresh your
experience and enable you to be responsive to emergent situations.
To derive optimum performance from your product, please read this manual and the supplied Safety
Information Booklet carefully before use.
This manual is applicable to the following model:
PD78X
PD78XG
Advertisement
Table of Contents

Related Manuals for Hytera PD78X


Summary of Contents for Hytera PD78X
- Page 1 Preface Thank you for purchasing Hytera DMR Digital Portable Radio. As a product built to the DMR standard, it is endowed with ergonomic design, all-round digital functions and remarkable quality to refresh your experience and enable you to be responsive to emergent situations.
- Page 2 Instructional Icons This radio is not intended for use by general population in an uncontrolled environment. It is only for occupational use and only applied to work-related conditions. The radio must be only used by users, who are fully aware of the hazards of the exposure and who are able to exercise control over their RF exposure to qualify for the higher exposure limits.
- Page 3 The Hytera product described in this manual may include Hytera computer programs stored in memory or other media. Laws in PRC and/or other countries or areas protect the exclusive rights of Hytera with respect to its computer programs. The purchase of this product shall not be deemed to grant, either directly or by implication, any rights to the purchaser with respect to Hytera computer programs.
- Page 4 RF Energy Exposure Compliance Your radio is designed and tested to comply with a number of national and international standards and guidelines (listed below) regarding human exposure to radio frequency electromagnetic energy. This radio complies with the IEEE and ICNIRP exposure limits for occupational/controlled RF exposure environment at operating duty factors of up to 50% transmitting and is authorized by the FCC for occupational use only.
- Page 5 EU Regulatory Conformance The equipment is in compliance with the essential requirements and other relevant provisions of the Directive 1999/5/EC. Note: The above information is applicable to EU countries only. FCC Licensing Information Part 15 Compliance This equipment has been tested and found to comply with the limits for a Class B digital device, pursuant to part 15 of the FCC Rules.
-
Page 6: Table Of Contents
Contents Checking Items in the Package ......................... 7 Product Overview ............................8 Product Controls ..........................8 Programmable Keys ........................... 9 Before Use .............................. 11 Charging the Battery......................... 11 Assembling the Accessories ......................12 Status Indication ............................14 LCD Icon............................14 LED Indicator ............................ - Page 7 Talk Around ............................28 Monitor ............................ 28 Squelch Off ........................... 28 Emergency............................28 Battery Power Indicator ........................32 Man Down (optional)......................... 33 Scrambler /Encrypt ......................33 Busy Channel Lockout........................34 Time-out Timer (TOT) ........................34 Pseudo Trunking ........................34 MIC AGC ............................34 Signaling Introduction..........................
-
Page 8: Checking Items In The Package
Checking Items in the Package Please unpack carefully and check that all items listed below are received. If any item is missing or damaged, please contact your dealer. Battery Charger Power Adapter Antenna Belt Clip Strap Owner’s Manual/ Safety Information Booklet/ Quick Reference Guide Radio Unit Note: The antenna may vary with different frequency bands. -
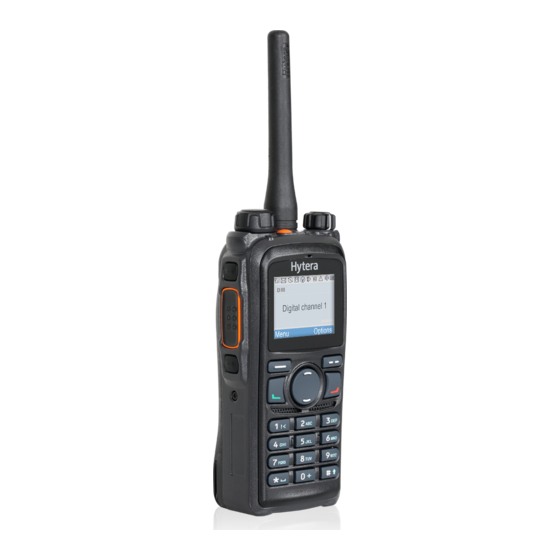
Page 9: Product Overview
Product Overview Product Controls Part Name Part Name SK1 (Side Key 1) LED Indicator ○ ○ PTT Key Antenna ○ ○ SK2 (Side Key 2) Radio On-Off/Volume ○ ○ Control Knob TK (Top Key) Accessory Jack ○ ○ Channel Selector Knob Back Key ○... -
Page 10: Programmable Keys
Programmable Keys For enhanced convenience, you may request your dealer to program the keys SK1, SK2, TK, as shortcuts to the functions listed below: Shortcut Keys Description Zone Up To select a desired zone quickly Zone Down Keypad Lock To lock or unlock the keypad quickly To access the menu “Contact List”... - Page 11 Man Down To activate Emergency in the case that the radio is positioned aslant for a preset time period due to an unexpected situation Scrambler: To encrypt your voice so as to Scrambler /Encrypt guarantee privacy of your communication Encrypt: To encrypt your voice and message guarantee privacy your...
-
Page 12: Before Use
Before Use Charging the Battery Use only the charger and battery specified by Hytera. Charger LED can indicate the charging process. Charge Diagram Procedures Connect the power adapter to AC source. See arrow ①. Plug the power adapter into the rear socket of the charger. See arrow ②. -
Page 13: Assembling The Accessories
Caution: Be sure to read the Safety Information Booklet, to get necessary safety information. Assembling the Accessories Attaching the Antenna Turn the antenna clockwise to fasten it. To remove the antenna, rotate it counter-clockwise. Attaching the Battery ○ 1. Insert the battery into top of the radio. See arrow ○... - Page 14 Attaching the Audio Accessory/Programming Cable 1. Open the accessory jack cover as the arrow shown. 2. Align the plug with the accessory jack. 3. Tighten the screw on the plug. To remove accessories, loosen the screw. Caution: When you are using an external accessory, waterproof performance of the radio may get affected.
-
Page 15: Status Indication
Status Indication LCD Icon Status Icon Icon Name Icon Radio Status No signal RSSI More bars indicate better signal strength New message/unread message Message Icon InBox is full Scanning is in progress Scanning pauses on a non-priority channel Scan Icon Scanning pauses on Priority Channel 1 Scanning pauses on Priority Channel 2 Low TX power for the current channel... -
Page 16: Led Indicator
The GPS feature is active, but no valid GPS data is received Scrambler/Encrypt The Scrambler/Encrypt feature is active Icon Note: The description related to the GPS feature in this manual is applicable to PD78XG only. Operation Mode Icon Icon Name Icon Operation Mode Direct... -
Page 17: Basic Operations
Basic Operations Turning the Radio On/Off Rotate the Radio On-Off/Volume Control knob clockwise/counter-clockwise until a click is heard to turn the radio on/off. Adjusting the Volume After turning the radio on, rotate the Radio On-Off/Volume Control knob clockwise to increase the call volume, or counter-clockwise to decrease it. - Page 18 following methods are available for you to lock or unlock the keypad: 1. Through key combination Use “OK+ ” to lock or unlock the keypad. 2. Through the function key Press the programmed Keypad Lock key to lock or unlock the keypad. 3.
-
Page 19: Call
Call To ensure an optimal volume of the receiving radio, hold the radio approximately 2.5 to 5 centimeters away from your mouth. Private Call Transmitting a Private Call You may transmit a Private Call through any of the following methods. When transmitting a Private Call, the icon will appear. -
Page 20: All Call
icon will appear. Transmitting a call to the preset contact In the home screen, hold down the PTT key to transmit a Group Call to the Group Call contact preset for the current channel. Transmitting a call through Contact List (1)... -
Page 21: Menu Navigation
Menu Navigation Main Menu Contact To access this item, press the Menu key in the home screen and then select “Contact”. Contact List You can save up to 200 entries in the list. To access this item, select “Contact -> Contact List” or press the shortcut key for Contact List. -
Page 22: Message
You can add a Private Call contact to the contact list. The number and alias of each contact must be unique, and the available number range is 1-16776415. Manual Dial You can manually input the Private Call number for calling. Message To access this item, press the Menu key in the home screen and then select “Message”, or press the shortcut key for Message directly. -
Page 23: Call Logs
and Delete. To delete all messages in the OutBox, select “Message -> OutBox -> Delete All”. Drafts The Drafts can save up to 20 draft messages. When the Drafts is full, the earliest message will be overwritten by the latest one automatically. For each message, you can choose to perform any of these operations: Send, Save and Delete. -
Page 24: Zone
Scan On/Off The Scan feature allows you to listen to communication activities on other channels so that you can keep a close track of your team members. This option is used to enable or disable the function. Scan List You can request your dealer to create a scan list for each channel. Each list may contain 32 channels at most (either digital channel or analog channel is OK). -
Page 25: Settings
Settings To access this item, press the Menu key in the home screen and then select “Settings”. Radio Set You can optimize your radio performance by customizing related parameters according to actual needs and your preferences. Power Level This option allows you to set TX power level. Alternatively, you can change the power level by pressing the shortcut key for Adjust Power Level in the home screen. - Page 26 Backlight To set the backlight parameters. There are three options available: On, Off and Timer. The timer is programmed by your dealer, with an available range of 5-60 seconds. Brightness To set the display brightness. You can raise or lower it using the Up/Down key. Keypad Lock To set whether to enable this function.
-
Page 27: Accessories
Accessories To access this item, press the Menu key in the home screen and then select “Accessories”. Position With this option, you can view longitude, latitude, time, date, speed, altitude and SA (satellite) information of your radio. GPS Text Msg If the GPS feature is enabled via the programming software, you can send the GPS text message to your desired contact. -
Page 28: Functions And Operations
Functions and Operations Home Screen The feature allows you to quickly return to the previous menu or the home screen. Operation: In the editing screen, press the programmed Home Screen key, and the radio exits the screen and returns to the previous menu immediately; in other screens, press the key, and the radio returns to the home screen immediately. -
Page 29: Talk Around
Talk Around You can continue to communicate in DM mode by pressing the programmed Talk Around key, when your repeater malfunctions, or when your radio is out of the repeater’s range but within talking range of other radios. Operation: Press the programmed Talk Around key to switch between DM mode and RM mode. Monitor To adjust match conditions for signal receiving, you can enable the feature “Monitor”. - Page 30 The Emergency process has the highest priority. You can make emergency operation even when your radio is transmitting or receiving. To enable the feature on a channel, an emergency system must be assigned to the channel via the programming software. In addition, the Emergency type, Emergency ID type and Emergency mode are settable via the programming software.
- Page 31 Your radio supports three Emergency modes. You can select one of them via your dealer (Note: For the following operation methods, we take the “Regular” type as an example). Emergency Mode Description In this mode, you can send alarm information to your Alarm companion or control center by pressing the programmed Emergency key, but you cannot talk with them.
- Page 32 Operation: Press the programmed Emergency key to send alarm information. The radio displays the icon and text information “Sending Alarm”, with red LED glowing. (None: If “Local Emergency Alarm” is enabled via the programming software, an alarm tone will sound.) When the icon appears, you can speak into the microphone to make an emergency call.
-
Page 33: Battery Power Indicator
And when a call is received, the icon appears. To exit the Emergency mode, long press the programmed Emergency key. Note: Your dealer may set the number of alarm cycles and alarm duration (None), number of polite retries and impolite retries (HDC1200), number of voice cycles, duration of each transmission and TX interval. -
Page 34: Man Down (Optional)
Green LED glows. High Orange LED glows. Medium Red LED glows. Red LED glows and the low Insufficient battery alert sounds. Man Down (optional) With this feature, your radio will alarm automatically to summon help from your companion if it is positioned aslant for a certain time period. -
Page 35: Busy Channel Lockout
If the Scrambler/Encrypt feature is enabled for a channel via the programming software, switch to the channel to enable the feature, or exit the channel to disable the feature. Busy Channel Lockout If enabled via the programming software, this feature can prevent your radio interfering with other transmitting radios on the same channel. -
Page 36: Signaling Introduction
Signaling Introduction The radio supports the following signaling. You can ask your dealer to make appropriate settings on your radio. For detailed information, please contact your dealer. HDC1200 The HDC1200 signaling is compatible with the MDC1200 signaling, and realizes functions such as PTT ID (Encoding &... -
Page 37: Troubleshooting
Troubleshooting Phenomena Analysis Solution The battery may be Remove the battery and improperly installed. attach it again. Recharge or replace the The battery may run out. battery. The radio can not Clean the battery contacts. If be powered on. The battery may suffer from the problem can not be solved, poor contact caused by dirtied contact your dealer or... - Page 38 You may be too far away from Move towards other members. the group members. You may be interrupted by Change the frequency, or Irrelevant radios using the same adjust the squelch level. communication or frequency. noise is heard on Set signaling for all member The radio may be set with no the channel.
-
Page 39: Care And Cleaning
Care and Cleaning To guarantee optimal performance as well as a long service life of the product, please follow the tips below. Product Care Do not pierce or scrape the product with any edged instruments or hard objects. Keep the product far away from substances that can corrode the circuit. Do not hold the product by its antenna or earpiece cable directly. -
Page 40: Optional Accessories
3-Wire Surveillance Earpiece with Six-unit Switching Power (leather) (swivel) LCY003 Transparent Acoustic Tube (beige) PS7002 EAN17 Caution: Use the accessories specified by Hytera only. If not, Hytera shall not be liable for any losses or damages arising out of use of unauthorized accessories. -
Page 41: Appendix
Appendix Input Method You can enter aliases, numbers or messages using the keypad. The radio supports the following input methods: Chinese Pinyin (simplified), English and Number. Simplified Chinese Pinyin Operation: 1. Press to switch to Chinese Pinyin mode; 2. Enter the pinyin through alphanumeric keys; then a list of possible combinations and corresponding characters will appear;... - Page 42 Note: You can use the Up/Down key to move the cursor leftward/rightward in the entered text.
Need help?
Do you have a question about the PD78X and is the answer not in the manual?
Questions and answers