
Related Manuals for Nevco MPC-7X2


Summary of Contents for Nevco MPC-7X2
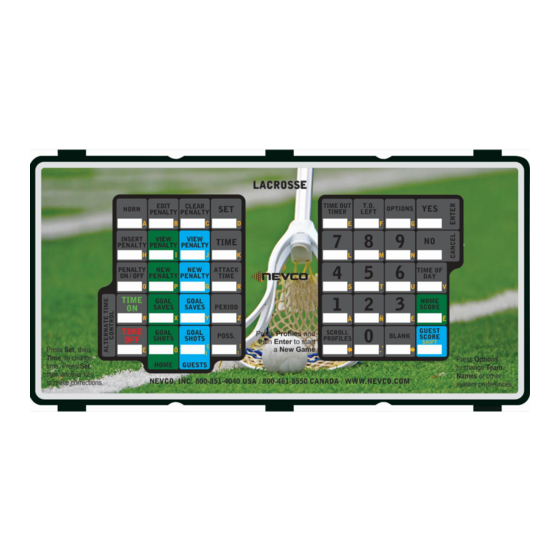
- Page 1 Scoreboard Operator’s Instructions MPC-7X2 Control Some features on the keyboard overlay may not be included on the particular model being operated. Since 1934 3/4/2019 135-0217RD...
- Page 2 LACROSSE Thank You Thank You for choosing NEVCO. We appreciate your business. The following instructions will help you become familiar with the operation and features of the scoreboard system. Please take a few minutes to study this manual, and to practice with the control.
- Page 3 Figure 1 – MPC Control (front view) MPC Control Can operate scoreboards for a wide range of sports and features. Power Supply 9 V DC (included with the control) Overlay Fits on top of control to label the keys (included with system) A TCS-7 time control switch is included with each control.
- Page 4 Figure 2 – MPC Control (rear view) Universal – to change sports, change the Overlay and enter the new Model Code. MPC Control Power Supply 9 V DC (included with control) Overlay For the sports used with the scoreboard Coiled Cord Stretches to over 4 ft.
-
Page 5: Table Of Contents
TABLE OF CONTENTS SETUP ............................1 ..........................1 PORT ..........................2 IRELESS ........................ 3 REATING A ROFILE START UP ..........................4 ..........................4 QUICK START GUIDE ......................5 KEYBOARD FUNCTION ......................7 TIME FUNCTION ........................8 STANDARD TIME FUNCTIONS ..................... 8 TIME CONTROLS ........................ - Page 6 To Set Time Outs Left ....................... 19 NEXT POSSESSION ......................19 Setting Next Possession ..................... 19 LACROSSE OPTIONS ......................20 ..........................20 ENALTIES OPTIONS..........................22 OPTIONS ....................22 MENU AVIGATION OPTIONS key ........................22 YES key..........................22 NO/CANCEL key ......................22 BRIGHTNESS ........................
- Page 7 Load Profile ........................38 Save Profile ........................39 Default Lock ........................39 Backup / Restore ....................... 39...
-
Page 8: Setup
SETUP Upon first power up of the MPC-7X2 control the control is configured to operate with a x6xx scoreboard as a lacrosse control. New Sport New sport changes the MPC-7X2’s input and output to operate a new sport. New sport settings are set with the last profile loaded or saved in that sport. -
Page 9: Wireless
Wireless The MPC-7X2 can operate one or more selectable wireless receivers depending on the customer’s need. The receivers can be linked or unlinked depending on the operational requirements at game time. It is strongly recommended to save wireless settings in each profile used. -
Page 10: Creating A Profile
If the wrong profile is entered press NO/CANCEL and begin again 1-MY PROFILE_ 5. Press MPC-7X2 will save profile and will display. 1-MY PROFILE 6. Press to verify profile, MPC-7X2 will display. For more information about profiles refer to the OPTIONS section of this manual. -
Page 11: Start Up
START UP New Game Scroll Profiles changes the MPC-7X2’s input and output to operate a new game or sport. Profiles settings are set with the last profile loaded or saved in that sport. To start a new game or sport:... -
Page 12: Quick Start Guide
QUICK START GUIDE With the scoreboard on and the control on the main time screen you are ready to set the time for the first period of play. Main Time Screen: 00:00.0▼ Per:1 Current Time Time Direction Period Set the play clock to 20 minutes Press Time: MM:SS.s◄... -
Page 14: Keyboard Function
NO key Use to cancel an operation, reset changes in the process of making them, exit a sub-option menu, and to send the MPC-7X2 back to the screen that displays the name of the sport being played. SET key Use ahead of a function key to directly enter a value, set times, and correct errors. -
Page 15: Time Function
3. Time Out – Time Out consists of 5 settable timers used to time a time out. 4. Attack Time – Time limit to cross midfield 5. Time Of Day – The MPC-7X2 will keep track of time of day TIME CONTROLS The standard keys used for time control. -
Page 16: Attack Time Key
ATTACK TIME Key Press SET, then press ATTACK TIME to set the time limit to cross midfield. TIME OF DAY Key Press TIME OF DAY to verify the time set within the control and display the time on the scoreboard. MAIN TIME ... -
Page 17: Period
2. Press the number corresponding to the Period 3. The Period will be set and the MPC-7X2 will then navigate to the main time screen TIME OUT Time out is functionally a set of timers used to organize time outs in a game. -
Page 18: To Start A Time Out
There may be a desire to skip to the warning time and/or conclude the time out early. To do this while the time is counting: Time2: First, to use this function the MPC-7X2 displaying the time out timer screen 01:59.0 To reenter the time out screen press the TIME OUT TIMER key. -
Page 19: Time Of Day
TIME OF DAY When Time Of Day is set the MPC-7X2 will keep track of Time of Day: Time Of Day can function with the 12 and 24 hour clock A press of TIME OF DAY will display time of day on the scoreboard in the main time place ... -
Page 20: In-Game Stats
2. The “+” indicates the MPC-7X2 is in add mode. The side the “+” is on is what side is being added to. 3. The “◄” or the “►” indicates the MPC-7X2 is in set mode. The side the “◄” or the “►” is on is what side is being set. -
Page 21: Score
SCORE Press HOME SCORE to enter the home score ADD mode Score The control will display Press GUEST SCORE to enter the guest score ADD mode. Score The control will display Adding to Score 1. Press Score Score 2. The control will display 3. -
Page 22: View Penalty
VIEW PENALTY Press Home VIEW PENALTY to view and scroll through home penalties. 00.00.0 The MPC-7X2 will display Press Guests VIEW PENALTY to view and scroll through guests penalties. 00.00.0 The MPC-7X2 will display NEW PENALTY Press HOME NEW PENALTY to enter new penalties to home... -
Page 23: Goal Saves
GOAL SAVES Press HOME GOAL SAVES to enter home goal saves ADD mode Saves The control will display Press GUESTS GOAL SAVES to enter guest goal saves ADD mode Saves The control will display Adding to Goal Saves 1. Press Saves Saves +## 2. -
Page 24: Adding To Goal Shots
Adding to Goal Shots 1. Press ##+ Shots Shots +## 2. The control will display 3. Enter any value 0-9 and it will add that value to the value with the “+”. Setting Goal Shots 1. Press then Shots Shots ►... -
Page 25: Penalty On/Off
PENALTY ON/OFF Press PENALTY ON/OFF to pause the penalty timer, then press Penalty On/Off again to start the penalty timer where it left off at. This would be used to pause the time for the penalties but keep the main time running. For example, this option would be used in a park &... -
Page 26: Time Outs Left
TIME OUTS LEFT Press Home T.O. LEFT H#◄ T.O. Left The MPC-7X2 will display Press Guests T.O. LEFT T.O. Left ►#G The MPC-7X2 will display To Set Time Outs Left Press H#◄ T.O. Left T.O. Left ►#G The control will display... -
Page 27: Lacrosse Options
Penalty Add On- This is enabled if a penalty add on board has been added to the scoreboard Default- Allows a default penalty time to be entered Penalties Press OPTIONS until the MPC-7X2 display reads Press YES to enter penalties menu Press OPTIONS again to scroll through the penalties menu Enable Button The first selection in the penalties menu is Enable Button. - Page 28 Penalty Add On If there is a penalty timer add on board that has been added to a scoreboard, then this option must be enabled for the scoreboard to correctly display the penalties. It is highly recommended to create or add this setting to a profile.
-
Page 29: Options
OPTIONS The OPTIONS menu consists of game settings and added features useable during a game or practice. The OPTIONS are set into 13 possible selections: 1. Brightness 6. Segment Timer 11. Wireless 2. Team Names 7. Time Out Timer 12. Scoreboard Model 3. -
Page 30: Brightness
To toggle between High or Low scoreboard brightness TEAM NAMES The team names option works with the Electronic Team Names (ETN) package in a Nevco scoreboard system. Using this system can replace the usual vinyl HOME and GUESTS with an LED display used for displaying the team names. -
Page 31: Backspace
Backspace key is used as a backspace button while entering team names Space key is used as a space during while entering team names Shift Key Default: uppercase letter state press “ ”: Changes to lowercase letters press “#”: Changes from letter entry to number entry press “... -
Page 32: Main Time
When “Disable .1” is selected, then main time will always display as MM:SS. (M for minutes, S for seconds, and T for tenth of seconds.) Press OPTIONS until the MPC-7X2 display reads Main Time Press to enter main time menu Changing the Direction of Main Time 1. -
Page 33: Aux Time
5. Style – Aux time can be entered in hour/minute format or minute/second format. To get to Aux Time options: Aux Time >> Press OPTIONS until the MPC-7X2 display reads Press to enter aux time menu Setting Aux Time Within Aux Time menu: 1. -
Page 34: Changing Direction Of Aux Time
Time Switch: The * represents enabled Setting Aux Stop Time Within Aux Time menu: 1. Press until the MPC-7X2 display reads Stop Time. Stop Time:00:00 If Aux Stop Time has never been set before display will read Stop Time:MM:SS◄ 2. Press to begin editing Aux Stop time 3. -
Page 35: Segment Timer
Once the time has expired, a new segment is entered and the drill changes. The segment timer will count down from the programmed segment time to zero. The MPC-7X2 segment timer function has a maximum of 20 segments. -
Page 36: Practice Timer
Segments can be set to automatically begin if required or to begin upon pressing the TIME ON key on the MPC-7X2 by toggling the auto advance function in the edit segment menu. Segment end can be signaled by the sounding of the horn or not by setting the Auto Horn function in the edit segment menu. Here is an... -
Page 37: Enable Or Disable
Enable or Disable 1. Press after entry in the segment timer menu until display shows Enable 2. Press to enable or disable segment timer function Enable Note: The “*” means that it is Enabled Display on Scoreboard 1. Press after entry in the segment timer menu until display shows Disp On Board 2. - Page 38 Toggling Auto Horn Seg: # Auto Hrn Press after entry in the edit segment timer menu until display shows Seg: # Auto Hrn* Press to toggle the auto horn function in the selected segment a. The “*” represents Auto Horn is enabled Toggling Auto Advance 1.
-
Page 39: Time Out Timer
MPC-7X2 display shows The number next to it is the current time out to be edited Time#: ##:##.# 2. Press until the MPC-7X2 display shows the desired time out to be edited 3. Press to go back to editing that time out... -
Page 40: Swap Home And Guest
This function does just as it says. All Home and Guests values switch places on the display and in the control’s display. Home and Guests team names switch if the scoreboard has electronic team names. Note: Home and Guest keys do not swap on the MPC-7X2 Press after entry in the segment timer menu until display shows Swap Home&Guest... -
Page 41: Horn Settings
285 Hz Tone = 8 303 Hz Tone = 9 385 Hz Press OPTIONS until the MPC-7X2 display reads Horn Settings >> Volume: # To enter the Horn Settings menu Horn Volume Adjusting the horn volume affects all 5 different horns. To adjust the horn volume: Volume: # 1. -
Page 42: Horn Key Tone
WIRELESS The Wireless options are to link receivers, add receivers, and delete receivers from the control. To set the wireless options: Press OPTIONS until the MPC-7X2 display reads Wireless >> Link Receiver Press YES to enter the Wireless Options menu... -
Page 43: Add Receiver
The MPC-7X2 allows the user to choose which wireless receivers to use during operation. The receivers used default to being linked this setting allows one to toggle the use of each receiver added to the MPC-7X2. To link or unlink a receiver: 1. -
Page 44: Delete Receiver
Delete Receiver The MPC-7X2 stores added receivers it uses in memory. If it is necessary to delete a receiver because it is no longer in use, defective, etc the Delete Receiver menu is used. Warning: Deleted receivers are deleted from the control as a whole. To make a receiver not operate in certain circumstance refer to the “Link Receiver”... -
Page 45: Profiles
A Profile retains all settings within the control for future use. A large amount of our customers may only need the default profile for each sport in the MPC-7X2 for the entirety of its use. The New Game key will access the last profile saved or loaded within each sport and there is no need to create multiple unique profiles. - Page 46 4. If the profile displaying is not the required profile then enter the two digit number of the profile required. If it is a single digit enter the number and press YES to load The MPC-7X2 will then begin the process of loading a profile. The MPC-7X2 beeper will sound while saving.
- Page 47 The Horn goes off when turning on Go to Options > Model and select the the control after transferring it from The Model is not set correctly correct Scoreboard Model another scoreboard. If the problem persists please contact the Nevco Service Department. 800-851-4040...
- Page 48 GLOSSARY ALTERNATE TIME CONTROL SWITCHES (keys): Located on the keypad, these 2 keys, TIME ON and TIME OFF, may be used instead of the Hand Held Time Control Switch. NOTE: These 2 keys are inactive while the Hand Held Time Control Switch is plugged in. To enable them, turn the control off, unplug the Hand Held Switch and restart the control.
- Page 49 A flat plastic panel that fits over and around the keys on the control. Tabs at the top and bottom hold it in place. Each overlay provides the proper labeling for each key, Nevco contact information, and the sport name. When you want to change to a different sport, install the correct overlay and enter the sport name on the new sport screen.
- Page 50 Appendix (Profile Chart) Profile ______________ Sport _______________ Profile ______________ Sport _______________ Profile ______________ Sport _______________ Profile ______________ Sport _______________ Profile ______________ Sport _______________...
- Page 51 Guests place on a standard scoreboard The horn keeps randomly Go to Interval horn in the options menu, Interval horn is enabled sounding. (Hockey) and turn off the Interval Enable option. If the problem persists please contact the Nevco Service Department 800-851-4040...
- Page 52 Appendix (Segment Timer) Segment Timer Project _______________ Profile _______________ Segment # Duration Drill...
Need help?
Do you have a question about the MPC-7X2 and is the answer not in the manual?
Questions and answers