
Related Manuals for Nevco 9560


Summary of Contents for Nevco 9560
- Page 1 Scoreboard Operator’s Instructions MPC Control Some features on the keyboard overlay may not be included on the particular model being operated. Since 1934 Retain this manual in your permanent files 5/14/2019 135-0123...
- Page 2 9660 Thank You Thank You for choosing NEVCO. We appreciate your business. The following instructions will help you become familiar with the operation and features of the scoreboard system. Please take a few minutes to study this manual, and to practice with the control.
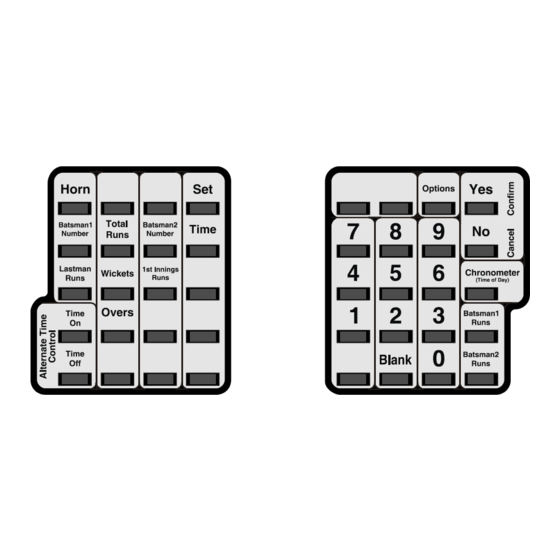
- Page 3 Figure 1 – MPC Control (front view) MPC Control Can operate scoreboards for a wide range of sports and features. Power Supply 9 V DC (included with the control) Overlay Fits on top of control to label the keys (included with system) A TCS-5 time control switch is included with each control.
- Page 4 Figure 2 – MPC Control (rear view) MPC Control Universal – to change sports, change the Overlay and enter the new Model Code. Power Supply 9 V DC (included with control) Overlay For your scoreboard model (included with system) Coiled Cord Stretches to over 4 ft.
-
Page 5: Table Of Contents
TABLE OF CONTENTS START UP PROCEDURE ......................1 START WHERE TURNED OFF LAST? ..................1 GO TO A BOOKMARK?....................... 1 ENTER YOUR MODEL CODE ....................1 QUICK START GUIDE ........................ 3 KEYBOARD FUNCTIONS ......................4 OPTIONS ............................7 ........................7 PTIONS HART ...................... -
Page 6: Start Up Procedure
START UP PROCEDURE When you turn the control on, the traveling display prompts you to “START WHERE TURNED OFF LAST?”, “GO TO A BOOKMARK?”, or “ENTER YOUR MODEL CODE”. Answer YES, NO, or enter the 3 character model code on the overlay. - Page 7 If you answer [ SELECT A GROUP ] The control will prompt then display the first group that is set up in the control. To see the next group name, press NO. When the desired group name is being displayed press YES.
-
Page 8: Quick Start Guide
QUICK START GUIDE [ * READY * ] With the scoreboard on, and the control showing You are ready for the game to begin. The Total Runs, Batsman 1 Runs, Batsman 2 Runs, Lastman Runs, 1 Innings Runs, Wickets, and Overs are all additive; just press the function key first, then the number to increment by. -
Page 9: Keyboard Functions
KEYBOARD FUNCTIONS Use the key to respond to questions and to confirm data input. Use the key to respond to questions and to cancel an operation. Use the key ahead of a function key to initiate the direct entry mode or to change the settings in OPTIONS, CHRONOMETER, and TIME OUT TIMER, or to set the TIME, and other features. - Page 10 CHRONOMETER Pressing the key will cause the Time of Day to be displayed on the control. Chronometer (Time of Day) SET, then CHRONOMETER Pressing will enter the set up mode. The questions asked will depend on your system and its current configuration. NOTE: Some scoreboard models do not support all settings or options.
- Page 11 Press Batsman 1 Number to display the uniform number for Batsman 1. Batsman 1 Number [__BATSMAN1____45__] The control might display When another player takes over the position of Batsman1, simply enter his uniform number, or press NO or YES or another function key to abort and leave the number unchanged. Batsman 2 Note: Any number from 0 to 99 may be entered.
-
Page 12: Options
OPTIONS Many options are available for modifying the way the scoreboard system works. The questions the control will ask and their order depends on the current system and settings. Pressing the OPTIONS key starts a scrolling report of the current system settings. This report will continue to repeat until a key is pressed. To change a setting, press SET OPTIONS and use the YES (confirm) and NO (cancel) keys to work your way through a series of questions that is based on your system and available options. -
Page 13: The Set Options Menu
The Set Options Menu DO YOU HAVE AN AUXILIARY TIME DISPLAY CONNECTED? The control will need to know if an auxiliary time display is connected as part of your system. The Auxiliary Time Display is used to display time (Main Time, Auxiliary Time or Time of Day)..Auxiliary Time Display models include: 9410, 9510, 9405 and 9505. - Page 14 SET A BOOKMARK? A bookmark is like a picture or snapshot of all the data and configuration settings in the control. When you go to a bookmark, the control is restored to where it was at the time the bookmark was saved. Bookmarks can be edited by going to the bookmark, making the changes needed, then saving the bookmark again using the same bookmark number or a different one.
-
Page 15: Troubleshooting Chart
Requires MPC-6 Rev. R3.1 or later or message “MODEL CODE IS INVALID”. MPCW-6 Rev. R3.1 or later. Contact NEVCO for a new control or a Use model code 301 to check revision revision update. number. If the problem persists please contact the Nevco Service Department. 800-851-4040... -
Page 16: Glossary
GLOSSARY ALTERNATE TIME CONTROL SWITCHES (keys): Located on the keypad, these 2 keys, TIME ON and TIME OFF, may be used instead of the Hand Held Time Control Switch. NOTE: These 2 keys are inactive while the Hand Held Time Control Switch is plugged in. To enable them, turn the control off, unplug the Hand Held Switch and restart the control. - Page 17 HAND HELD TIME CONTROL SWITCH: A hand held switch with a coiled cord that plugs into either side of the control. When connected, the alternate time control switches (keys) are disabled. (Makes it easier for another person to control the main time or sound the horn). INTERVAL HORN: A horn that sounds repeatedly at preset intervals throughout the game.
-
Page 18: My Bookmark Program Chart
My Bookmark Program Chart Bookmark # 1 Model Code _______________ Bookmark # 2 Model Code _______________ Bookmark # 3 Model Code _______________ Bookmark # 4 Model Code _______________ Bookmark # 5 Model Code _______________... - Page 19 Appendix ( Chronometer (Time of Day) A CHRONOMETER (Time of Day Clock) is built into the control Once set, it will maintain its accuracy even while the control is turned off or disconnected from power. During normal operation the Time of Day can be recalled to the display on the control by pressing a single key, the Chronometer key.
-
Page 20: Appendix (Chronometer)
Appendix Chronometer TURN CONTROL OFF BUT LEAVE CHRONOMETER TIME DISPLAYED? (Allows the control to be turned off, disconnected, and stored away in a safe location, while the scoreboard or auxiliary time display, or both, continues to display a running “time of day” clock.) DISPLAY CHRONOMETER TIME ON ALL DISPLAYS? (Scoreboard(s) and auxiliary time display(s)) -
Page 21: Example
Appendix Chronometer EXAMPLE To Set The Chronometer: A. Set the Chronometer to 12:00:00 Do The Following Steps: Press SET --- then CHRONOMETER. DO YOU HAVE AN AUXILIARY TIME DISPLAY The control will ask --- CONNECTED? --- (Answer this question appropriately.) NOTE: This question is asked only once for each time the control is started fresh by entering a model code.
Need help?
Do you have a question about the 9560 and is the answer not in the manual?
Questions and answers