Table of Contents
Advertisement
Quick Links
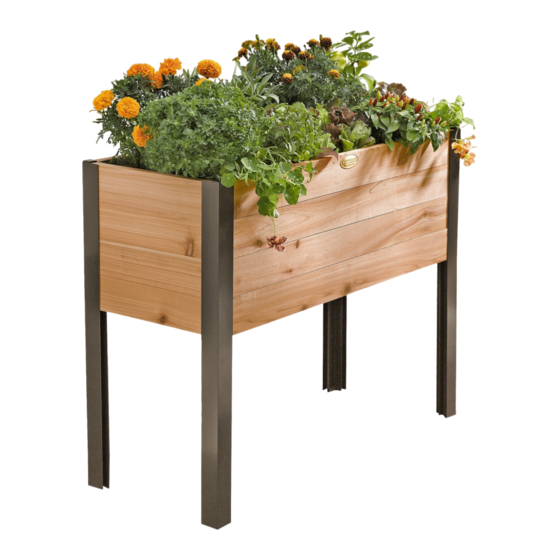
The Standing Garden lets you garden without bending or kneeling. The rot-resistant cedar bed contains a self-watering tray with a
4-gallon reservoir. The planter is 10-
Parts Included
(2) End Panels with attached Reservoir Braces and Legs
(8) Long Cedar Boards
(1) Water Reservoir with Capillary Strip and Water Level Indicator
(2) Long Reservoir Braces
(16) Phillips Screws
(8) Corner Caps/Soil Plugs
Tools Needed
Phillips screwdriver or screw gun with Phillips bit
Rubber mallet or hammer
Assembly
Step 1. Identifiy and organize all parts on a clean, level surface.
Step 2. Lay one End Panel with aluminum legs on the ground with the open
channels in the aluminum facing up.
Step 3. With the rough side of the Cedar Boards facing in, slide or tap four
boards into the left aluminum channel as shown in Figure 1. Make sure the
top board is flush with the top of the channel and all edges of the boards
are flush inside the channel. Secure the boards by inserting the screws through the pre-drilled
holes in the legs, except for the bottom hole. NOTE: Leave the bottom hole free for attaching the
Reservoir Brace in a later step.
Step 4. Repeat Step 3 to attach the four remaining Cedar Boards to the right side aluminum channel.
Step 5. Insert the Cedar Boards into the open channels of the other End Panel and fasten with screws, following Step 3.
Step 6. Connect a Long Reservoir Brace to the Legs at all four corners, using the Phillips screws. Set the Brace with the lip facing up,
(the same position as the Short Brace shown in Figure 2). Insert a screw through the Reservoir Brace and bottom predilled hole on
the Aluminum Leg (Figure 2). The Braces act as a shelf to hold the Water Reservoir securely.
Figure 1
Cedar Boards inserted into open channel
(rough side facing in)
8586751
Standing Garden
" deep and holds 100 quarts or five 20-qt. bags of our Self-Watering Potting Mix.
1/2
Screws inserted into
predrilled holes in channel
End Panel with
attached Platform
Supports and Legs
Figure 2
End Panel
Short
Reservoir
Brace
Aluminum Leg
Cedar Boards
Long Reservoir
Brace
over please
0220S Rev 08/16
Advertisement
Table of Contents

Subscribe to Our Youtube Channel
Related Manuals for Gardener's 8586751


Summary of Contents for Gardener's 8586751
- Page 1 Screws inserted into predrilled holes in channel Aluminum Leg End Panel with attached Platform Supports and Legs Cedar Boards Short Reservoir Brace Long Reservoir Brace Cedar Boards inserted into open channel (rough side facing in) over please 8586751 0220S Rev 08/16...
- Page 2 NOTE: If you have the optional Casters, now is the time to insert them into the bottom of the legs. Figure 3 Turn the assembled garden upside down. Place the Caster Inserts into the four legs and tap into place with a rubber mallet.
Need help?
Do you have a question about the 8586751 and is the answer not in the manual?
Questions and answers