JAGER PRO M.I.N.E Operation Manual
Hide thumbs
Also See for M.I.N.E:
- Operation manual (26 pages) ,
- Operator's manual (25 pages) ,
- Operation manual (23 pages)
Table of Contents
Advertisement
Quick Links
Advertisement
Table of Contents

Related Manuals for JAGER PRO M.I.N.E


Summary of Contents for JAGER PRO M.I.N.E
- Page 1 Australian Version 1.2...
-
Page 2: About Feraltech
We are the exclusive importer and distributor of the JAGER PRO line of trapping products in Australia and New Zealand. Having worked closely with people on the land and those charged with managing and caring for environmental lands we were hearing more and more of the devastation that feral animals were having on the lively hood and the environment. -
Page 3: Warranty
In no event will JAGER PRO, LLC be liable to you, or any third party, for any damages in excess of the purchase price of the product. -
Page 4: Table Of Contents
CAMERA CHARACTERISTICS ....................6 QUICK START PROGRAMMING .................... 9 MAIN MENU TABS ......................10 ACTIVATING A JAGER PRO CAMERA MANAGEMENT PORTAL SUBSCRIPTION SERVICE ... 15 MOBILE APP SETUP ......................16 MANUALLY SENDING PHOTO (Test Photo) ................17 SMS COMMAND CODES ....................18 LOGIN FAIL CORRECTIVE ACTION .................. - Page 5 Thank you for choosing the JAGER PRO M.I.N.E. or JAGER PRO I.C.E. Camera. This manual will help you get the most out of your new device. You will also find this manual, other technical articles and more information about your camera at www.feraltech.com.au...
-
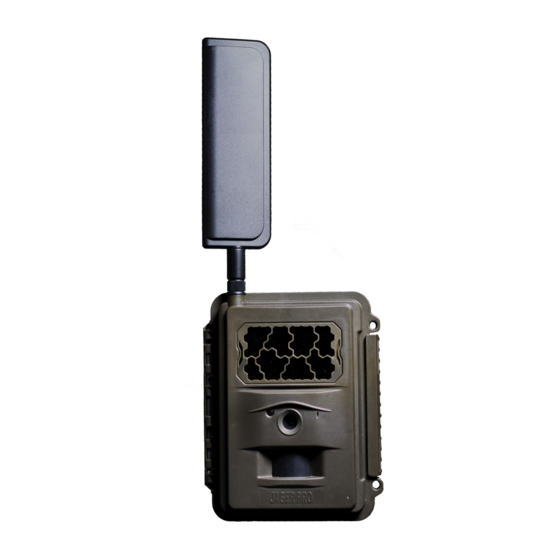
Page 6: Camera Characteristics
CAMERA CHARACTERISTICS This manual is intended to visually guide users through the individual steps to properly program, operate and maintain the 4G GSM version of the JAGER PRO M.I.N.E.™ and JAGER PRO I.C.E.™ Cameras. Antenna: Standard antenna shown receives cell tower signals. Several high gain booster antennae are available as an accessory for operation in low signal areas. - Page 7 BOTTOM OF THE CAMERA FEATURES DC Port Plug: Waterproof seal to protect internal components when external battery (optional equipment) is not in use. Mounting Port: 1/4 x 20 internal threads for securing camera to a variety of different type of cameras mounts.
- Page 8 OK Button: Selects the highlighted item. 10. USB Port: Standard USB cable connection interface to transfer information between the camera and a computer. 11. Del Button: Deletes unwanted pictures, numbers, and letters. 12. Playback Button: Allows user to view pictures on SD card.
-
Page 9: Quick Start Programming
QUICK START PROGRAMMING Begin programming the M.I.N.E.™ or I.C.E. Camera for operation by removing the protective red or yellow cap from the antenna jack and installing the standard antenna. Ensure the black rubber O-ring is not removed from the antenna jack threads. Twist the antenna base snug but do not over tighten. -
Page 10: Main Menu Tabs
MAIN MENU TABS Press the MENU button to access the program display. There are four main menu tabs: CAMERA, TRIGGER, SYSTEM and WIRELESS. Press the left or right buttons to change tabs. Press the up or down buttons to cycle through the submenu settings of the highlighted green tab. Press left or right to select items with green highlights to edit and view choices. - Page 11 TRIGGER TAB SETTING ITEMS DESCRIPTION Trigger Sensitivity/PIR OFF (time lapse only, not PIR triggered) Low (temps below -12.2 Normal (-12.2 C – 27 High (temps above 27 The timeout period between PIR triggers for each photo or Trigger Interval video capture. We recommend a one (1) minute trigger interval.
- Page 12 Work Day Allows you to select the days of the week the camera is active, (i.e. active on weekdays and off on the weekend). SYSTEM TAB SETTING ITEMS DESCRIPTION SYSTEM Clock Enter correct Date and Time (NB: Date is in Australian format).
- Page 13 The default password is 000000. Choose OFF to stop this function and ON to set a six-digit password. If you lose the password, you must send it to JAGER PRO in America to reset it. Beep The default is ON. Choose OFF to silence keypad when making selections.
- Page 14 ON regardless of the method of how the message is being sent. Menu available Premium – The camera utilises the JAGER PRO Camera Send via with Premium Management Portal and mobile app to transmit images, Option which requires an annual subscription to be taken out.
-
Page 15: Activating A Jager Pro Camera Management Portal Subscription Service
Download the JAGER PRO app from either the Apple or Google Play Stores. After creating your portal user account, you can add a camera to your account using either the Mobile App or Portal. -
Page 16: Mobile App Setup
Click the Update button Make a note of your Account ID, the Admin Access Code and/or the Guest Access Code. On your mobile device, go to the appropriate app store and search for the “JAGER PRO Wireless Camera Mgt” app. -
Page 17: Manually Sending Photo (Test Photo)
Return to the main screen. If your phone is connected to WiFi, your pictures should appear. Click on download photos if they did not automatically download. Check the following settings and change if appropriate: From the top left menu, tap on Mobile Settings Turn “Automatically Download”... -
Page 18: Sms Command Codes
The Switch must be in the ON position and the Realtime Setting must be on for the camera to receive text commands and was previously covered under the WIRELESS menu tab. The M.I.N.E.™ Cam is able to receive text commands from up to four phone numbers to perform 29 different functions remotely. All four phone numbers have the ability to send and receive SMS commands to control the camera. -
Page 19: Pairing M.i.n.e.™ Camera Transmitter To Control Box Receiver
THE I.C.E.™ CAMERA DOES NOT UTILISE AN INTERNAL TRANSMITTER. The M.I.N.E.™ Camera has an internal transmitter on the circuit board and must be located within 45 meters of the M.I.N.E.™ Gate to operate correctly. Users must manually pair camera transmitter signal to each control box receiver the first time they are linked together. -
Page 20: Camera Deployment
Forcing external threads to the bottom will damage the camera mounting port and the camera housing. Never mount the M.I.N.E.™ Cam on the same star picket securing a trap panel or severe damage may result. Always mount the M.I.N.E.™ Cam on a separate 2.4-meter-long star picker post at least 30 to 60 centimetres outside the trap enclosure. -
Page 21: Information Strip
INFORMATION STRIP From left to right- JAGER PRO is the camera manufacturer. The “M” indicates the photo was triggered by “Motion”. The letter “S” would indicate a photo triggered by SMS code *500#. “P” would indicate a photo triggered by “Time Lapse” and “E” would indicate a manually triggered photo using the camera’s OK select button during SETUP. -
Page 22: Care & Maintenance
CARE & MAINTENANCE EXTERIOR Ensure the antenna is not loose, bent, broken or cracked. Check the black antenna grommet is in good condition and is not damaged. Check for condensation in the IR LED bank. Wipe excess dirt from camera lens with a soft cloth and use a moist cotton swab with rubbing alcohol to thoroughly clean. -
Page 23: Camera Accessories
CAMERA ACCESSORIES JAGER PRO™ and FeralTech offers several items for the M.I.N.E.™ and I.C.E.™ Cameras to increase the versatility and function of the camera. These items may be purchased online at www.feraltech.com.au. Micro Booster Antenna This 3.5 dG high gain antenna is designed for areas where mobile coverage is weak and enables users to expand the usable range of the M.I.N.E.™... -
Page 24: Camera Solar Power Kit
Camera Solar Power Kit Made by FeralTech and designed to specifically provide a long-term power solution for the Jager Pro camera range. This kit is pre-wired and ready to mount on a star picket (sold separately) and plugged in. Kit includes: 10w Solar Panel with star picket mounting bracket •... -
Page 25: Selecting A Sim Card
SELECTING A SIM CARD When selecting a SIM Card to use for your M.I.N.E. or I.C.E. camera we recommend that you either use one supplied by your corporate organisation or purchase a pre-paid SIM. We personally utilise the Pre-Paid Telstra SIM when undertaking trapping campaigns as we have found they offer the greatest mobile coverage. -
Page 26: Glossary
Scroll down to the third page. Press enter when on FW Update Select “YES” Do not turn camera off during the upload. The camera will turn off then back on which indicates that the update has been successful. Once complete proceed to g) for further instruction. Apply the Firmware Update using the Playback Button Press and hold the Playback Button, you should hear the camera make a sound. -
Page 27: Camera Specifications
CAMERA SPECIFICATIONS Picture Resolution 3MP/5MP/8MP 1080p 30fps,720p 30fps, WVGA (800*480 30fps) Video Resolution QVGA (320*240 30fps) Trigger Time 0.6s Lens FOV (Field of View) = 52 ° Night Illumination InfraRed Blackout lash (940nM) 2.0” LCD (Liquid Crystal Display) Display Screen Memory Card up to 32GB, Class 10 Trigger... -
Page 28: Sms Command Code List
Ensure the SMS Switch is set to ON and that RealTime is ON for the camera to receive text commands. The M.I.N.E.™ and I.C.E. ™ Cam is capable of receive text commands from up to four phone numbers to perform these 29 different functions remotely. All four phone numbers are ability to send and receive SMS commands to control the camera. - Page 29 • Change Camera Mode: Video *200#1# Response: Set to video mode • Check Cellular Antenna Signal *150# Response: Signal: The signal is very weak/ The signal is weak/ The signal is good/ The signal is very good • Check Battery Strength *201# Response: Battery Level 1 to 5 (low to high) •...
-
Page 30: Troubleshooting / Faq's
TROUBLESHOOTING / FAQ’s My Camera isn’t sending photos via MMS? There could be a couple of reasons that this can happen. Check the list below to work through possible issues. • One of the first things to check is the SIM. Please check that a SIM has been inserted into the camera, the SIM has both phone and data capabilities and if it is a pre-paid SIM that it has credit available. - Page 31 My camera isn’t finding the network. • The M.I.N.E. ™ and I.C.E. ™ Cameras are designed to work on the Mobile network, they will not work in areas with no mobile connection. If you are in a mobile reception area check that an activated SIM is installed in the camera.
- Page 32 JAGER PRO offers a complete line of Hog Control Products, Services & Education View their instructional video series online at: Available exclusively from FeralTech 5/30 Creek Street CROWS NEST, QLD 4355 PHONE: 1300 FeralTech (1300 337 258) EMAIL: sales@feraltech.com.au WEBSITE: www.feraltech.com.au...
Need help?
Do you have a question about the M.I.N.E and is the answer not in the manual?
Questions and answers