Matsuko SWITCH BOX Installation And Operating Manual
Hide thumbs
Also See for SWITCH BOX:
- Installation and operating manual (13 pages) ,
- Installation and operating manual (9 pages)
Table of Contents

Related Manuals for Matsuko SWITCH BOX


Summary of Contents for Matsuko SWITCH BOX
- Page 1 INSTALLATION AND OPERATING MANUAL SWITCH BOX • SWITCH BOX TIMER SWITCH BOX TIMER + PUMPGUARD WARNING: Ensure that your Matsuko Switch Box is switched off at the mains before you attempt to conduct any type of maintenance.
-
Page 2: Important Safety Information
However, in • Always isolate the unit from mains order for all of this to occur, the Switch Box electricity supply before carrying out any must be run for a minimum of 48 hours with maintenance. - Page 3 CONTENTS Introduction Dimensions & Specifications Installation 7-10 Programming (Switch Box Timer, Switch Box Timer + PG) 11-14...
-
Page 4: Switch Box
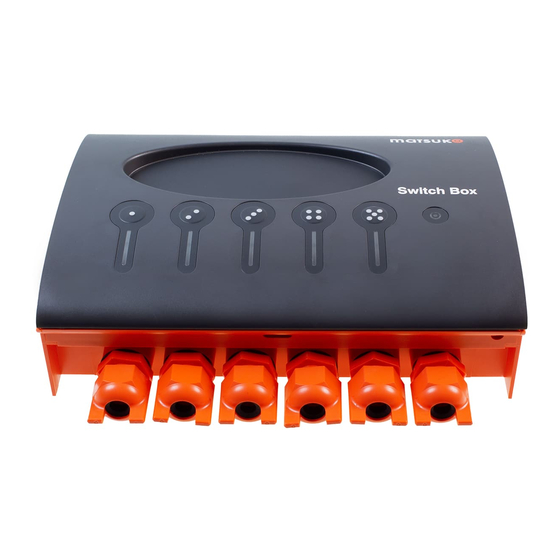
Congratulations on purchasing your Matsuko Switch Box. All Matsuko Switch Boxes are built to complement your outdoor enjoyment, giving you total control of your lifestyle. All Matsuko Switch Boxes are designed to be weatherproof, stylish, robust and safe in your outdoor environment. - Page 5 SWITCH BOX TIMER* 5 Way Programmable Switch Box - Offers 5 lines of power each delivering up to 1500 W per line. Every device that gets connected can be individually programmed to power on or off at your convenience. *NOTE:- total unit output is limited to 3000W.
- Page 6 * 1500 Watts per line when installed into the mains household electrical wiring using appropriate cable. ** A double layer capacitor stores electrical energy to remember your programs in case of a power cut for at least 24 hrs when fully charged. The Matsuko double layer capacitors need minimum 48 hours to be fully charged.
-
Page 7: Installation
INSTALLATION (PLEASE SEE SEPARATE SHEET FOR WALL MOUNT INSTRUCTIONS) WARNING: ALWAYS TURN THE SWITCH BOX POWER OFF AT THE MAINS ELECTRIC BEFORE OPENING THE COVER. ALWAYS SECURE WITH CLOSING SCREW. OPENING THE COVER To open the cover insert a small screwdriver (1) or similar implement into the round opening at the base of the cover. -
Page 8: Connecting The Cables
Power input is supplied into a separate mains channel (9). Use two screws to secure the cable grip and fix each cable into place inside the Switch Box (11). Outside the Switch Box, if using the supplied cable gland sealing ring, ensure the cable gland sealing ring is turned clockwise until the cable is firmly secured and sealed in the connector (10). - Page 9 Once you have connected all of your appliances, always secure the lid with the closing screw. There are two blanking plugs supplied with Matsuko Switch Boxes. These blanking plugs should be used to replace the cable glands if you decide not to wire a device in at any point.
- Page 10 To activate each appliance, simply press the corresponding on / off button on the front of the Switch Box, labelled: For more detailed programming instructions (for the Switch Box Timer) see page 11. TYPICAL EXAMPLE OF A COMPLETE INSTALLATION POWER...
- Page 11 The screen will display a large TICK to confirm that program slot changes have been recorded. When a line switches on, the light on the Switch Box will illuminate to show the line is on.
- Page 12 Line 1 on every Matsuko Switch Box Timer + PG is set to automatically learn how the new pump behaves when it is first connected and turned on through the timer.
- Page 13 PROGRAMMING (SWITCH BOX TIMER AND TIMER + PG) TO EDIT OR DELETE A PROGRAM SLOT Press Menu to enter the programming menu. Select the line you want to change using and Down . Press Enter . If required, use Up and Down to change the name of the device and press Enter .
- Page 14 NEW FEEDER TIMER FUNCTION (SWITCH BOX TIMER AND TIMER + PG) The new feeder timer function lets you specify the amount of time you want a feeder to operate. This can be set in minutes and seconds. Connect your feeder to line 4 or 5.
- Page 15 NOTES ....................................................................................................................................................................................................................................................
- Page 16 Tel: 01226 397383 Email: sales@matsuko.co.uk Web: www.matsuko.co.uk...
Need help?
Do you have a question about the SWITCH BOX and is the answer not in the manual?
Questions and answers