Advertisement
Quick Links
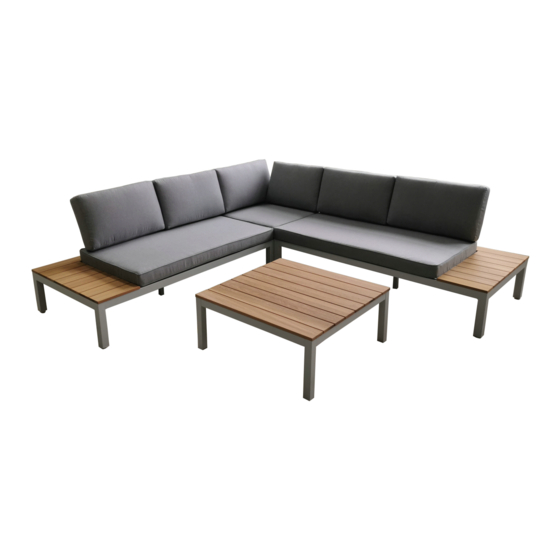
HARTINGTON
SPIRIT COLLECTION
Corner Sofa Set
Powder-coated aluminium frame
FSC teak table top
2-Seater sofa - H64 x W159.5 x D79.5cm
Corner section - H64 x W79.5 x D79.5cm
Table - H34 x L79.5 x W79.5cm
Important
Please read these instructions before using the product and retain for future use.
HHGL Limited, MK9 1BA HHGL (ROI) Limited, D02 X576
Advertisement

Related Manuals for Homebase SPIRIT HARTINGTON


Summary of Contents for Homebase SPIRIT HARTINGTON
- Page 1 HARTINGTON SPIRIT COLLECTION Corner Sofa Set Powder-coated aluminium frame FSC teak table top 2-Seater sofa - H64 x W159.5 x D79.5cm Corner section - H64 x W79.5 x D79.5cm Table - H34 x L79.5 x W79.5cm Important Please read these instructions before using the product and retain for future use. HHGL Limited, MK9 1BA HHGL (ROI) Limited, D02 X576...
- Page 2 SAFETY & CARE ADVICE Please read these instructions fully before starting assembly. • Check you have all the components and tools listed in this booklet before assembly. • Remove all fittings from their plastic bags and separate them into their groups. •...
- Page 3 COMPONENTS - FITTINGS COMPONENTS - PANELS Please check you have all fittings listed Please check you have all components below. If you have any missing or listed below. If you have any missing or damaged fittings, please contact your damaged components, please contact local store.
- Page 4 ASSEMBLY INSTRUCTIONS - Left Sofa Step 1 Turn the sofa upside down on a soft clean surface, attach middle leg (C) to the seating tube with bolts (E) and flat washers (F) using Allen key (G). Step 2 Turn the sofa over and place in desired position. Attach 2 backrest panels (A) to sofa (B) with bolts and flat washers...
- Page 5 COMPONENTS - FITTINGS COMPONENTS - PANELS Please check you have all fittings listed Please check you have all components below. If you have any missing or listed below. If you have any missing or damaged fittings, please contact your damaged components, please contact local store.
- Page 6 ASSEMBLY INSTRUCTIONS - Right Sofa Step 1 Turn the sofa upside down on a soft clean surface, attach middle leg (C) to the seating tube with bolts (E) and flat washers (F) using Allen key (G). Step 2 Turn the sofa over and place in desired position. Attach 2 backrest panels (A) to sofa (B) with bolts and flat washers...
- Page 7 COMPONENTS - FITTINGS COMPONENTS - PANELS Please check you have all fittings listed Please check you have all components below. If you have any missing or listed below. If you have any missing or damaged fittings, please contact your damaged components, please contact local store.
- Page 8 ASSEMBLY INSTRUCTIONS - Corner Seat Step 1 Attach one backrest panel (A) to the seating section of the chair (B) with bolts (C) and flat washers (D) using Allen key (E). Step 2 Attach another piece of backrest panel (A) to the seating section of the chair (B) with bolts and flat washers (D),...
- Page 9 COMPONENTS - FITTINGS COMPONENTS - PANELS Please check you have all fittings listed Please check you have all components below. If you have any missing or listed below. If you have any missing or damaged fittings, please contact your damaged components, please contact local store.
- Page 10 ASSEMBLY INSTRUCTIONS - Table Step 1 Turn table top (A) upside down on a soft clean surface, attach 4 legs (B) to the table top with bolts (C) and flat washers (D) using spanner (E). Step 2 Turn the table over and place in desired position. ASSEMBLY COMPLETE...
- Page 11 COMPONENTS - FITTINGS COMPONENTS - PANELS Please check you have all fittings listed Please check you have all components below. If you have any missing or listed below. If you have any missing or damaged fittings, please contact your damaged components, please contact local store.
- Page 12 ASSEMBLY INSTRUCTIONS Step 1 Position part (A), part (B) and part (C) ready for assembly. With brackets (D), position over the adjoining section parts. ASSEMBLY COMPLETE...
Need help?
Do you have a question about the SPIRIT HARTINGTON and is the answer not in the manual?
Questions and answers