
Related Manuals for SGS SAT942K


Summary of Contents for SGS SAT942K
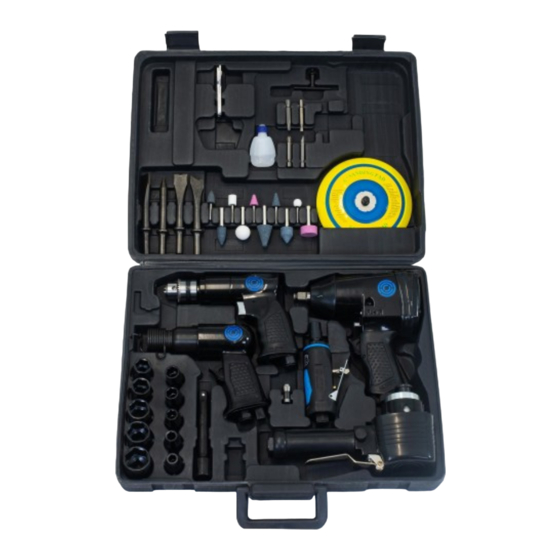
- Page 1 SAT942K AIR TOOL KIT OWNER’S MANUAL FOR YOUR SAFETY PLEASE READ THESE INSTRUCTIONS CAREFULLY AND RETAIN THEM FOR FUTURE USE.
-
Page 2: Safety Instructions
Tool attachments can become loose or Make sure that any attachments are se- break and fly apart, propelling articles at curely assembled. the operator and others in the work area. WWW.SGS-ENGINEERING.COM PAGE 2 PAGE 3... -
Page 3: Risk Of Injury
Air tools can inadvertently propel fasten- Use only parts, fasteners and accessories ers or other materials in work area. recommended by SGS Engineering. INHALATION HAZARD Keep work area clean and free of clutter. Keep children and others away from tool... -
Page 4: Risk Of Entanglement
8. Check hoses for wear before individual use. Make certain that all con- repaired before use. nections are securely fastened. Use only accessories identified by SGS En- Use of an accessory not intended for a gineering as suitable for use with specific specific tool increases the risk of injury to tools. -
Page 5: Connecting The Air Supply
The tool should be lubricated before each use with air tool oil (not in- cluded). Air tool oil is available from SGS Engineering. During continuous Connect the other end of the hose to the compressor. - Page 6 Set the air pressure at 90 PSI. (See Figure 4) Push forward the throttle lever lock and press down on the throttle lever. How far the throttle lever is pressed determines the tool rotation speed. Figure 4 Figure 5 Figure 6 Figure 7 WWW.SGS-ENGINEERING.COM PAGE 10 PAGE 11...
- Page 7 6. Push F/R valve downwards (to “R” position) and press on the trigger whenever you are releasing the drill out of the work piece. (See Figure 4 & Figure 5) Figure 4 Figure 5 Figure 6 Figure 7 WWW.SGS-ENGINEERING.COM PAGE 12 PAGE 13...
- Page 8 4. Push forward the throttle lever block and press down on the throttle lever. How far the throttle lever is pressed determines the tool rota- tion speed. (See Figure 5) Figure 4 Figure 5 Figure 6 Figure 7 WWW.SGS-ENGINEERING.COM PAGE 14 PAGE 15...
-
Page 9: Adjusting The Speed
4. Peel off the back of the self adhesive sanding sheet and stick it to the backing pad. Take care that it is positioned centrally. 5. IMPORTANT: Only use sanding sheets designed for use with this type of 150mm dia sanding pad. WWW.SGS-ENGINEERING.COM PAGE 16 PAGE 17... -
Page 10: Ec Declaration Of Conformity
SGS Engineering (UK) Ltd West Side Park Raynesway Derby, DE21 7AZ EC Declaration of Conformity This is an important document and should be retained MANUFACTURER’S NAME: SGS Engineering (UK) Ltd AIR TOOL KIT TYPE OF EQUIPMENT: SAT942K PART NUMBER: APPLICATION OF EC COUNCIL DIRECTIVES / STANDARD:...
Need help?
Do you have a question about the SAT942K and is the answer not in the manual?
Questions and answers