Advertisement
Assembly Instructions
& User's Manual
30'' Kyrie Fire Pit
FSMVPT6012
Please keep this instruction manual for future reference
Warning:
READ INSTRUCTION MANUAL BEFORE ATTEMPTING TO ASSEMBLE OR
OPERATE THIS PRODUCT.
Adult assembly required.
Keep screws and parts out of reach of children.
Customer Service: (866) 814-0585, 8:00am to 8:00pm,
Monday thru Friday Eastern Standard Time
--------------------------------------OR-------------------------------------
Customer Service: (888) 922-2336 7:00 am to 12:00 am CST (daily)
Live Chat at: www.academy.com
Email: customerservice@academy.com
(Made in China)
Advertisement
Table of Contents

Subscribe to Our Youtube Channel
Related Manuals for Mosaic FSMVPT6012


Summary of Contents for Mosaic FSMVPT6012
- Page 1 Assembly Instructions & User's Manual 30'' Kyrie Fire Pit FSMVPT6012 Please keep this instruction manual for future reference Warning: READ INSTRUCTION MANUAL BEFORE ATTEMPTING TO ASSEMBLE OR OPERATE THIS PRODUCT. Adult assembly required. Keep screws and parts out of reach of children.
-
Page 2: Table Of Contents
Table of Contents Table of Contents ................1 Warnings..................2 Parts and Hardware ................ 4 Assembly Instructions ..............Care and Maintenance............... Warranty Information................REMINDER BEFORE ASSEMBLY Verify that all parts are included with your fire pit BEFORE you begin assembly by checking the Parts and Hardware List. -
Page 3: Warnings
Warnings WARNING For Outdoor Use Only (outside any enclosure) WARNING 1. Improper installation, adjustment, alteration, service, or maintenance may result in property damage, injury or death. 2. Read the installation, operation, maintenance instructions thoroughly before installing or servicing this equipment. 3. - Page 4 Warnings DO NOT store or use gasoline or other flammable vapors or liquids in the vicinity of this or any other appliance. DO NOT store or use an LP gas cylinder within 10 feet (3.05 m) of this fire pit while it is in operation. DO NOT use this fire pit near automobiles, trucks, vans or recreational vehicles.
-
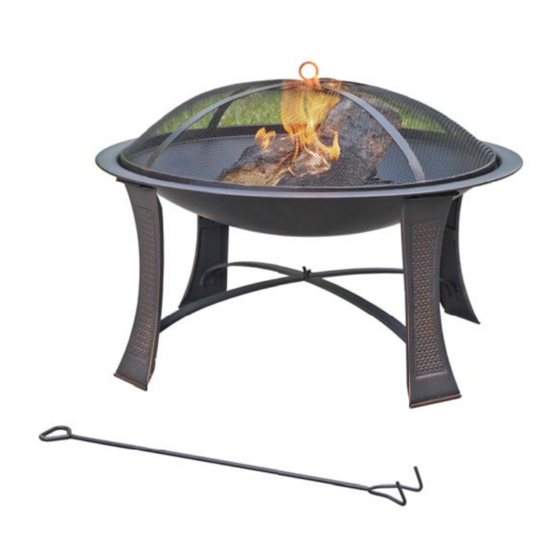
Page 5: Parts And Hardware
Parts and Hardware TOOLS REQUIRED (Not included): Phillips screwdriver Page 4 of 9... - Page 6 Parts List Part # Description Picture Screen Hook Screen Charcoal Grid Fire Bowl Leg Support (Upper) Leg Support (Lower) Hardware Hardware # Description Picture M6 x 10 Bolt (Pre-assembled 8) M6 Ring Screw M6 Flange Nut M6 Nut M6 x 10 Wing Screw Page 5 of 9...
-
Page 7: Assembly Instructions
Assembly Instructions NOTE: Assemble the fire pit on a non-abrasive, level surface. If missing parts please contact customer service. Step 1 Place the fire bowl (D) upside down, unscrew (8) M6 x 10 bolts (AA) from the fire bowl (D), then attach the legs (G) to the fire bowl (D) with (8) M6 x 10 bolts (AA) as illustrated. - Page 8 Assembly Instructions Step 3 Attach the M6 ring screw (BB) to the top of the screen (B) with M6 flange nut (CC) as illustrated. Hardware Used M6 Ring Screw M6 Flange Nut Step 4 Place charcoal grid (C) on top of fire bowl (D) followed by screen (B) and screen hook (A) as illustrated.
-
Page 9: Care And Maintenance
Care and Maintenance Lighting 1. Make sure there is only a small amount of ash in the bottom of the bowl. 2. Place a layer of dry kindling or a natural fire-starter onto the center of the grid. 3. Place above that a layer of dry seasoned hardwood that is no more than 3/4 the diameter of the bowl. -
Page 10: Warranty Information
Warranty Information The appliance has been manufactured under the highest standards of quality and workmanship. We warrant to the original consumer purchaser that all aspects of this product will be free of defects in material and workmanship for one year (1) from the date of purchase. A replacement for any defective part will be supplied free of charge for installation by the consumer.
Need help?
Do you have a question about the FSMVPT6012 and is the answer not in the manual?
Questions and answers