Table of Contents
Advertisement
Available languages
Available languages
Quick Links
Advertisement
Table of Contents

Subscribe to Our Youtube Channel
Related Manuals for Ugolini MT micro HOT


Summary of Contents for Ugolini MT micro HOT
- Page 1 MANUALE D’ISTRUZIONI MT micro HOT O P E R A T O R ’ S MA N U A L...
-
Page 2: Dichiarazione Di Conformità Ce
DICHIARAZIONE DI CONFORMITÀ CE Noi Ugolini S.p.A. - Via Mario Ugolini 3 - 27010 Torrevecchia Pia - Pavia - Italy dichiariamo, sotto la nostra responsabilità, che l’apparecchio DISTRIBUTORE DI BEVANDE CALDE - Marca: UGOLINI S.p.A. - Fabbricante: UGOLINI S.p.A. - Modelli: MT... -
Page 3: Garanzia
Ugolini s.p.a., un condizione che: A- il difetto di funzionamento dell'apparecchio sia stato -a pena esborso superiore al prezzo versato dall'acquirente per l'acquisto del prodotto. -
Page 4: Caratteristiche Tecniche
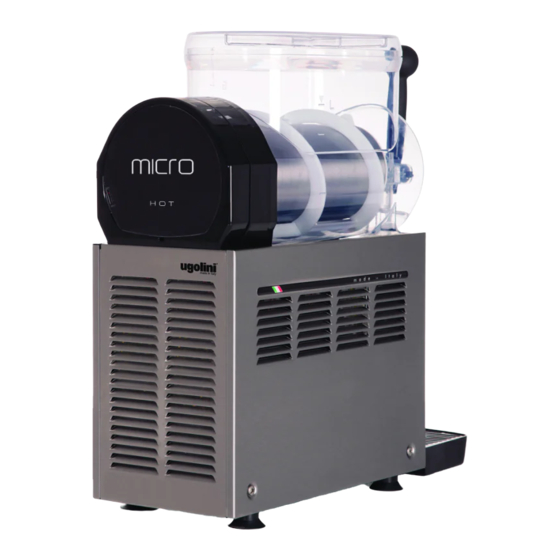
MT micro HOT 3 INSTALLAZIONE 1 CARATTERISTICHE TECNICHE Estrarre il distributore dall’imballo, che è con- sigliabile conservare per future necessità. IMPORTANTE Contenitori trasparenti smontabili Nelle operazioni di trasporto o solleva- Capacità singolo contenitore, circa mento, il distributore non deve mai essere... -
Page 5: Istruzioni Per L'uso
d'acqua. Il distributore non esce prelavato e sanitiz- L’apparecchio deve essere installato su zato dalla fabbrica. Prima dell’uso esso deve superficie piana, in posizione verticale. essere smontato, lavato e sanitizzato seguendo Non utilizzare all’interno dell’apparecchio quanto previsto nelle presenti istruzioni al capi- sostanze esplosive come bombolette spray con- tolo 5.3 PULIZIA. -
Page 6: Descrizione Dei Comandi
MT micro HOT partenza come indicato nella sequenza.(vedere Il distributore deve sempre funzionare con i figura 1)(vedere figura 2)(vedere figura 3) coperchi montati al fine di prevenire un’eventuale contaminazione del prodottoda agenti esterni. Il distributore deve funzionare ininterrotta- mente. 5. 1 INDICAZIONI DI UTILIZZO Il presente distributore è... - Page 7 5. 5 PULIZIA del distributore (lato rubinetto) Le funzioni dei comandi del distributore sono di Pulizia e lavaggio sono fondamentali per seguito elencate(vedere figura 4): garantire la perfetta conservazione del prodotto e la massima efficienza del vostro distributore. Le procedure descritte nel seguito devono essere considerate di carattere generale e possono variare per effetto della regolamentazione sanita- ria vigente.
- Page 8 MT micro HOT davanti (vedere figura 7). figura 6 figura 9 Togliere la guarnizione di tenuta del conteni- tore dalla sua sede (vedere figura 10). figura 7 figura 10 Sfilare dall'evaporatore la spirale esterna Disassemblare il rubinetto con la sequenza (vedere figura 8) e successivamente il giunto indicata (vedere figura 11).
- Page 9 Sfilare il cassetto raccogligocce e svuotarlo. Asportare con un panno o carta la crema rimasta a contatto con tutte le parti della mac- ATTENZIONE china. Durante il lavaggio del distributore non 5. 5. 2 LAVAGGIO usare eccessiva quantità di acqua in vici- nanza dei componenti elettrici;...
- Page 10 MT micro HOT mancanza di un prodotto sanitizzante specifico, accompagnandolo fino in fondo. (vedere figura preparare una soluzione di acqua e ipoclorito di sodio (varechina) in proporzione di 1 cucchiaio ogni 2 litri di acqua. Immergere nella soluzione tutte le parti da sanitizzare per il tempo indicato dal fabbricante del prodotto.
-
Page 11: Manutenzione
del tipo “usa e getta”. sostituire il giunto stesso con un ricambio origi- nale del fabbricante (vedere figura 18). 5. 6 SANITIZZAZIONE DEL DISTRIBUTORE MONTATO La sanitizzazione dell'apparecchio montato, precedente la sua messa in funzione, può es- sere eseguita, se necessaria, solo come ulte- r i o r e p r e c a u z i o n e i n a g g i u n t a a l l a sanitizzazione dell'apparecchio smontato de- scritta in precedenza ma mai in sostituzione... -
Page 12: Technical Characteristics
MT micro HOT assembly, go through these procedures in order 1 TECHNICAL CHARACTERISTICS to be properly trained and to make sure that no misunderstandings exist. 3 INSTALLATION Remove the corrugate container and packing materials and keep them for possible future use. -
Page 13: To Operate Safely
The appliance is not suitable for outdoor PROCEDURES). use. Do not squeeze the main cable. IMPORTANT Is forbidden to insert cream spray bottles inside bowl. Use only for cooling mentioned Install the dispenser so that the plug is liquids. easily accessible. Do not storage of hazardous and toxic substance or liquid in the appliance. -
Page 14: Using Tips
MT micro HOT 5. 1 USING TIPS Position I : Mixer is On. Thermostat (C) This machine is to be used with anhydrous It controls the temperature of the product in the “creams”. These specific mixes have the correct bowl. Turning the knob counterclockwise you de- viscosity when they look bright and shining. - Page 15 slide it out (see figure 3). figure 5). figure 4 figure 2 figure 5 Remove the bowl gasket from its seat (see figure 6). figure 3 Slide the outer spiral out (see figure 4) and then Outside magnetic rotor assembly (see figure 6 Dismantle the faucet assembly (see figure...
- Page 16 MT micro HOT thoroughly clean all disassembled parts in the cleaning solution. ATTENTION When cleaning the machine, dump it, do not allow excessive amounts of water around electrically operated components of the unit. Electrical shock or damage to the machine may result.
- Page 17 lubricant. end (see figure 10). figure 8 Assemble the faucet by reversing the disassembly steps (see figure 7) Fit bowl gasket around its seat. Note: the largest brim of gasket must face figure 10 against the rear wall (see figure 9). Install the outer spiral.
-
Page 18: In-Place Sanitization
MT micro HOT figure 12). damaged parts. Replace parts as needed. ATTENTION Before any disassembly and/or cleaning procedure make sure that the dispenser is disconnected from its power source by unplugging it. Every month: check that the hexagonal joint gasket is not worn. If it is, replace the joint itself with an original spare part from the manufacturer (see figure 13). - Page 19 polycarbonate.
- Page 20 02422-H0099 R0.4 20A18...
Need help?
Do you have a question about the MT micro HOT and is the answer not in the manual?
Questions and answers