Table of Contents
Advertisement
Available languages
Available languages
Quick Links
PIZZA OVEN
HORNO PARA PIZZA
FOUR À PIZZA
WPO700/WPO750
For your safety and continued enjoyment of this product,
always read the instruction book carefully before using.
Para su seguridad y para disfrutar plenamente de este producto,
siempre lea las instrucciones cuidadosamente antes de usarlo.
Afin que votre appareil vous procure en toute sécurité beaucoup
de satisfaction, lire attentivement le mode d'emploi avant de l'utiliser.
Advertisement
Chapters
Table of Contents

Related Manuals for Waring WPO700


Summary of Contents for Waring WPO700
- Page 1 PIZZA OVEN HORNO PARA PIZZA FOUR À PIZZA WPO700/WPO750 For your safety and continued enjoyment of this product, always read the instruction book carefully before using. Para su seguridad y para disfrutar plenamente de este producto, siempre lea las instrucciones cuidadosamente antes de usarlo.
-
Page 2: Important Safeguards
IMPORTANT SAFEGUARDS READ ALL INSTRUCTIONS When using electrical appliances, basic safety precautions should always be followed, including those listed below: 1. To protect against electrical hazards, do not immerse oven in water or other liquids. 2. NEVER clean with water jets, which can result in critical bodily injury or death. - Page 3 14. This appliance is not intended for use by persons (including children) with reduced physical, sensory or mental capabilities, or lack of experience and knowledge, unless they have been given supervision or instruction concerning use of the appliance by a person responsible for their safety. 15.
-
Page 4: Table Of Contents
Installing and Replacing Oven Light ..........13 Safety Feature .................. 14 Warranty ................... 14 GROUNDING INSTRUCTIONS For your protection, the Waring Commercial Pizza Ovens are ® supplied with a molded 3-prong grounding-type plug and should be used in combination with a properly connected grounding-type outlet. -
Page 5: Introduction
Keep cord away from heat and sharp edges. NOTE: This appliance is for 240 volts only and should not be used with a converter. INTRODUCTION The Waring Commercial Pizza Ovens duplicate the ideal baking ® environment of traditional Italian brick pizza ovens. Ceramic pizza deck measures 18"... -
Page 6: Parts And Accessories
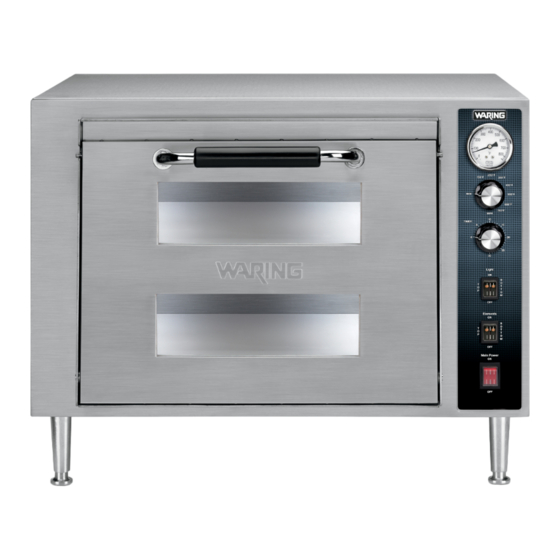
PARTS AND ACCESSORIES WPO700 1. Temperature Gauge 2. Temperature Control Knob 3. Manual Timer (30 minutes) 4. Main Power On/Off Switch 5. Oven Light On/Off Switch (one per chamber) 6. Top Element On/Off Switch 7. Bottom Element On/Off Switch 8. Ceramic Pizza Deck (packed separately) - Page 7 WPO750 10. Tempered Glass Viewing Windows 11. Interior Light (not shown) 12. Top Heating Element (not shown) Available only on WPO750 13. Bottom Heating Element (not shown) 14. Rear Exhaust Vent (not shown) 15. Deck Cleaning Brush 16. Adjustable Legs (packed separately in styrofoam) 17.
- Page 8 1. Temperature Gauge Lets you visually monitor oven temperature. 2. Temperature Control Knob Simple dial knob to select temperature settings. 3. Manual Timer Timer range is 30 minutes. An audible signal (single chime) indicates selected time has elapsed. NOTE: TIMER DOES NOT TURN OVEN ON OR OFF. 4.
-
Page 9: Oven Installation
OVEN INSTALLATION • After removing the outer shipping carton and packaging material, place the oven on the floor or other flat surface. • Open oven and remove any instructions or packaging material shipped in the unit. • With sufficient help, lift up the front of the oven and attach the two front legs (packed separately in styrofoam), carefully twisting each one into a corner and hand tighten. -
Page 10: Before Using Your Pizza Oven
SLOTS (fig. 1) (fig. 2) BEFORE USING YOUR PIZZA OVEN • With ceramic deck inserted, place oven in a well-ventilated area to burn off any residual dust from manufacturing. • Plug unit in, open door and set Temperature Control to 400˚F (205˚C). -
Page 11: Tips And Hints
The temperature range for baking fresh pizza is usually between 500˚F (260˚C) and 575˚F (300˚C), depending on the individual product. Generally, frozen items are cooked at a lower temperature, but always follow recommended cooking instructions. Bake pizza until the cheese bubbles and the bottom is evenly browned, rotating it during the baking process if necessary. -
Page 12: Use And Care
8. For further information or to purchase additional accessories, please phone Waring Customer Service at 1-800-492-7464. If there is something wrong with this product, please contact Ecolab Equipment Care (EEC/GCS) service call center at... -
Page 13: Installing And Replacing Oven Light
INSTALLING AND REPLACING OVEN LIGHT (Bulb Type: G9 220V/240V/25W Halogen) A. Be Sure Oven Is Completely Cool and Unplugged B. Remove the Glass Bulb Cover Locate bulb cover in back right corner. Carefully twist counterclockwise and remove. C. Remove Bulb Grasp bulb and gently pull straight out to remove. -
Page 14: Safety Feature
If the unit will not turn back on, or continues to heat beyond the recommended temperature level, repeat steps above or call a Waring Certified Customer Service Center for assistance. LIMITED ONE YEAR WARRANTY... -
Page 15: Medidas De Seguridad Importantes
MEDIDAS DE SEGURIDAD IMPORTANTES LEA TODAS LAS INSTRUCCIONES Al usar aparatos eléctricos, debe tomar precauciones básicas de seguridad, incluso las siguientes: 1. Para reducir el riesgo de electrocución, no coloque el aparato en agua u otro líquido. 2. NUNCA lo lave a presión; esto presenta un riesgo de herida grave o de muerte. - Page 16 13. Nunca bloquee las aberturas de aire ni coloque el aparato sobre una superficie blanda, donde se puedan obstruir. 14. Los niños o las personas que carezcan de la experiencia o de los conocimientos necesarios para manipular el aparato, o aquellas cuyas capacidades físicas, sensoriales o mentales estén limitadas, no deben utilizar el aparato sin la supervisión o la dirección de una persona responsable por su seguridad.
-
Page 17: Instrucciones De Puesta A Tierra
Mecanismo de seguridad ..............27 Garantía ....................27 INSTRUCCIONES DE PUESTA A TIERRA Para su protección, el cable de los hornos para pizza Waring ® Commercial está dotado de un enchufe con puesta a tierra, el cual debe ser conectado a una toma de corriente debidamente puesta a tierra. -
Page 18: Introducción
NOTA: Enchufe el cable en una toma de corriente de 240V solamente. No utilice el aparato con un convertidor de voltaje. INTRODUCCIÓN El horno para pizza Waring Commercial reproduce el ambiente ® de los hornos de ladrillos italianos tradicionales, el ambiente de cocción ideal para la pizza. -
Page 19: Piezas Y Características
PIEZAS Y ACCESORIOS WPO700 1. Indicador de temperatura 2. Control de temperatura 3. Temporizador manual (hasta 30 minutos) 4. Botón de encendido/apagado del horno 5. Botón de encendido/apagado de la luz (uno por nivel/cámara) 6. Botón de encendido/apagado de la resistencia superior 7. - Page 20 WPO750 9. Asa termoresistente 10. Puertas de vidrio templado 11. Luz (no ilustrada) 12. Resistencia superior (no ilustrada) Modelo WPO750 solamente 13. Resistencia inferior (no ilustrada) 14. Placa de ventilación trasera (no ilustrada) 15. Cepillo de limpieza 16. Pies de altura regulable (empaquetados por separado) 17.
- Page 21 1. Indicador de temperatura Permite controlar visualmente la temperatura del horno. 2. Termostato/Control de temperatura Perilla fácil de usar. 3. Temporizador manual Hasta 30 minutos. Una señal sonora (un pitido) indica el final del tiempo. NOTA: EL TEMPORIZADOR NO ENCIENDE/APAGA EL HORNO. 4.
-
Page 22: Instalación Del Horno
INSTALACIÓN DEL HORNO • Retire el material de embalaje y coloque el horno sobre el piso u otra superficie plana. • Abra el horno y retire el material que se encuentra adentro. • Con la ayuda de otra persona, levante la parte delantera del horno y atornille los pies delanteros (empaquetados por separado) en las esquinas, apretando a mano. -
Page 23: Antes Del Primer Uso
HENDIDURAS (Fig. 1) (Fig. 2) ANTES DEL PRIMER USO • Coloque el horno, con la piedra para pizza puesta, en un lugar bien ventilado y queme el polvo y otros residuos acumulados durante el proceso de fabricación. • Enchufe el cable en una toma de corriente, abra la puerta y ajuste la temperatura a 400 ˚F (205 ˚C). -
Page 24: Consejos Útiles
Este horno para pizza puede usarse para cocer productos frescos o congelados. Meter los productos congelados al horno (precalentado) lo más pronto posible después de sacarlos del congelador. El tiempo de cocción variará según la consistencia y el peso del producto. Para cocer pizza fresca, ajuste la temperatura entre 500 ˚F (260 ˚C) y 575 ˚F (300 ˚C), dependiendo del tipo de pizza. -
Page 25: Uso Y Mantenimiento
USO Y MANTENIMIENTO Para mantener el horno en condición óptima, límpielo todos los días. PERMITA QUE EL APARATO SE ENFRÍE COMPLETAMENTE ANTES DE LIMPIARLO. 1. Desconecte el cable de la toma de corriente. 2. No utilice materiales abrasivos ni utensilios duros o cortantes; esto podría dañar la superficie del horno. -
Page 26: Reemplazo De La Bombilla
INSTALACIÓN/REEMPLAZO DE LA BOMBILLA (Tipo de bombilla: bombilla halógena G9 de 220 V/240 V/25 W) A. Desenchufe el horno y permita que se enfríe B. Retire la cubierta de vidrio La luz se encuentra en el fondo del horno, a mano derecha. -
Page 27: Mecanismo De Seguridad
MECANISMO DE SEGURIDAD Para su tranquilidad, el horno para pizza Waring Commercial viene ® equipado con el mecanismo de seguridad siguiente: Dispositivo de protección anti-sobrecalentamiento Este dispositivo apaga automáticamente el aparato en caso de sobrecalentamiento. Si esto ocurriera, ponga el control de temperatura en la posición "OFF", desenchufe el cable de la toma... -
Page 28: Importantes Consignes De Sécurité
IMPORTANTES CONSIGNES DE SÉCURITÉ LIRE TOUTES LES INSTRUCTIONS L'utilisation d'appareils électriques requiert la prise de précautions élémentaires, parmi lesquelles les suivantes : 1. Afin de prévenir tout risque de choc électrique, ne jamais placer l'appareil dans l’eau ou tout autre liquide. 2. - Page 29 13. Ne pas obstruer les entrées/sorties d'air ou placer l'appareil sur une surface molle, où elles pourraient se boucher. 14. Cet appareil ne devrait pas être utilisé par des enfants ou des personnes souffrant d’un handicap physique, mental ou sensoriel, ou qui ne disposent pas des connaissances ou de l'expérience nécessaires, à...
-
Page 30: Instructions De Mise À La Terre
Remplacement de l’ampoule d’éclairage ........39 Dispositif de sécurité ............... 40 Garantie ................... 40 INSTRUCTIONS DE MISE À LA TERRE Pour votre protection, les fours à pizza Waring Commercial sont ® équipés d'une fiche à trois broches. Cette fiche doit être branchée dans une prise de terre correctement configurée. -
Page 31: Introduction
REMARQUE : utiliser cet appareil sur courant de 240 V uniquement. Ne pas utiliser cet appareil avec un convertisseur de tension. INTRODUCTION Votre four à pizza Waring Commercial reproduit l'environnement des ® fours en briques italiens traditionnels, l'environnement de cuisson idéal pour la pizza. -
Page 32: Pièces Et Caractéristiques
PIÈCES ET ACCESSOIRES WPO700 1. Indicateur de température 2. Bouton de réglage de la température 3. Minuteur manuel (jusqu'à 30 minutes) 4. Bouton de mise sous/hors tension 5. Bouton d'éclairage (un par niveau/chambre) 6. Bouton de contrôle de la résistance supérieure 7. - Page 33 WPO750 10. Portes en verre trempé 11. Éclairage intérieur (non illustré) 12. Résistance supérieure (non illustrée) Modèle WPO750 uniquement 13. Résistance inférieure (non illustrée) 14. Plaque de ventilation arrière (non illustrée) 15. Brosse de nettoyage 16. Pieds à hauteur réglable (emballés séparément) 17.
- Page 34 1. Indicateur de température Permet de contrôler visuellement la température du four. 2. Bouton de réglage de la température Cadran de réglage facile à utiliser. 3. Minuteur manuel Jusqu'à 30 minutes. Un signal sonore (un bip) indique que le temps est écoulé.
-
Page 35: Installation Du Four
INSTALLATION DU FOUR • Retirer le matériel d'emballage et placer le four par terre ou sur une autre surface plate. • Ouvrir le four et retirer le matériel qui se trouve à l'intérieur. • Avec l'aide d'une autre personne, soulever l'avant du four et visser les deux pieds de devant (emballés séparément) aux coins du four, en serrant à... -
Page 36: Avant La Première Utilisation
FENTES (fig. 1) (fig. 2) AVANT LA PREMIÈRE UTILISATION • Placer le four, avec la pierre en céramique à l'intérieur, dans un endroit bien aéré et brûler toute trace de poussière résiduelle provenant de la fabrication. • Brancher l'appareil, ouvrir la porte du four et régler la température sur 400˚F (205˚C). -
Page 37: Conseils Utiles
Ce four à pizza peut s'utiliser pour cuire des produits frais ou congelés. Mettre les produits congelés au four (préchauffé) aussitôt sortis du congélateur. Le temps de cuisson variera selon la consistance et le poids des aliments. Pour cuire une pizza fraîche, régler la température entre 500˚F (260˚C) et 575˚F (300˚C) –... -
Page 38: Utilisation Et Entretien
NETTOYAGE ET ENTRETIEN Pour un fonctionnement optimal, il est conseillé de nettoyer le four tous les jours. LAISSER LE FOUR REFROIDIR COMPLÈTEMENT AVANT DE LE NETTOYER. 1. Débrancher le cordon d'alimentation de la prise de courant. 2. Ne pas utiliser de matériaux abrasifs ni d’ustensiles durs ou coupants ;... -
Page 39: Remplacement De L'ampoule D'éclairage
INSTALLATION/REMPLACEMENT DE L'AMPOULE D'ÉCLAIRAGE (Type d'ampoule : ampoule halogène G9 de 220 V/240 V/25 W) A. Débrancher le four et le laisser refroidir complètement B. Retirer le couvercle en verre L'éclairage se trouve au fond du four, du côté droit. Dévisser dans le sens inverse des aiguilles d'une montre et retirer. -
Page 40: Dispositif De Sécurité
GARANTIE LIMITÉE D'UN AN Waring garantit tout nouvel appareil Waring Commercial contre tout vice de matière ou de fabrication pendant une période d'un an suivant sa date d’achat, à condition qu’il ait été utilisé uniquement avec des produits alimentaires. - Page 41 __________________________________________________________________ __________________________________________________________________ __________________________________________________________________ __________________________________________________________________ __________________________________________________________________ __________________________________________________________________ __________________________________________________________________ __________________________________________________________________ __________________________________________________________________ __________________________________________________________________ __________________________________________________________________ __________________________________________________________________ __________________________________________________________________ __________________________________________________________________ __________________________________________________________________ __________________________________________________________________ __________________________________________________________________ __________________________________________________________________ __________________________________________________________________ __________________________________________________________________ __________________________________________________________________ __________________________________________________________________ __________________________________________________________________ __________________________________________________________________ __________________________________________________________________ __________________________________________________________________ __________________________________________________________________ __________________________________________________________________ __________________________________________________________________...
- Page 42 NOTES...
- Page 43 NOTES...
- Page 44 Todas marcas registradas o marcas de comercio mencionadas en ésta pertenecen a sus titulares respectivos. Toutes marques déposées ou marques de commerce ci-incluses appartiennent à leurs propriétaires respectifs. ©2016 Waring Commercial 314 Ella T. Grasso Ave. Torrington, CT 06790 1-800-4-WARING www.waringcommercialproducts.com...
Need help?
Do you have a question about the WPO700 and is the answer not in the manual?
Questions and answers