Advertisement
Quick Links
www.costway.com
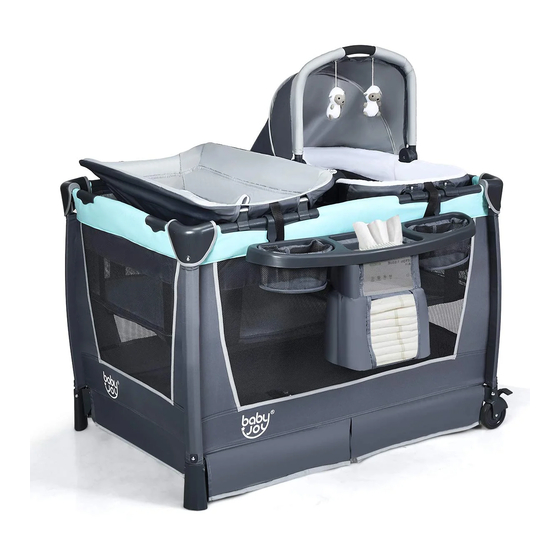
Baby Playard
BB0480
THIS INSTRUCTION BOOKLET CONTAINS IMPORTANT SAFETY INFORMATION. PLEASE READ AND KEEP FOR FUTURE REFERENCE.
Follow Costway
Please give us a chance to make it right and do better!
Visit us: www.costway.com
Contact our friendly customer service department for help first.
Replacements for missing or damaged parts will be shipped ASAP!
Advertisement

Related Manuals for Costway BB0480


Summary of Contents for Costway BB0480
- Page 1 THIS INSTRUCTION BOOKLET CONTAINS IMPORTANT SAFETY INFORMATION. PLEASE READ AND KEEP FOR FUTURE REFERENCE. Follow Costway Please give us a chance to make it right and do better! Visit us: www.costway.com Contact our friendly customer service department for help first. Replacements for missing or damaged parts will be shipped ASAP!
- Page 2 Please read all instructions carefully and keep it for future reference. General Warnings: Attention: To prevent possible injury by entanglement, remove this toy when the child starts trying to get up on its hands and knees in a crawling position.
-
Page 3: Fall Hazard
WARNING Playard Warnings WARNING: Failure to follow these warnings and the instructions could result in serious injury or death. This product including side rails, must be fully erected prior to use. Make sure latches are secure. SUFFOCATION HAZARD INFANTS HAVE SUFFOCATED: •... - Page 4 WARNING • NEVER place the playard near a window where cords from blinds or drapes can strangle a child. • Child can become entrapped and die when improvised netting or covers are placed on top of a playard. Never •...
- Page 5 AVERTISSEMENT IMPORTANT! To ensure safe operation of your playard, please follow these instructions carefully. Please keep these instructions for future reference. IMPORTANT! Before assembly and each use, inspect this product for damaged hardware, loose joints, missing parts or sharp edges.
- Page 6 (2) Curved Connector Bar (2) Short Bar with Connectors Large bassinet with metal support tubes Changing Table Parent Organizer (2) or (4) Rock-a-Bye bassinet Bars *Music Center **Portable Rock-a-Bye bassinet...
- Page 7 ASSEMBLY TO ASSEMBLE PLAYARD Playard Mattress ATTENTION: Playard must be fully assembled and securely locked before installing or using other accessories. 1) • Unzip bag and remove Playard frame (Fig. 1). Undo the Fasten straps and set the Mattress aside.
- Page 8 ASSEMBLY ASA 3) • Once all four (4) top rails are locked in place, push down on the center handle (Fig. 3a). The center mechanism automatically locks in place. IMPORTANT: Test each top rail by pushing down slightly to confirm each is rigid and securely in place before use (Fig.
- Page 9 5) • Insert the hook & loop fasteners located on the underside of the mattress through the slots in the floor of each end of the playard (Fig. 5a). Fasten the hook and loop fasteners to the underside of the playard floor to prevent the mattress from moving (Fig.
- Page 10 Center latch 8) • Locate the rail latch release in the center and Tube Tube bottom side of each rail. Squeeze the lever with two hands until the rail releases the two tubes (Fig. 8a), then push down (Fig. 8b).
- Page 11 WARNING ACCESSORIES Bassinet & Cradles Warnings: WARNING: Failure to follow these warnings and the instructions could result in serious injury or death. WARNING FALL HAZARD: To help prevent falls, do not use this product when the infant begins to push up on hands and knees or has reached the height of 25 in.
- Page 12 WARNING • The Playard must be fully assembled and installed before using. • The playard, including side rails, must be fully erected prior to use. Make sure each latch is secure. • NEVER leave the large bassinet in place when child is in playard.
- Page 13 ASSEMBLY TO ASSEMBLE LARGE BASSINET Bassinet with metal support tubes ATTENTION: Playard must be fully assembled and securely locked before installing or using the Bassinet feature (See To Assemble Playard section). You will need to remove the mattress from the bottom of the Playard to use inside your Bassinet.
- Page 14 13) • Place the Mattress into the Bassinet with the padded side facing upward (Fig. 13). Fig. 13 TO REMOVE LARGE BASSINET • Remove Mattress from Bassinet. Disconnect opposing Mattress Support Tubes. Unsnap all clips and lift Bassinet. TO ASSEMBLE CHANGING TABLE...
- Page 15 SUFFOCATION HAZARD : Babies have suffocated while sleeping on changing tables. Changing tables are not designed for safe sleep. • NEVER allow baby to sleep on changing table. • NEVER leave the changing table in place when the child is in the large bassinet or the playard.
- Page 16 Fig. 14c Fig. 14c Fig. 14e Fig. 14f TO SECURE THE CHANGING TABLE TO THE PLAYARD IMPORTANT! When the changing table is on the upper position the changing table must be secured to the playard frame by using the snap buttons straps or fasteners provided.
- Page 17 Fig. 15c Fig. 15b TO USE CHANGING TABLE RESTRAINT SYSTEM 16) • Place child on changing table, make sure hand and arms are clear of the restraint. Bring the restraint around the child’s waist and clip the male and female ends of the buckle together (Fig.
- Page 18 PARENT ORGANIZER ASSEMBLY Parent Organizer 18) • Parent Organizer: Position each hook so that the hooked end is facing the rear side of the organizer. Press the Fig. 18a snaps into place (Fig. 18a). Diaper Stacker: Skip to step 18b.
- Page 19 • Remove Toybar/Mobile/Canopy with toys when baby begins to push up on hands and knees. Recommended use from birth to 5 months. • Toys are not intended to be mouthed by the baby and should be positioned clearly out of reach of the baby's face and mouth.
-
Page 20: Fall Hazard
WARNING WARNING: Failure to follow these warnings and the instructions could result in serious injury or death. FALL HAZARD: To prevent falls, stop using the product when infant: • Begins to wiggle out of position or turn over in the product, head touches the upper edge of the product, reached the height of 25 in. - Page 21 WARNING FALL HAZARD: Child’s activity can move carrier. NEVER place carrier on counter tops, tables, or any other elevated surface. NEVER use this carrier as a means to transport an infant in a motor vehicle. Infant carriers not intended for use as infant restraint devices in motor vehicles.
- Page 22 ASSEMBLY ATTENTION: Playard and large bassinet must be fully assembled and securely locked before installing or using the Portable Rock-a-Bye bassinet feature. (See To Assemble Playard and large bassinet sections, pages 19 - 26). Rock-A-Bye Bassinet assembly will require the following parts:...
- Page 23 20) • To insert the Rock-A-Bye Bassinet Bars: Open the 4 foot extensions on both Bars (Fig. 20a). Before inserting them into the housing check that the foot extensions all point inward as seen in the diagram (Fig. 20b).
- Page 24 • The rear of the canopy has 2 fabric openings. Pull both opening over the 2 clips at the rear of the bassinet frame. Ensure to wrap the elastic completely over the bassinet frame (Fig. 21a). NOTE: Always complete the canopy before attaching the bassinet to the playard frame.
- Page 25 ROCKER FUNCTION 22) • Turn the bassinet over and close the 4 peg legs (Fig. 22a). Set Bassinet on a NOTE: Rocking requires adult assistance and supervision, this is not an automatic rocking cradle (Fig. 22c). Fig. 22a NEVER use Bassinet on raised surface such as Table, Bed or Chair.
- Page 26 23) • Locate the 4 clip fasteners on the bottom of the Rock-A-Bye Bassinet (Fig. 23a). • To attach the Rock-A-Bye Bassinet to the Playard, lower it into the large bassinet. Push down on the 4 clips and secure it onto the large bassinet railing (Fig.
-
Page 27: Operation
• Remove the Rock-A-Bye Bassinet from the • To Fold Reverse the previous section: TO ASSEMBLE Portable Rock-A-Bye Bassinet on pages 49 - 53. Fig. 24 OPERATION MUSIC CENTER *With Vibration WARNING: Keep batteries out of children's reach. Old and new batteries should not be mixed. - Page 28 25) • The Music Center is designed to be attached to the playard’s/bassinet’s long rail (Fig 25). Fig. 25 Music Operation 26) • The Music Center requires 4 AA batteries. Unscrew the battery door screws and pull outward on the battery door. Install batteries as shown.
- Page 29 MUSIC To listen to MUSIC, press the MUSIC button. Press the button to change the song. To listen to NATURE sounds, press the NATURE SOUNDS NATURE button. Press the button to change the sound. To listen to SLEEP music, press the SLEEP SLEEP MUSIC button.
- Page 30 OTHER FCC Statement This device complies with Part 15 of the FCC rules. Operation is subject to the following two conditions: 1 this device may not cause harmful interference, and 2 this device must accept any interference received, including interference that may cause undesired operation.
- Page 31 February 24, 2019 Great products so far. Fast delivery, easy setup, and working without any issues. With your inspiring rating, COSTWAY will be more consistent to offer you EASY SHOPPING EXPERIENCE, GOOD PRODUCTS and EFFICIENT SERVICE! US office: Fontana, California...
Need help?
Do you have a question about the BB0480 and is the answer not in the manual?
Questions and answers