
Related Manuals for adept technology SmartFleet EX


Summary of Contents for adept technology SmartFleet EX
- Page 1 Adept SmartFleet EX Appliance User's Guide (Including the Enterprise Manager and Fleet Manager)
- Page 3 Adept SmartFleet EX Appliance User's Guide (Including the Enterprise Manager and Fleet Manager) P/N: 11445-000 Rev. A March, 2012 5960 Inglewood Drive • Pleasanton, CA 94588 • USA • Phone 925.245.3400 • Fax 925.960.0452 Otto-Hahn-Strasse 23 • 44227 Dortmund • Germany • Phone +49.231.75.89.40 • Fax +49.231.75.89.450 Block 5000 Ang Mo Kio Avenue 5 •...
- Page 4 The information contained herein is the property of Adept Technology, Inc., and shall not be reproduced in whole or in part without prior written approval of Adept Technology, Inc. The information herein is subject to change without notice and should not be construed as a commitment by Adept Technology, Inc.
-
Page 5: Table Of Contents
Adept Enterprise Manager Adept SmartFleet EX Features What Comes with the Adept Enterprise Manager and Adept Fleet Manager Bundles? What Doesn’t Come with an Adept SmartFleet EX? 1.2 Warnings, Cautions, and Notes 1.3 Precautions and Required Safeguards 1.4 Manufacturer’s Declaration 1.5 How Can I Get Help? - Page 6 4.8 Configuring ARAM 4.9 Enabling the ARCL Server 4.10 Connecting the Adept SmartFleet EX to Your Network 4.11 Configuring a Robot to Connect to the Adept SmartFleet EX Appliance Enabling Enterprise Manager 4.12 Customizing Each Robot Separate Charging Stations (MT400 Robots) Distinct "Voices"...
- Page 7 Table of Contents Chapter 7: Technical Specifications 7.1 Processing Specifications 7.2 Environmental Specifications 7.3 Power Requirements 7.4 Dimensions 7.5 Connections External Internal Optional Adept SmartFleet EX User’s Guide, Rev. A Page 7 of 54...
-
Page 9: Chapter 1: Introduction
The Adept Enterprise Manager and Adept Fleet Manager bundles are hardware and software solutions that helps you to manage a fleet of Adept mobile robots. With either application, the Adept SmartFleet EX™ appliance can communicate with all of the robots in the fleet and per- form a variety of fleet-oriented tasks. -
Page 10: Features
Manager software. Both applications, running on the Adept SmartFleet EX appliance: Allow you to manage the configuration for the entire fleet of robots. Each robot downloads its configuration data from the Adept SmartFleet EX appliance, thus saving you time and making updates less error-prone. -
Page 11: What Comes With The Adept Enterprise Manager And Adept Fleet Manager Bundles
Run robustly without human intervention. The Adept SmartFleet EX is an appliance, not a server, therefore it does not need main- tenance from IT staff. It can handle power outages without a loss, it is solely dedicated... -
Page 12: What Doesn't Come With An Adept Smartfleet Ex
Options on page 47. There are two PCIe expansion slots. Desktop-mounting brackets (see Mounting Options on page 16) What Doesn’t Come with an Adept SmartFleet EX? Keyboard, mouse, and monitor If power interruption is a concern, a UPS is recommended. Contact Adept Customer Service for more information. -
Page 13: Precautions And Required Safeguards
You may need to scroll down to see it. 4. Use the Description column to locate the document for your Adept SmartFleet EX appli- ance, and then click the corresponding Download ID number to access the Download Details page. -
Page 14: Related Manuals
Chapter 1: Introduction Related Manuals This manual covers the installation and startup of an Adept SmartFleet EX appliance with either the Adept Enterprise Manager or Adept Fleet Manager software. There are additional manuals that cover programming the system, reconfiguring installed components, and adding other optional or related components. -
Page 15: Chapter 2: Installation
–25° to +55° C (-13° to 131° F). The recommended humidity range is 5 to 90%, non-condensing. The Adept SmartFleet EX must always be stored and shipped in a clean, dry area that is free from condensation. -
Page 16: Inspecting
2.4 Mounting the Adept SmartFleet EX The Adept SmartFleet EX appliance is not intended for use in hazardous environments (explo- sive gas, water, dust, oil mist). It has an IP rating of IP-20 (NEMA Type 1). - Page 17 2x M3 x 6MM 2x 77 BOTH SIDES 3.6 TYP. 2x 09228-100 14.2 R3.6 TYP. THRU 22.2 TYP. 31.8 18.5 REMOVABLE FEET 4x 462 482.8 Figure 2-1. Rack-Mounting the Adept SmartFleet EX Adept SmartFleet EX User’s Guide, Rev. A Page 17 of 54...
-
Page 18: Connecting Power
Chapter 2: Installation Desktop Mounting To table-mount the Adept SmartFleet EX, install two brackets on each side near the bottom of the unit, as shown in the following figure. These brackets must be ordered separately; they do not come with the Adept SmartFleet EX. -
Page 19: Chassis Grounding
Grounding Point Figure 2-3. Chassis Grounding Point In many locations, the mounting and all terminations of the Adept SmartFleet EX must be per- formed in accordance with local and national regulations to maintain regulatory compliance. Adept SmartFleet EX User’s Guide, Rev. A... -
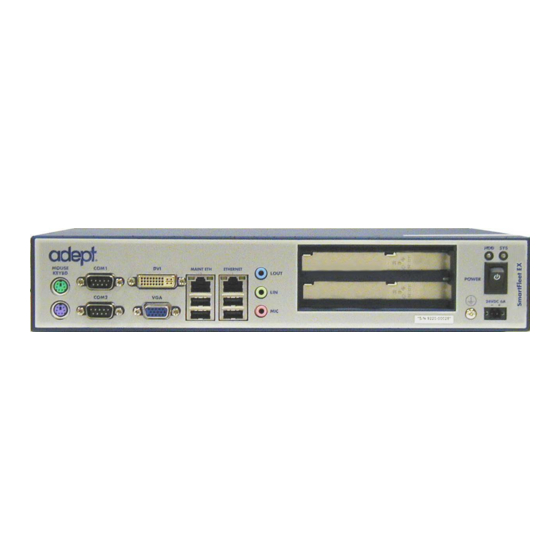
Page 21: Chapter 3: Connectors And Indicators
Chapter 3: Connectors and Indicators The Adept SmartFleet EX appliance, shown in the following figure, can connect to many dif- ferent peripherals. This section describes the connectors and indicators available. Figure 3-1. Adept SmartFleet EX Connectors NOTE: In a typical installation, while running either the Adept Enterprise Manager or Adept Fleet Manager software on an Adept SmartFleet EX appliance, the appli- ance will have only the 24 VDC power and the Ethernet connector attached. - Page 22 Connect the VGA cable to the VGA connector on a monitor. See Connecting a Monitor on page 25. This is only used for an upgrade. Use an Ethernet connector for connecting the Adept SmartFleet EX to a network. See Connecting to a Network on page 25.
- Page 23 The power switch is a toggle switch. Press the switch once to enable power. Pressing this switch while the power is on powers off the Adept SmartFleet EX. By default, the Adept SmartFleet EX automatically powers on when 24 volts is applied. This ground point is not used.
-
Page 24: Keyboard And Mouse Ports
The PS/2 connectors (shown in the following figure) allow you to use a PC- compatible keyboard and mouse with the Adept SmartFleet EX. The unit accepts any IBM AT- compatible keyboard, including 84-key standard keyboards and 101-key enhanced keyboards. -
Page 25: Connecting A Monitor
To attach your Adept SmartFleet EX to a network, or broadband device, connect an Ethernet cable between the device and one of the Ethernet ports on the Adept SmartFleet EX. The appli- ance may have only one available Ethernet port, if no GigE cards are installed. Do not use the Maintenance Ethernet port. -
Page 26: Vdc Power
3.8 24 VDC Power Power Switch The front panel power switch turns on or off 24 V power to the Adept SmartFleet EX. Pressing this switch, while the power is on, powers off the Adept SmartFleet EX. 24 VDC Connector The connector from the 24 V power supply plugs in here. -
Page 27: Chapter 4: Configuration
Chapter 4: Configuration This chapter covers the data connections and configuration of the Adept SmartFleet EX. When you are using a Adept SmartFleet EX, any configuration changes that you make will be stored on that appliance, rather than on a robot. -
Page 28: Connecting Your Pc To The Adept Smartfleet Ex
Maintenance Ethernet plug (RJ-45) on the Adept SmartFleet EX. Figure 4-1. Maintenance and LAN Ethernet Jacks NOTE: If you are ever unable to connect to the Adept SmartFleet EX using the LAN Ethernet port (due to a lost password or IP address conflict), you can directly con- nect to the Maintenance Ethernet port, which does not require a password and has a fixed IP address (1.2.3.4). - Page 29 2. Select the Server Mode radio button under the IP Settings. 3. Enter a valid, available IP address for the Adept SmartFleet EX in the IP Address field. Do not use the IP address: 1.2.3.4, because this would create a conflict with the IP address permanently set for the Maintenance Ethernet port.
-
Page 30: Enabling Setnetgo And Defining Login Information
2. Re-enter the password in the Confirm Password field. 3. Click Apply. Synchronizing Time The robots' clocks can be synchronized with either the Adept SmartFleet EX clock or with an external device (Network Time Protocol, or NTP). You can use one or the other, but not both methods. -
Page 31: Configuring Aram
Chapter 4: Configuration To use NTP, enable the NTP client button, and enter the IP address of the NTP server. To use the Adept SmartFleet EX to synchronize the robot clocks via RDate, use the following procedure. On the Adept SmartFleet EX appliance: Select Enable next to the RDate Time Server field. -
Page 32: Connecting The Adept Smartfleet Ex To Your Network
(where X.X.X.X is the IP address assigned to the Adept SmartFleet EX). NOTE: Be sure to communicate with IT staff to confirm that the Adept SmartFleet EX is able to communicate with the robots using the wireless net- work. Adept SmartFleet EX User’s Guide, Rev. A... -
Page 33: Configuring A Robot To Connect To The Adept Smartfleet Ex Appliance
Before you can properly use the Adept Enterprise Manager or Adept Fleet Manager with your mobile robots, you must configure each mobile robot to connect to the Adept SmartFleet EX. To do so, you must connect to SetNetGo on each mobile robot. -
Page 34: Customizing Each Robot
1. In the Custom arguments field, add: -separateSection "Speech Synthesis" The -separateSection restricts the effect of this parameter to just this robot. 2. Click Apply. 3. Wait for the software to restart. Adept SmartFleet EX User’s Guide, Rev. A Page 34 of 54... -
Page 35: Chapter 5: Operation
Configuration chapters. 5.1 Turning Power ON and OFF The Adept SmartFleet EX does not have a shutdown sequence, you can simply turn it on and off as needed. Expect a 1 to 2 minute boot time. Reaction to a Power Failure The queue will be saved and automatically recovered in the event of power failure. -
Page 36: Aram Crash Recovery
The queue will be saved and automatically recovered in the event that the software (ARAM) crashes. 5.3 Resetting to Factory Defaults You can reset all the networking and general settings for the Adept SmartFleet EX to their fac- tory defaults. You can also restore the following ARAM configuration default settings from Set- NetGo:... -
Page 37: Managing Queueing (Adept Enterprise Manager Only)
The tasks involved are generally: Generate a map, using a single robot. Upload the map to the Adept SmartFleet EX and make it the current map. The map will automatically get downloaded to each robot in your fleet The Adept SmartFleet EX communicates with each robot individually, rather than doing a broadcast. -
Page 38: Manually Clearing The Entire Queue
3. Use the CentralServerDisplayDeliveryQueue custom command (in MobileEyes) to verify that the queue has been cleared. 4. In SetNetGo, remove the "-enableEnterpriseManagerFlush" entry, and click Apply. 5. Wait for the software to restart. Adept SmartFleet EX User’s Guide, Rev. A Page 38 of 54... -
Page 39: Queueing Examples
The following flowchart illustrates a simple pickup and delivery cycle. Other factors, such as state of charge, can alter this flow. Figure 5-1. Manual Queueing Cycle Adept SmartFleet EX User’s Guide, Rev. A Page 39 of 54... -
Page 40: Queueing Parameters
This can be a decimal number of minutes (i.e. 0.1 minutes is 6 seconds). The queueing manager will not interrupt a robot active on a job. Adept SmartFleet EX User’s Guide, Rev. A Page 40 of 54... - Page 41 This will pick the robot with the highest charge level. DefaultDropoffPriority The default priority to use in all dropoff requests to the queueing manager. DefaultPickupPriority The default priority to use in all pickup requests to the queueing manager. Adept SmartFleet EX User’s Guide, Rev. A Page 41 of 54...
- Page 42 The following screen shows configuration parameters that need to be set for queueing: Figure 5-3. Queueing Parameters The following screen shot shows the commands available for queueing. Figure 5-4. MobileEyes Queueing Commands Adept SmartFleet EX User’s Guide, Rev. A Page 42 of 54...
-
Page 43: Troubleshooting
No robots appear in WiFi network Verify robots are set up on WiFi. MobileEyes permissions error Verify that robots have firewall access to access SmartFleet EX from WiFi network Adept SmartFleet EX User’s Guide, Rev. A Page 43 of 54... -
Page 44: Including A .Debug File
If the Adept SmartFleet EX has not been setup on the main LAN, then a direct connection will need to be established from a PC to the Maint Eth port. The IP address should be set to: 1.2.3.5. - Page 45 Open a web browser and enter the URL: https://1.2.3.4 In either case, you will be requested to confirm security certificates. You should now have a window similar to the following: Adept SmartFleet EX User’s Guide, Rev. A Page 45 of 54...
- Page 46 1. Scroll to the bottom in the left pane and select “Debug Info” (circled in red in the pre- vious figure). This will display a “Download debug info” button. 2. Select Download debug info. 3. Save the file, and attach it to your support request. Adept SmartFleet EX User’s Guide, Rev. A Page 46 of 54...
-
Page 47: Chapter 6: Options
6.1 Mounting Options Desk-mounting brackets (Brackets for rack-mounting are included in the bracket kit.) 6.2 Expansion Slot Options The Adept SmartFleet EX has two expansion slots, which support the following PCIe card option: GigE card 1 port per card 6.3 Installing PCIe Cards This section gives instructions for installing a PCIe card. - Page 48 7. After installing PCIe card(s), reconnect the internal 24 V plug. 8. Cable-tie any unused power cables to nearby cables, to keep them out of the way. 9. Reinstall the Adept SmartFleet EX top cover. 10. Reconnect the external 24 VDC power plug.
-
Page 49: Chapter 7: Technical Specifications
Chapter 7: Technical Specifications This chapter gives the technical specifications and dimensions of the Adept SmartFleet EX. 7.1 Processing Specifications Table 7-1. Processing Specifications ® Intel Core Duo, dual core, 2.16 GHz Memory 2 GB DDR2 Operating System SetNetGo Embedded LINUX Hard Drive 80 GB (2.5 in.) -
Page 50: Dimensions
Chapter 7: Technical Specifications 7.4 Dimensions This section gives the dimensions and weight of the Adept SmartFleet EX. Table 7-4. Physical Specifications Weight 2.69 kg (5.92 lbs) Dimensions: Width 328.9 mm (12.9 in.) Depth 185.4 mm (7.3 in.) Height 63.6 mm (2.5 in.) box only 69.4 mm (2.73 in.) with feet... -
Page 51: Connections
PS/2 Keyboard Audio In (not used) Audio Out (not used) Microphone Jack (not used) Internal PCIe card slots x 2 (Optional) Optional Up to two PCIe cards: GigE x 1 Adept SmartFleet EX User’s Guide, Rev. A Page 51 of 54... - Page 54 5960 Inglew ood D riv e Pleasanton, C A 94588 P/N: 11445-000 Rev. A 925 · 245 · 3400...
Need help?
Do you have a question about the SmartFleet EX and is the answer not in the manual?
Questions and answers