Table of Contents
Advertisement
Quick Links
Advertisement
Table of Contents

Related Manuals for Riotoro CR480


Summary of Contents for Riotoro CR480
- Page 1 Your Guide to Great Gaming CR480 CASE...
- Page 3 Congratulations you are on your way to build the perfect gaming machine...
-
Page 5: Table Of Contents
- Install Drives to 2.5” Mounts - Attaching Cables - Attaching the Case Fan Cables - Fan Mounting Point and Water Cooling Support - Install the Power Supply - Troubleshoot Your New CR480 Chapter 3: Specifications - Specifications - Recommended Parts - Recommended Peripherals... - Page 6 120mm radia- tors, a tool free design, USB 3.0 and multiple SSD/HDD bays. Note: This manual is a guide for RIOTORO’s computer cases. For instructions on installing the motherboard and other components, please refer to their documentation.
-
Page 7: Chapter 1: Before You Begin
Before You Begin www.riotoro.com/cases... -
Page 8: What Is In The Box
CR480 GAMING CASE What’s in the Box Included Hardware CR480 Case 10x thumb screws 2x spare thumbscrews for optional cooling radiators 16x small Philips head screws 8x screws for fans for tying cable 8x long screws 6x nylon ties Chapter 1... -
Page 9: Product Details
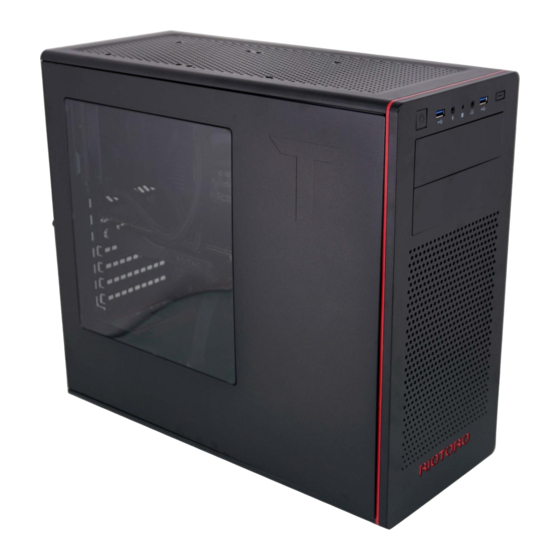
CR480 GAMING CASE Product Details 1) Front Panel: - USB 3.0 ports - Microphone jack - Headphone jacks - Power switch - Reset switch - Hard Disk Drive LED Chapter 1 Before You Begin... - Page 10 Cr480 rIOtOrO Product Details 2) I/O shield cutout 3) PCI-E expansion slots 4) Power supply bay Chapter 1 Before You Begin...
-
Page 11: Before You Begin
CR480 GAMING CASE Before You Begin Please take the following precautions: - Handle all PC components and cards with care. - Hold cards and processors by their edges to avoid damaging components. - To avoid damaging components by electrostatic discharge, periodically ground yourself by touching an unpainted metal surface or by using a wrist grounding strap. - Page 12 CR480 GAMING CASE Before You Begin When routing cables Route and bundle PSU and case cables to reduce clutter for a cleaner look and to improve airflow. The case is designed with cable pass-through cutouts throughout and space to conceal cables under the right side panel (as seen from the front).
-
Page 13: Chapter 2: Ready, Setup, Go
Ready, Setup, Go www.riotoro.com/cases Chapter 1 Before You Begin... - Page 14 CR480 GAMING CASE Remove the Case Side Panels Put the case upright on a stable, flat surface with rear facing you. Remove the thumbscrews from both side panels and store them in a safe place. Remove each panel by sliding the panel toward the rear.
-
Page 15: Install The Motherboard
CR480 GAMING CASE Install the Motherboard The CR480 is compatible with motherboards up to E-ATX, including ATX, Micro ATX, and Mini-ITX. Chapter 2 Ready, Setup, Go... - Page 16 CR480 GAMING CASE Install the Motherboard Install the CPU, CPU cooler and memory on the motherboard. Refer to your CPU and motherboard documentation how to mount the CPU and its cooler on your motherboard. If you are using a liquid CPU cooler you may find it easier to install it after the motherboard is installed in the case.
- Page 17 CR480 GAMING CASE Install the Motherboard Install the I/O shield Your motherboard should have come with a standard I/O shield that exposes the rear motherboard connectors out of the back of the case. From inside, snap the I/O shield into the cutout in the rear of the case.
- Page 18 Install the Motherboard Attach the motherboard to the case. The CR480 comes with most pre-installed standoff, it also adds a couple extra if you need to add them, Slide the motherboard into the I/O shield and then align the motherboards screw holes with the case standoff. Attach the moth- erboard to the standoffs with the provided motherboard screws.
- Page 19 CR480 GAMING CASE Install HDD & SSD The CR480 has one 3.5” drive bays and two 2.5” drive bays. These bays are located in the compartment under the motherboard. The Cr480 comes with three 3.5” bays for HDD, the bays and retention mecha- nism are tool less.
- Page 20 CR480 GAMING CASE Installing Drives into the 2.5” Mounts The CR480 case has two mounts for 2.5” drives such as SSD’s. Instructions: - Place the 2.5” drive and align the drive to a position where it can be secured. - From the other side of the...
- Page 21 CR480 GAMING CASE Installing Drives into the 5.25” Mounts The CR480 supports a total of 2 Optical Drive bays. Instructions: - Remove the plastic cover from the front Bezel. By gently pushing the cover out. - Once the cover is removed...
- Page 22 Attching Cables Connect the Front Panel Switches and LEDs The CR480 front panel switches, LEDs, and USB ports have wire leads that need to be attached to header pins the motherboard. Refer to your mother- board manual to locate the proper motherboard header pins and attach the cable connectors listed below.
-
Page 23: Attaching The Case Fan Cables
CR480 GAMING CASE Attaching the Case Fan Cables The CR480 comes with two 120mm fan —a front intake LED fan and a rear exhaust fan. Connect the 3-pin connector of each fan to a 3 pin fan header on your motherboard. Refer to your motherboard manual for more information. -
Page 24: Fan Mounting Point And Water Cooling Support
(1x120mm fan included) Top: 2x 120mm fan mounts on top Bottom: 1x120mm Fan mount Some of the fan mounts on the CR480 can also be used to mount Water cooling radiators, the following are supported: Front: Radiator supported: 120mm Top:... -
Page 25: Install The Power Supply
CR480 GAMING CASE Install the Power Supply The power supply unit (PSU) drive bay is located on the bottom of the case. - Slide the PSU in the case PSU bay with the fan facing the case bottom. Push the power supply to the rear - Align the PSU and case mounting holes and secure the power supply to the case with the provided PSU screws. -
Page 26: Troubleshoot Your New Cr480
How to clean the Dust filters. The CR480 comes with dust filters, and are meant to help keep the computer compo- nents clean, blocking the dust from the outside, they are located across several points that could potentially be used as intake areas. (Fresh air intake) - Magnetic filters: simply detach those filters, and use compressed canned air. -
Page 27: Chapter 3: Specifications
Specifications... -
Page 28: Specifications
CR480 GAMING CASE Specifications Motherboard Support - ATX, Micro ATX, Mini-ITX Drive Bays - 3x 3.5” - 3x 2.5” - 2x 5.25” Front Panel I/O - 2x USB 3.0 ports - 1x Headphone - 1x Microphone - Power button - Rest button... - Page 29 CR480 GAMING CASE Specifications Fan/Radiator Mount Points - Top: 1x120mm Radiator - Front: 1x120mm Radiator PSU Support - Standard ATX up to 220mm Long Max. GPU Length - 320mm - 164.8mm Materials - Steel, plastic Dimensions - 18.3x8.26x17.6in / 464.82x209.80x447.04mm Weight - 12.1 Lbs/5.48kg...
-
Page 30: Recommended Parts
CR480 GAMING CASE Recommended Parts P O W E R S U P P L Y U N I T ONYX 650W & ONYX 750W: Are designed to hit the sweet spot for practical real-world performance, reliability, and price. To protect you and your PC, ONYX PSUs include full over-voltage, under-voltage, over-current, over-pow- er, and short-circuit protections. - Page 31 Using a 45mm extra thick radiator, the Bifrost 120ti uses more liquid, improv- ing its cooling performance. RIOTORO LED FAN , Cross X Red, White or Blue: The FW120 delivers unparal- leled Cooling Performance with it's Precision-Molded Fan Blade Design and a Fan Speed of 1500 RPM.
-
Page 32: Recommended Peripherals
CR480 GAMING CASE Recommended Peripherals G A M I N G M I C E G A M I N G K E Y B O A R D The URUZ Z5: It delivers precise tracking complimented by professional Design. The URUZ Z5 offers on-the-fly DPI adjustments up to 4,000 DPI, Multicolor RGB Customizable Back-lighting up to 16.8 million different colors. -
Page 33: Chapter 4: Everything Else
Everything Else... -
Page 34: Important Safety Information
CR480 GAMING CASE Important Safety Information In order to achieve maximum safety while using your CR480 GAMING CASE, we suggest that you adopt the following guidelines: - Should you have trouble operating the device properly and troubleshooting does not work, unplug the device and contact the RIOTORO hotline or go to www.riotoro.com for support. -
Page 35: General Maintenance
CR480 GAMING CASE General Maintenance The CR480 GAMING CASE requires minimum maintenance to keep it in optimum condition. Once a month we recommend you unplug the device from the USB port and clean it using a soft cloth or cotton swab with a bit of warm water to prevent dirt buildup. -
Page 36: Limited Product Warranty ("Limited Warranty")
CR480 GAMING CASE LIMITED PRODUCT WARRANTY ("Limited Warranty") Limited Warranty. RIOTORO warrants the Product to be free from defects in materials and workmanship when used normally in accordance with the official documentation for the applicable Warranty Period from the date of retail purchase. - Page 37 Technical Support and Customer Service US & Canada 1-888- 270-7090 support@riotoro.com customerservice@riotoro.com sales@riotoro.com © Copyright 2017 RIOTORO. All rights reserved. All trademarks are the property of their respective owners. Reproduction in whole or part without written permission is prohibited.
- Page 38 RIOTORO © 2017 RIOTORO Inc. All rights reserved. RIOTORO, the RIOTORO logo and CR480 are trademarks of RIOTORO Inc., Registered in the U.S. and other countries. All other trademarks are the property of their respective owners. Product may vary slightly from those pictured.
- Page 40 www.riotoro.com...
Need help?
Do you have a question about the CR480 and is the answer not in the manual?
Questions and answers