
Related Manuals for Zumimall GX2K


Summary of Contents for Zumimall GX2K
- Page 1 Get Smarter About Your Security gx7k@zumimall.com USER MANUAL GX2K PAN TILT BATTERY CAMERA WIRELESS 丨 OUTDOOR 丨 WATERPROOF 丨 Wi-Fi...
- Page 3 We will also appreciate any valuable suggestions. Register via link below to get 3 Years Warranty Extension. http://bit.ly/zuReg Product Services Email: gx7k@zumimall.com Distributor: distributor@zumimall.com Cell/iMessage/SMS/Whatsapp/Wechat: +86 18938687483 More About Us Official Web: www.zumimall.com Facebook: www.facebook.com/zumimalloffice Amazon Official Store: www.amazon.com/zumimall...
-
Page 4: Table Of Contents
INDEX PAGE 1. What's in the Box -------------------------------------------------------------------------------P1 2. Camera Diagram ------------------------------------------------------------------------------P2 3. Download & Install App ---------------------------------------------------------------------P3.4 4. Account Registration ---------------------------------------------------------------------------P5 5. Camera Settings --------------------------------------------------------------------------------P5 5.1 Preparations Before Connection ----------------------------------------------------------P5 5.2 Connect Camera to App -------------------------------------------------------------------P6 6. Camera Installation ----------------------------------------------------------------------------P7 6.1 Installation Tips ------------------------------------------------------------------------------P7 6.2 Installation Steps ----------------------------------------------------------------------------P8 7. - Page 5 INDEX PAGE 10. Message Menu ------------------------------------------------------------------------------P25 10.1 Records Playback/Delete ------------------------------------------------------------P25.26 11. Homepage -------------------------------------------------------------------------------P26.27 11.1 Album ------------------------------------------------------------------------------------ P27 11.2 Online Help ------------------------------------------------------------------------------P28 12. PIR Body Detection --------------------------------------------------------------------------P28 13. Two-Way Audio -----------------------------------------------------------------------------P29 14. Reset ------------------------------------------------------------------------------------------P30 15. Multi-Device Management ----------------------------------------------------------------P30 16. Product Specification --------------------------------------------------------------------P31.32 17.
-
Page 6: What's In The Box
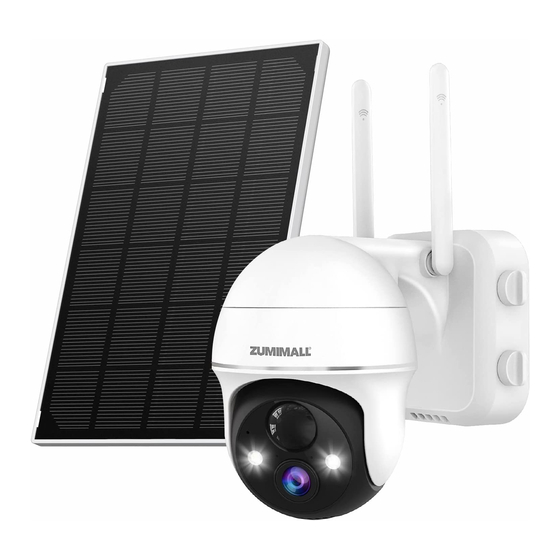
1. What's in the Box Get Smarter About Your Security gx7k@zumimall.com USER MANUAL GX2K PAN TILT BATTERY CAMERA WIRELESS 丨 OUTDOOR 丨 WATERPROOF 丨 Wi-Fi 1 ZS-GX2S Camera 1 Solar Panel with Cable 1 Metal Mount 1 User Manual... -
Page 7: Camera Diagram
2. Camera Diagram Wi-Fi Antenna Thumb Screw USB Charge Port DC 5V PIR Sensor Microphone Power Key Power Light Speaker Power Reset Reset Key Lens SD Card Slot Mode Indicator Status Light Camera Status Keep pressing for 5-10 seconds to power on/power off... -
Page 8: Download & Install App
3. Download & Install App Download the ZUMIMALL App from Google Play™ or App Store™. The camera supports Android and iOS systems. OR scan the QR code below using the QR scanner on your phone. NOTE: Google Play™ is the trademark of Google Inc. - Page 9 *Tips: Please turn on both of the following permissions. 1.Allow ZUMIMALL to access mobile cellular data and wireless LAN. Otherwise, it will fail to connect the camera. 2.Allow ZUMIMALL to receive notifications. Otherwise, the phone will not receive alarms when motion is detected.
-
Page 10: Account Registration
4. Account Registration New user needs to sign up "ZUMIMALL" App with email. Click "Sign up" to create a New Account and follow the steps to complete registration. 5:51 5:51 5:51 Glad to meet you! < < Sign Up Sign Up >... -
Page 11: Connect Camera To App
5.2 Connect Camera to App 5:49 5:49 5:48 5:48 < < Select Device Add Battery Camera Devices Add Battery Camera Get Smarter about your Smart Security Camera Doorbell Battery Camera Hold the device power button to start the Please reset the device. -
Page 12: Camera Installation
6. Camera Installation 5:48 5:48 5:48 < < < Network Diagnostic How to install camera Please choose a proper place Install tips: WIFI signal strength 1.Please use outdoor mounting bracket if you want to install camera outside. 2.It is recommended to install the camera at a height of 2-3 meters. -
Page 13: Installation Steps
6.2 Installation Steps Step 1: Choose a dry, clean, flat surface(Recommend attaching directly on a wooden wall; avoid uneven wooden and stucco walls). Step 2: Drill holes in the wall and fasten the camera with screws. Step 3: Rotate the camera to a proper angle. -
Page 14: Solar Panel
Please find a place which has sunlight for most of a day and adjust the angle to make sure maximum exposure. The ZUMIMALL solar panel needs few hours of direct sunlight to convert solar energy into electricity. The conversion efficiency is affected by weather conditions, seasonal changes,... - Page 15 Step 2: Mount the bracket with the mounting template and the screws provided in the package Step 3: Slot the solar panel into the bracket and make sure it's secure Step 4: Loosen the adjusting control on the bracket...
- Page 16 Step 5: Connect the solar panel to the ZUMIMALL Camera with the micro USB cable. Important Notes: 1. Make sure that there is NO blocking on the solar panel. The energy harvesting efficiency drops drastically even when a small portion of the solar panel is blocked.
-
Page 17: Device Menu
8. Device Menu 8.1 Device Page After installing the camera, set up the camera on the ZUMIMALL App. Begin by becoming familiar with the device page first. 5:51 Add a Camera Device List Devices 2020-10-08 14:50:10 Watch Up to 4 Devices... -
Page 18: Live Page
8.2 Live Page Click triangle button on the picture to enter a live view, where you can screenshot a live page, have live talk, record live videos, turn on/off Motion Dection. Camera ID/ Name 5:51 Back (to Device Page ) Camera Settings <... -
Page 19: History Page
8.3 History Page After entering live page, you can easily switch to history page. 5:51 < 060238708 2020-10-08 15:30:10 Click the Button to Adjust Timeline Interval Time Coordinate 14:00 15:00 16:00 Live History Cloud Take Snapshots of History Choose a Specific Date... - Page 20 8.3.1 SD Card An SD Card or cloud service is essential for storing videos or alert videos won't be saved and cannot be accessed. When the SD Card is full, the video clips recorded in the past will be automatically overwritten. You don't need to delete them manually.
- Page 21 8.3.2 Replay Video Restored in SD Card To replay the video, enter the History Column and follow the steps as below. (For example, to check events around 9 pm on September 14,2020) Step 1 - Click Calendar and choose the 14,Sept...
-
Page 22: Cloud Page
8.4 Cloud Page 8.4.1 About Cloud Service A, Each camera has 7 days’ free trail for Cloud service, then you can decide to whether to continue using it or not. If yes, you need to pay for the subscription. Attached table for subscription fee. -
Page 23: Multi-User Sharing
1. Tap 'Add' 2. Scan QR code of other user's account or manually enter other's email account 3. Allow sharing on your phone 4. Accept sharing request on other user's phone Note: Other user need to register on ZUMIMALL App first... - Page 24 5:50 5:50 Option 1: Scan QR < < Device Share Device Share Code of the Other Person Scan QR Code Account Recent Contacts Option 2: Manually How do you share your camera with others? Enter the Registered Email of Others...
- Page 25 5:50 5:50 < < Device Share My QR Code yuki 924355665@qq.com yuki Tips 924355665@qq.com YoungCz Requests to share his Allow sharing camera“060552692” device:060552682 to you Reject Accept Scan the QR Code to share the camera with me. Share Select 'Accept'...
- Page 26 9.2 Basic Function 9.2.1 Network Indicador Status light is default to be ON, showing blue when 5:50 < camera is working. If you want to hide the light, you Basic Function can turn it off. Fundamental Setting Night vision light (red) will automatically show up in darkness.
-
Page 27: Motion Detection
9.3 Motion Detection The camera supports motion detection. You can turn on/off detection or adjust 5:50 < sensitivity (1-10 levels) and set alarm interval Motion Detection (Off, 2 minutes, 5 munutes, 10 minutes). Motion Detection Please make sure motion detection is turned After turning it on,you can montior the human behavior who on if you need to receive motion alerts. - Page 28 9.3.1 Alert Plan The camera will work only during a specified time period. You can create an alarm plan to set working hours for the camera. When setting the plan: Start time should be earlier than End time. (for example, if you want to set working times as 8:00PM- 07:00AM, it must be divided into two pieces: 8:00PM-11:59PM, &...
-
Page 29: Recording Management
9.4 Recording Management 5:50 < The camera supports Event Recording. In Event Recording mode, Recording management Recording Time you can set recording time as 10,20,30 seconds. 10 seconds 20 seconds 30 seconds SD Card Capactity Capacity No SD Card 9.5 Cloud Storage Service... -
Page 30: Message Menu
10. Message Menu 10.1 Records Playback/Delete Enter Alarm Messages to check or delete alarm records. You can also enter alarm messages from device menu. 5:51 Messages > Sharing History Enter Alarm Messages > Alarm Messages > System Messages Devices... -
Page 31: Homepage
5:51 5:51 Click ‘Edit’ to < 060238200 Edit Cancel 060238200 Select All Delete Video 2021-01 2021-01 2020-10-12 10:32:12 10:35:12 AM 2020-10-12 10:32:12 10:35:12 AM Motion Detection Motion Detection Click Triangle Button to Play 2020-10-12 10:32:09 10:03:28 AM 2020-10-12 10:32:09... -
Page 32: Album
5:51 Amanda > 295552475@qq.com > Device Share > Album > > Settings > App Version 2.4.2 Devices Messages 11.1 Album All screenshots or manually recorded videos on live/history/cloud page will be saved in Album. Files here can be saved in your phone Album or shared to others directly. -
Page 33: Online Help
11.2 Online Help If you like the product, welcome to share your comment. If you meet any problems, please feel free to contact us by gx7k@zumimall.com +86 18938687483 email : or phone number: 12. PIR Body Detection PIR body detection level is adjustable, you can set motion detection level to 1-10 grades. -
Page 34: Two-Way Audio
13. Two-Way Audio Step 1: Activate the audio option. Step 2: Press and hold the intercom button to speak. Step 3: Release the button to listen. Tips: To activate audio function, please allow App to activate the microphone. 5:51 <... -
Page 35: Reset
14. Reset Step 1: Delete the device from App. (If the camera was added to App) Step 2: Keep pressing reset button for 5-10s until you hear a "Boogu" sound and status light flashes slowly in red. Step 3: Reconnect the camera. -
Page 36: Product Specification
16. Product Specification Camera Specification Image Sensor 1080P Color Sensor 1/3CMOS Audio Input/Output Built-in Microphone and Speaker Lens 2.8mm Angle of View 120 Degree Day & Night Electronic(IR-CUT Filter with Auto Switch) Network Alarm Trigger Intelligent Motion Detection, Support PIR... -
Page 37: Firmware Upgrade
Frame Rate 25fps 17. Firmware Upgrade When your camera is connected on ZUMIMALL App, it will prompt you when the latest firmware is available. You can also manually check the firmware upgrade in Device Version of the App. Please keep full battery during upgradation. - Page 38 Keep pressing the reset button for 5-10 seconds Reset Hear "Boogu" sound Status light flashes slowly in Red Remove the camera in ZUMIMALL App Change to New Network Press the reset button to factory setting Re-connect the camera Ensure you have turned on motion detection and...
- Page 39 (2)In cold weather, the battery capacity will be reduced, which will affect the endurance of the device. Please Email us for Better Solution before returning any unqualified product to Amazon gx7k@zumimall.com THANK YOU...
- Page 41 尺寸 宽度140MM*高度140MM 128G 铜版纸 双铜...
Need help?
Do you have a question about the GX2K and is the answer not in the manual?
Questions and answers
We moved locations and I don't know how to reset the cameras to put them on our wifi to this location. Can you assist me with this?
To reset the Zumimall GX2K camera and connect it to a new Wi-Fi network, press and hold the reset button for 5-10 seconds. The camera will blink slowly in red, indicating it is awaiting a Wi-Fi connection and ready to add devices. Then, follow the app instructions to connect the camera to the new network.
This answer is automatically generated